ADDENDUM - All Export 880/850 Hot Tub Models 880/850 Export 50Hz Owner’s Manual Update, #6530-317 Rev-A The following changes apply to the owners manual identified above: • Fluidix Intelli-Jet Operation Details (page 1) • New Change Filter Reminder Feature (page 2) • Revised Hot Tub Gravity Drain Operation Procedure (page 2) • Revised 2005+ Cameo Hot Tub “Top View” Figure-F (page 3) • Revised Light Button Operation Instructions (page 4) • New AquaTerrace Light Controller Operation for 2005 Cameo & Optima (p
Programming The Change Filter Reminder Display Your new spa may be equipped with a programmable CHANGE “Change Filter” reminder that appears on the control FILTER panel display after a specified number of days. It is designed to remind you to clean and/or replace your filter cartridge(s) on a regular basis but does not affect spa operation in any way. This reminder must be reset at each filter cleaning interval. It offers a selectable range from 10-120 days or can be disabled.
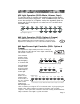
Figure-F, Hot Tub Top View 7 16 21 7 10 19 4 5 18 18 8 5 24 11 18 18 4 5 18 5 11 6 18 20 18 7 10 11 11 11 11 17 12 11 2 11 11 13 6 12 8 12 11 8 8 9 13 7 25 3 23 4 5 11 11 6 6 11 11 6 6 14 15 25 21 2 7 Select Cycle Mode Display e e 1 22 Note: 2005+ Cameo Model with Optional Audio System Illustrated. 2005+ Cameo/ Optima models include the new AquaTerrace waterfall control valve #16, waterfall #19, and light controller #20 as shown.
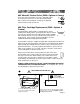
850 Light Operation (2005+ Marin, Altamar, Capri) The spa light offers 6 constant color variations and a unique random mode for enhanced spa enjoyment. Press the LIGHT sensor pad once to turn the spa light on in “Random” mode, then repeatedly press the sensor pad to turn the light off or to select one of 6 constant colors illustrated below.
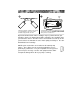
880 Waterfall Control Valve (2005+ Optima & Cameo) 4x Turn valve counterclockwise to increase waterfall output. Turn clockwise to decrease or turn off waterfall output. Note: it takes 4 full revolutions to change the waterfall from a full off to a full on flow rate.
D E Filter Nut Trapped Air Bubbles A A B C Submerge new filter cartridge in spa and tilt each end upward to remove most of the air bubbles trapped inside the filter. 1. Install new filter cartridge, then tighten filter nut until it just touches filter face. DO NOT OVERTIGHTEN! 2. Turn power to hot tub back on. Replacement MicroClean II filter cartridges may be purchased from your Sundance dealer. An optional pleated filter cartridge is also available from your Sundance dealer.
850 Export Series Séries Exportation 850 850er Serie Export Installation & Owner’s Manual Instructions en Français Installations- und Bedienungsanleitung
ENGLISH Table of Contents 1.0 2.0 3.0 3.1 3.2 4.0 5.0 6.0 7.0 Important Hot Tub Owner Information ..................................1 Important Safety Instructions ...................................................2 Locating Your Sundance Hot Tub.............................................5 Outdoor Locations ..........................................................................................5 Indoor Locations..........................................................................................
ENGLISH 11.0 Hot Tub Maintenance................................................................28 11.1 Cleaning The Filter.......................................................................................28 11.2 Draining and Refilling .................................................................................29 11.3 Cleaning The Hot Tub Interior.................................................................30 11.4 Pillow Care ...................................................................
ENGLISH 1.0 Important Hot Tub Owner Information Your Sundance hot tub is constructed to the highest standards and is capable of providing many years of trouble-free use. However, because heat retentive materials are utilized to insulate the hot tub for efficient operation, an uncovered hot tub surface directly exposed to sunlight and high temperatures for an extended period is subject to permanent damage. Damage caused by exposing the hot tub to this abuse is not covered by warranty.
ENGLISH 2.0 Important Safety Instructions When using this electrical equipment, basic safety precautions should always be followed, including the following: 1. READ AND FOLLOW ALL INSTRUCTIONS BEFORE OPERATING THE HOT TUB! 2. DANGER - RISK OF ELECTRICAL SHOCK: Install at least 1.5m, from all metal surfaces. A hot tub may be installed within 1.5m of metal surfaces, if in accordance with the country electrical code. 3.
ENGLISH 8. Overflowing or Overfilling: Overfilling can cause the hot tub to siphon out water through the air venturis. Overfilling problems are not covered by the warranty. 9. Before entering a hot tub, the user should measure the water temperature with an accurate thermometer since the tolerance of the water temperature-regulating device may vary as much as ±3°C. 10. Always enter and exit the hot tub slowly and cautiously. Wet surfaces will be slippery. 11. Do not use the hot tub while alone. 12.
ENGLISH 19. Persons using medication should consult a physician before using a hot tub since some medications may induce drowsiness while other medications may affect heart rate, blood pressure, and circulation. 20. Long exposures in the hot tub may result in nausea, dizziness or fainting. Observe a reasonable time limit, leave the hot tub, then shower, cool down, and if you wish, return for another brief stay. 21. Excessive temperatures may cause hyperthermia.
ENGLISH 3.0 Locating Your Sundance Hot Tub IMPORTANT: Because of the combined weight of the hot tub, water and users, it is extremely important that the base upon which the hot tub rests be smooth, flat, level and capable of uniformly supporting this weight, without shifting or settling, for the entire time the hot tub is in place. If the hot tub is placed on a surface which does not meet these requirements, damage to the skirt and/or the hot tub shell may result.
ENGLISH If you have any questions regarding the placement or installation of your hot tub, consult your authorized Sundance Dealer. 4.0 General Electrical Safety Instructions Your new Sundance hot tub is equipped with the "state-of-the-art" SentryTM equipment system. It contains the most advanced safety and self-protective equipment in the industry. Nonetheless, this hot tub must be installed properly to insure dependable usage.
ENGLISH Before installing this hot tub, check with the local government/electrical authority to insure installation conforms to local country/area states codes. 5.0 Electrical Installation Instructions (240V Service) IMPORTANT NOTICE: The electrical wiring of this hot tub must be installed by a qualified electrician to comply with all regulations and standards specified by the electrical authority in your state or country.
ENGLISH 4. Select the power supply cabinet inlet you want to use (Figure-A, Page 6), Install the power cable through the large opening provided in the bottom of the metal control box. 5. Hot tubs with one main terminal block (Figure-B, Page 7) must be supplied with 20 Amps. Note: the 850 series hot tub can be adapted to use higher amperage circuits when available. Contact your Sundance dealer for details. 6.
ENGLISH CAPRI Models Voltage Frequency Max. Current Draw Wattage: Number of Wires 230 VAC 50Hz 12.1 Amps* 2.8kW Three 230 VAC 50Hz 23.6 Amps** 5.4kW Three Standard 12.1 Amp (2.8kW) configuration: the heater will not operate while the jets pumps is running. ** Alternate 23.6 Amp (5.4kW) configuration: the heater will operate while the jets pumps is running. * Listed above are the most common power configurations by model.
ENGLISH • Fill the hot tub until the water level is midway in the filter bucket skimmer opening and above all jets. Do not overfill. Important: Always fill your hot tub through the filter bucket after draining. Failure to do so may cause air to be trapped in either pump, preventing the pump from circulating water. • Remove hose and replace filter cartridge as illustrated in section 11.1, page 28-29 (Figure-G). C. Turn On Power Turn on power to hot tub at the home’s circuit breaker.
ENGLISH When power is turned on, the spa defaults to STANDARD mode. In STANDARD mode, the skimming/heating cycle will activate pump 1 as programmed to provide skimming action and additional filtration. In ECONOMY mode, the skimming/heating cycle will not come on. This is the main difference between the two operating modes. WARNING - RISK OR INJURY Always check the water temperature carefully before entering the hot tub. H.
ENGLISH 8.0 Operating Instructions Your Sundance hot tub has a touch-sensitive control panel, massage selector valves and air control knobs located on the top rim of the hot tub (Figure-F, page 14). These controls let you operate many of the special functions of your Sundance hot tub. By familiarizing yourself with the following information, you will be able to gain the full benefit afforded by the various functions of your hot tub. 8.
ENGLISH 8.5 Jets 2 - On models with two jet pumps, JETS 2 controls the high-speed pump #2. Auto Turn Off — Anytime a pump has been manually turned on, it will automatically turn off after approximately 20 minutes. If at this time you desire more jet operation you may simply turn the pump(s) back on. Figure-D, Command Center These display temperature setting and increase or decrease temperature setting and other programmable features. Scrolls menu through skimming/heating cycle programming features.
ENGLISH Figure-F, Hot Tub Top View 15 8 2 6 5 9 6 7 4 14 5 6 17 13 11 n S c e n t s T u M S 12 10 3 15 2 Select Cycle Mode Display 16 1. 2. 3. 4. 5. 6. 7. 8. 9. 10. 11. Control Panel Air Controls Filter Lid Massage Selector Valve #1 Whirlpool Jets (N/A Capri) Therapy Jets (Fluidix Intelli-Jets) Massage Selector Valve #2 (N/A Capri) Auxiliary Control Panel (N/A Capri) Therapy Seat Air Injectors Hot Tub Light 1 Cameo Model with Optional Audio System Illustrated 12.
ENGLISH 8.6 Selecting The Desired Massage Action Your Sundance spa is equipped to allow you to customize C the massage action you desire. Each model incorporates B a diverter valve(s) that allow you to customize the masA sage and performance by diverting water between various jet systems. Simply turn diverter to position A (Combo), B, or C to divert water pressure to various jet groups. Note: The diverter valve is designed to operate in positions A (Combo), B, and C for optimum performance.
ENGLISH 8.8 Air Controls Each jet system has its own air control. These controls allow you to regulate the amount of air which is mixed with the water entering through the jets. Clockwise rotation adds more air and counterclockwise rotation reduces air flow. To minimize heat loss, these controls should be closed when the hot tub is not in use. 8.9 Fragrance Dispenser On the rim of your hot tub is a screw-off cap labeled “SunScents Fragrance Dispenser” (Figure-F, Page 14).
ENGLISH Optional SunSoundTM Stereo Receiver Features 4 5 6 7 8 9 MARINE MRD 60 SOURCE LOCAL DISC IN 3 SET TRACK SCAN POWER 2 INTRO MUTE 10 RANDOM REPEAT 2 3 1 TUNE DISK 4 5 BAND 6 11 12 1 AUDIO 21 20 19 18 1. 2. 3. 4. 5. 6. 7. 8. 9. 10. Volume Up/Down (VOL) Mute Power On/Off Source Infrared Receiver for Wireless Remote Control Preset Buttons 1 to 6 Front Panel Release Button Display Clock Set Local AUTO 17 16 15 14 13 11. 12. 13. 14. 15. 16. 17. 18. 19. 20. 21.
ENGLISH E. Adjusting Bass Level Press audio button (20) until display reads “BAS.” Rotate volume knob to desired setting. A display of “C 0” indicates center, -2 to -12 indicates bass cut, and +2 to +12 indicates bass boost. Note: unit returns to volume mode if volume control is not rotated for 3 seconds. F. Adjusting Treble Level Press audio button (20) until display reads “TRE.” Rotate volume knob to desired setting.
ENGLISH D. Open/Close Front Panel Place thumb on front panel release button (7) with forefinger below front overhang. Press firmly on release button, then flip panel open by pulling outward at top edge. To close panel, flip panel up and press firmly until you hear an audible click. Keep the front panel closed at all times to prevent water intrusion, except when changing discs. CAUTION: never insert wet discs into unit or CD player will be damaged! E.
ENGLISH H. Scan Functions Select any AM or FM band and press scan button (11) to listen to a few seconds of each radio station. The display will flash and the radio will automatically scan to the next higher station, play that station for a few seconds, then scan to the next higher station. To stop scanning and continue listening to the current station, press scan button a second time. Note: the radio remains in scan mode until the scan button is pressed a second time or one of the tune buttons is pressed.
ENGLISH • play time is not shown, press clock set button (9) once. To remove CD: open the front panel and press the CD eject button located under the front panel. Remove CD from drive and close front panel. CAUTION: listen for an audible click to ensure the front panel is closed to prevent water intrusion that could damage your unit. B. Changing CD Tracks and Music Seek To advance to the next track, press the tune/seek-up button (13) once and the track counter will increase one track.
ENGLISH B. Fogged CDs and Lens This condition may occur when it’s cold. Wipe fogged CDs with a soft cloth. Fogged optical components inside the unit will return to normal operation after an hour in a heated environment.
ENGLISH General Nominal power supply . . . . . . . . . . . . . . . . . . . . . . . . . . . . . . . . . . .14.4 VDC Allowable power supply . . . . . . . . . . . . . . . . . . . . . . . . . . . . .10.8-15.6 VDC Current consumption . . . . . . . . . . . . . . . . . . . . . . . . . . . . . . . . . . . .<10 Amp Speaker impedance . . . . . . . . . . . . . . . . . . . . . . . . . . . . . . . . . . . .4-8 Ohms 9.
ENGLISH 9.2 Standard Skimming/Heating Mode In this mode, 2-stage water filtration is achieved by activating pump 1 for the programmed skimming/heating cycle. Water temperature is regulated by the set temperature, 24-hour circulation pump, and heater which turns on as needed. After the programmed set temperature is reached, the heater turns off and the circulation pump continues to operate 24-hours to filter and clean your spa through the MicroClean filter cartridge (unless programmed otherwise). 9.
ENGLISH 10.0 Programming Instructions 10.1 Adjusting Time of Day The Sentry control system remembers the time of day even in the event of a prolonged power outage. However, it may occasionally be necessary to reset the time of day. For example: if you are not in the Pacific Time Zone you will want to reset the time for your own time zone. (The system will automatically adjust to and from daylight savings time.) To accomplish this, press DISPLAY, MODE and DISPLAY within five seconds each.
ENGLISH At any time, you may check the programming of any aspect of the skimming/heating cycle by first pressing CYCLE then moving through the menu by pressing either CYCLE or SELECT. The programming is changed only by pressing UP or DOWN during this process. 10.3 Programming The Change Filter Reminder Your new spa is equipped with a programmable “Change CHANGE Filter” reminder that appears on the control panel display FILTER after a specified number of days.
ENGLISH (3) Press SELECT sensor, “Start time” indicator displays. Press UP or DOWN sensor to set ozone start time in 30 minute increments. (4) Press SELECT sensor, “Duration” indicator displays. Press UP or DOWN sensor to set ozone duration in 2 hour increments. (5) Press DISPLAY sensor to exit setup and return to normal water temperature display. 10.5 Locking The Skimming/Heating Cycle You may keep the skimming/heating cycle program from being inadvertently altered by electronically “locking” it.
ENGLISH 11.0 Hot Tub Maintenance Proper and regular maintenance of your hot tub will help it retain its beauty and performance. Your authorized Sundance Dealer can supply you with all the information, supplies, and accessory products you will need to accomplish this. 11.1 Cleaning The Filter A programmable “Change Filter” reminder flashes on the CHANGE control panel display after a specified number days to remind FILTER you to clean (or replace) your filter cartridge(s).
ENGLISH E D 2. Top Stage 1 filter (Reuseable) Filter Face Rinse debris from the stage 1 filter pleats using a garden hose and high-pressure nozzle. Start at the top and work downward to the face. Repeat process until all filter pleats are clean. F 1. New Stage 2 filter Stage 1 filter 1. Install new stage 2 filter onto clean stage 1 filter. 2. Insert retainer into stage 2 filter and rotate clockwise to assembly. DO NOT overtighten retainer (finger tight only).
ENGLISH use, attention paid to water quality maintenance, etc. You will know it is time for a change when you cannot control sudsing and/or you can no longer get the normal feel or sparkle to the water even though the key water balance measurements are all within the proper parameters. CAUTION! READ THIS BEFORE DRAINING: To prevent damage to the hot tub’s components, turn off power to the hot tub at the circuit breaker before draining it. Do not turn the power back on until your hot tub has been refilled.
ENGLISH 11.4 Pillow Care Remove and clean the headrest pillows as needed with soapy water using a cloth or soft-bristle brush. To maintain water resistance and luster, apply a quality vinyl conditioner once a month. Always remove the pillows when adding chemical shock treatment to the hot tub water. The pillows can be returned to the hot tub when the sanitizer reading drops below 5 ppm.
ENGLISH 11.7 Maintaining The Cover Using the Sundance insulating hot tub cover anytime the hot tub is not in use will significantly reduce your operating costs, heat-up time and maintenance requirements. To prolong the life of the cover, handle it with care and clean it regularly using mild soap and water. Periodic treatments with a special conditioner developed for Sundance hot tub covers will help protect against deterioration caused by U.V. rays from the sun.
ENGLISH the equipment compartment. Replace the drain plugs. Loosen hose clamp at bottom of heater (Figure-A, Page 6) and pull hose off of heater fitting (twist the hose back and forth while pulling downward). Tip hose down and allow to drain. 8. Re-install cabinet side panels and cover hot tub so that no casual moisture can enter into it. Consult your Authorized Sundance Dealer if you have any questions regarding winter use or winterizing. 7. 11.
ENGLISH 12.0 Water Quality Maintenance Maintaining the quality of the water within specified limits will serve to enhance your enjoyment and prolong the life of the hot tub's equipment. It is a fairly simple task, but it requires regular attention because the water chemistry involved is a balance of several factors. There is no simple formula, and there is no avoiding it.
ENGLISH 12.3 Other Additives Many other additives are available for your hot tub. Some are necessary to compensate for out-of-balance water, some aid in cosmetic water treatment and others simply alter the feel or smell of the water. Your Authorized Sundance Dealer can advise you on the use of these additives. 12.
ENGLISH REFILLED. IF YOU SUSPECT THAT THIS IS THE CASE, SEE THE INSTRUCTIONS ON PAGE 37 UNDER “PUMP DOES NOT OPERATE...” Panel sensors have been pressed too many times in a short period of time. Because this could cause excessive wear on equipment components, panel sensors are temporarily deactivated. Panel sensors will automatically re-activate if no sensor is pressed for 30 seconds. Circuit board temperature has exceeded acceptable limit.
ENGLISH 14.0 Troubleshooting - Procedures In the unlikely event your hot tub is not working the way you believe it should, please first review all installation and operating instructions in this manual and check the message on the panel display; second, if you are still not satisfied it is working properly, please follow the appropriate troubleshooting instructions. PROBLEM NONE OF THE COMPONENTS OPERATE (i.e. pump, blower, light) PROCEDURE Check the control panel lights. 1.
ENGLISH (Note: This method must be used for pump #2 of all Altamar, Cameo, Marin, and Optima models because pump #2 is not connected to the filter.) IMPORTANT: If freezing conditions exist and pump is not operational, take measures to protect the system from freeze damage. See “Winterizing” (page 32). POOR JET ACTION (Figure-F, Page 14) 1. 2. 3. 4. 5. 6. Make certain the pump is on. Check position of massage selectors Open air control for selected jet system. Check for adequate water level.
0 0 0 0 1 1 1 1 0 0 0 0 1 1 1 1 0 0 0 0 0 0 0 0 1 1 1 1 1 1 1 1 1 1 0 0 1 1 0 0 1 1 0 0 1 1 0 0 JP9-9 ON ON ON ON ON ON ON ON ON ON ON ON ON ON ON ON ON ON ON ON ON ON ON ON ON ON ON ON ON ON ON Light 20.1 Amp* (4.8kW) 20.1 Amp* (4.8kW) 12.1 Amp (2.9kW) 12.1 Amp (2.9kW) 16.6 Amp (3.9kW) 16.6 Amp (3.9kW) 12.1 Amp (2.9kW) 12.1 Amp (2.9kW) 20.1 Amp* (4.8kW) 12.1 Amp (2.9kW) 12.1 Amp (2.9kW) 12.1 Amp (2.9kW) 16.
Page 40 HEATER 2.7kW, 230 VAC SPA LIGHT From TB1 N TB7 L Red N TB3 Black L See Chart (Page 39) JP9 JP19 1 3 5 7 9 1 3 5 7 9 11 13 JP20 1 J8 OPTIONS G N HI TB2 PUMP 1 L L 1 2 3 TB1 N N L TB1 F1 L J3 L HI PUMP 2 TB4 1 2 N TB2 L N Circulation Pump BLOWER UV or CD Ozonator (Optional) STEREO (Optional) N L N System Control Panel 230 VAC, 1-Phase, 50 Hz; 1 Pump = 12A/24A; 2 Pump = 18A/30A USE MIN.
Sundance Spas, Inc. 14525 Monte Vista Ave, Chino, CA 91710/U.S.A., Phone: (909) 606-7733, Fax: (909) 606-0195 Website: http://www.sundancespas.com 6530-327, Rev. A © 2004 Sundance Spas, Inc. Printed in U.S.A.