DC-Powered Refrigerator & Freezer DC100 Manual SunDanzer 420 E Aviation Drive Suite 130 Tucson, AZ, 85714 USA 1 Rev.
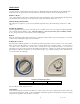
INTRODUCTION Congratulations! You have purchased one of the most efficient refrigeration products available on the market today. The SunDanzerTM chest freezers and chest refrigerators are designed to provide years of efficient trouble-free operation. The design is optimized for energy savings with an efficient DC compressor, thick insulation, and a chest style configuration.
General Safety • • • • Before cleaning or repositioning the appliance, always disconnect from the electrical power supply. Service the appliance only if you are a trained or authorized refrigeration technician. This appliance contains refrigerant R-134a and a polyol-ester compressor oil in its refrigerant circuit. Take utmost care when handling your appliance so as to not cause damage to the refrigerant circuit with consequent possible leakage.
INSTALLATION Unpacking and Cleaning Remove all packaging and securing tapes from the appliance. To avoid injury and causing damage to the appliance, be extremely cautious when using sharp or pointed tools to complete this task. Keep children away from the packaging material. DANGER OF SUFFOCATION! Wash the inside and outside of the appliance with luke warm water and a mild soap or detergent.
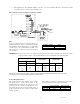
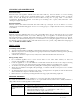
• If the appliance has been handled standing on its side or on end, it should be allowed to stand in the normal operating position for 12 hours before turning it on. Electronics Diagram (Direct Battery connection example) or 7.5A fuse Fuse A fuse is required in order to protect the wiring. A standard automobile fuse is recommended and the fuse should be wired to the positive (“+”) side of the system close to the positive battery terminal. For 12V operation, use a 15A fuse, and for 24Voperation use a 7.
OPERATION Once the wiring is complete and the refrigerator has 12 or 24VDC available, the unit will turn on automatically. The thermostat is also an on/off switch for the unit. When the dial is fully counter clockwise, the fridge will be off. Initial Cooldown Once on, the refrigerator will reach operating temperature in about 20 minutes. We recommend letting the fridge run at least 30 minutes before placing food or beverage inside. Large warm loads can take hours to cool.
Opening and Closing the Lid The lid is fitted with a uniform sealing strip to prevent warm air and moisture from entering the appliance compartment. Be sure that the lid and the lid seal is free from obstructions and forms a complete seal around the rim of the cabinet. Overfilling and/or unlevel installation of the appliance will prevent a good seal. It might be hard to open the lid immediately after the lid is closed. This is due to air contraction in the cabinet.
CLEANING AND MAINTENANCE Internal Cleaning Wash the inside of the appliance with luke warm water and a mild soap. Never use abrasive or corrosive cleaning agents, steel wool, scouring sponges, chemical cleaning agents, or highly perfumed cleaning products to clean the interior as these will damage the surface and leave behind a strong odor. A sponge, towel, or soft brush is recommended. Washing with a mixture of two table spoons of baking soda to 1 quart (1.14L) warm water.
Appliance is operating, but the interior is not cold. • • • • • The lid will not open. • Excessive frost and ice has built up. • • • • Noise • • connection is not as tight as it should be, or the wire size to the compressor is too small. The low voltage problem occurs at the instant of start-up and is sometimes difficult to detect with a volt meter because the event is very quick (<100 ms) Allow the appliance at least 4 hrs from initial turn-on to become cold.
MATERIAL AUTHORIZATION (RMA) NUMBER. ANY PRODUCT REPAIRED OR REPLACED UNDER THIS WARRANTY WILL BE WARRANTED FOR THE BALANCE OF THE WARRANTY PERIOD WITH RESPECT TO THE ORIGINAL PURCHASED PRODUCT. SUNDANZER WILL NOT BE LIABLE FOR ANY INCIDENTAL OR CONSEQUENTIAL DAMAGES, LOSSES, OR EXPENSES ARISING FROM INSTALLATION, USE OR ANY OTHER CAUSES.