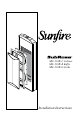
SRS–210W-C Cabinet SRS–210W-B Baffle SRS–210W-G Grille Installation Instructions
Safety Important Safety Instructions 1. Read Instructions 2. Keep these Instructions 3. Heed all Warnings. 4. Follow all Instructions 5. Do not use this apparatus near water. 6. Clean only with dry cloth. 7. Do not install near any heat sources such as radiators, heat registers, stoves, or other apparatus (including amplifiers) that produce heat. 8. Unplug this apparatus during lightning storms or when unused for long periods of time. 9. Refer all servicing to qualified service personnel.
Cabinet Contents Baffle Install Safety Instructions............. 2 Introduction....................... 4 Unpacking......................... 5 Dimensions....................... 6 Location............................. 7 Framing............................. 9 Cabinet installation............ 10 Wiring................................ 11 Final rough-in.................... 12 Horizontal mounting.......... 14 Baffle installation............... 16 Grille installation................
Introduction Introduction Thank you for purchasing this Sunfire SubRosa™ Subwoofer. We hope you enjoy it and the music it makes as much as we have enjoyed creating it for you.
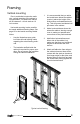
The cabinet may be mounted vertically between wall studs. The width is ideal for fitting between vertical 2x4 studs, spaced 16 inches apart. It may also be fitted horizontally. A cardboard debris shield is supplied to fill the front aperture and prevent any dust, paint, or debris from entering during installation and sheetrock finishing. Strips of foam material are supplied to fit between the cabinet and the studs and sheetrock. Contents of each package SRS–210W-C cabinet • Cabinet assembly Dimensions 44.
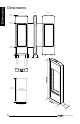
Front View Side View Back View 44.500 in/ 1,130.3 mm 35.590 in/ 904 mm 8.830 in/ 224.3 mm 26.76 in/ 679.7 mm 10.717 in/ 272.2 mm 13.045 in/ 331.343 mm 14.250 in/ 362 mm 3.533 in/ 89.7 mm 0 0 1.261 in/ 32.1 mm Dimensions Dimensions 3.500 in 88.9 mm Front Cutout required in wall to fit woofer assembly 11.784 in/ 299.
Location Location The suggestions below will typically result in outstanding performance. However, although low frequencies are non-directional, factors such as room reflections, standing waves, resonance and absorption will strongly affect your subwoofer’s performance. Since your SubRosa subwoofer is designed to be professionally installed into your wall, engineering services from your Authorized Sunfire Dealer and/or outside acoustical resources should be considered to ensure optimum performance.
Center location Location Installing the subwoofer closer to the center of the front wall will still provide adequate bass, but will tend to be less “heavy” and somewhat tighter. This is ideally suited for: • For rooms smaller than 200 square feet • Dedicated music listening rooms. Central location Using Two Subwoofers If you wish to use two subwoofers, the sound output will double.
Vertical mounting Due to residential construction methods, vertical mounting of the cabinet is recommended. The subwoofer cabinet will fit between 2 x 4 inch studs on 16 inch centers. Horizontal mounting is also possible, but needs additional framing steps. See page 10 for horizontal mounting details. 1. It is recommended that you add a horizontal brace below the cabinet to raise it above the height of the finished floor and baseboard molding. This will prevent accidental nail punctures in the cabinet.
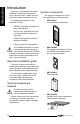
Cab Install Cabinet Installation 1. With the help of an assistant to lift the cabinet, check the fit of the cabinet into the framing. Use wood shims if there is any gap between the cabinet sides and the vertical studs. 2. If it makes it easier, you can connect the wiring to the cabinet before you secure it in place. See the next page for details. 3. When you are happy with the fit of the cabinet, apply wood glue, such as Liquid Nails™ along the cabinet sides.
Wiring Install the speaker wires following all local codes for electrical wiring installation. Use class 2 wiring, and 12 gauge is recommended, 16 gauge is the minimum. 2. Follow common low voltage practices like avoiding high voltage electrical wiring, or crossing them perpendicularly. This will reduce the chance of picking up hum or other interference. 3. Make the speaker wire connections to the subwoofer terminal cup, observing the correct polarity. The terminals are spring-loaded. 4.
Rough-in Final Rough-in 1. Make sure the debris shield is fitted into the cabinet opening using the plastic push rivets supplied. This will prevent dust and sheetrock debris from entering the cabinet.
1. Apply glue to the framing surrounding the cabinet. Also apply glue to the front surface of the cabinet, wherever it will be in contact with the sheetrock. 3. Fit the sheetrock in place with sheetrock screws spaced 4 inches apart. 4. Carefully cut away the sheetrock to reveal the cabinet's aperture. Now that you can see the location better, add screws to secure the sheetrock to the front face of the subwoofer glue cabinet. Make sure that no screws pass close to the speaker wires or the terminal cup.
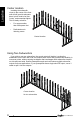
Horizontal Horizontal mounting In this position, the subwoofer's longest side is horizontal. This may be required for some installations, although it requires more framing work. The procedure for mounting is basically the same as the vertical mounting. 1. 2. Attach the self-adhesive foam strips (supplied) to the cabinet wherever there will be contact with the studs or sheetrock. Use longer strips for the sides, and shorter strips for the front face and the shorter vertical side.
With the help of an assistant to lift the cabinet, check the fit into the framing, and use shims if required. 4. Wiring the subwoofer is the same as described previously, except that there is not much room to make the connections to the binding posts. 5. Use wood glue, such as Liquid Nails™ along the cabinet top and side. Fit the cabinet into the framing until its front face is flush with the front face of the framing. 6. Use a level to make sure the cabinet is horizontal. 7.
Woofer baffle installation With the cabinet installed, and all the sheetrock, finishing and decorating done, the woofer baffle can be installed.
Baffle installation procedure 1. Remove the debris shield from the front of the in-wall cabinet. You can do this by cutting the cardboard with a sharp knife and pulling out the cardboard pieces and the plastic rivets holding it in place. Do not cut the two wires inside the cabinet, and do not remove any soundproofing material. 4. Secure the woofer baffle assembly to the in-wall cabinet using 14 Allen-head screws and washers supplied. Make sure the two wires do not get pinched.
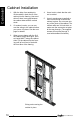
Grille installation With the woofer baffle installed, and the subwoofer tested, the grille can now be installed. Painting The grille assembly consists of the following components: • The grille frame. This screws to the woofer baffle and holds the grille in place. It forms a nice frame around the subwoofer opening in the wall, hiding the sheetrock edges. • The grille. This pushes into the grille frame, covering the woofer baffle assembly and the grille frame screws from view.
Installing the grille assembly 1. Secure the grille frame to the woofer baffle using 12 screws supplied in the grille package. 2. If you have already painted the frame and grille, please jump to step 6. 3. Fit the supplied cardboard paint shield into the frame to cover the woofers and baffle. Press the grille in place temporarily. 4. Paint the frame and grille to match the wall and decor. 5. When the paint is dry, carefully remove the grille and discard the paint shield.
SRS–210W-C Cabinet SRS–210W-B Baffle SRS–210W-G Grille Manual 913-142-00 Rev 7