Theater Grand Media Player TGM-100 Server TGM-100C Client User’s Manual
SAFETY Important Safety Instructions 1. Read Instructions 2. Keep these Instructions 3. Heed all Warnings. 4. Follow all Instructions 5. Do not use this apparatus near water. 6. Clean only with dry cloth. 7. Do not install near any heat sources such as radiators, heat registers, stoves, or other apparatus (including amplifiers) that produce heat. 8. Unplug this apparatus during lightning storms or when unused for long periods of time. 9. Refer all servicing to qualified service personnel.
SAFETY 16. To prevent electric shock, do not use this polarized plug with an extension cord, receptacle or other outlet unless the blades can be fully inserted to prevent blade exposure. This apparatus does not exceed the Class A/Class B (whichever is applicable) limits for radio noise emissions from digital apparatus as set out in the radio interference regulations of the Canadian Department of Communications.
Contents Important Safety Instructions.......................2-3 Introduction...............................................................4 CHAPTER 1: Quick Start Guide ........................... 5-8 Remote Control............................................................5 dvd/cd Player.............................................................6 Playing Music...............................................................6 Playing Movies.............................................................
Introduction Congratulations on your purchase of the incredible Theater Grand Media System - the only server solution of its kind to deliver the luxury and performance that the name Sunfire symbolizes. Highly robust and purpose-built, The TGM Series is an expandable server/client and hard drive system for storing, managing and playing your entire collection of movies and music.
CHAPTER 1 – Quick Start Quick Start Guide Your TGM-100 supports several different types of connection to televisions, and automatically detects which is being used when you power it on. Please ensure that all connected peripheral devices are switched on before turning on your TGM-100. Turning the Unit On and Off To switch the unit on, press the ; button on the front panel. The Power LED will flash red to blue for a period of time, then glow steadily blue to indicate that the unit is powered on.
CHAPTER 1 – Quick Start The DVD/CD Player Playing Music From the Library • Place a CD or DVD in the slot. • Press the àLibrary button to view the Home Screen. • Select Disc. If your TGM-100 is connected to the Internet, details of the disc content will be found automatically and displayed on the screen. • • Select Play Disc or Record Disc from the TV User Interface. You may also begin playback by pressing the aPlay button on the remote control. Press the àLibrary button to display the Home Screen.
CHAPTER 1 – Quick Start Playback Transport Buttons Playing Movies From the Library To stop playback, press the g Stop button on the remote control. • To pause playback, press the h Pause button. • Press the e or f Skip button to skip to the next or previous track. • Hold down the c or d Seek button to seek forward or backward within the current track. Play resumes from the new position when you release the button.
CHAPTER 1 – Quick Start User Interfaces There are several ways to view the User Interface (UI) of your TGM-100. Each method will be detailed within this manual, but some basic concepts are listed here for easeof-use when getting started. TV UI (pgs. 16-26) Admin UI (pgs. 27-35) The Admin UI allows full access to all setup and playback functions. This UI allows for more complex actions than the TV UI and has more options, but many of the options are not required for day-to-day activities.
CHAPTER 2 – Connections and Remote TGM-100 Front View 4 1 3 2 1 STANDBY BUTTON Press the Standby button to turn the TGM-100 On; press it again to turn the unit Off. (Blue = ON; Red = OFF; Flashing = STARTUP) 2 DISC PLAYER CDs and DVDs should be inserted with the label side facing up. NOTE: Push slowly, then the motorized tray will pull in the disc. 3 EJECT BUTTON Pressing the EJECT button ejects the disc.
CHAPTER 2 – Connections and Remote TGM-100 Rear View 14 1 1 13 12 2 11 HDMI VIDEO Use the HDMI connector to connect your TGM-100 to a digital flat-panel television or projector. HDMI Output is usually connected to the main television used for viewing movies in your home. This connector has the ability to send up to 1080p video as well as 5.1 Channel Dolby, DTS and stereo over one cable.
CHAPTER 2 – Connections and Remote Remote Control 1 The following diagram explains the functions of the buttons on your remote control: ; STANDBY BUTTON Use this button to shutdown or restart the TGM-100 2 AUDIO SERVER Press this button to select the TGM-100 as the device to be controlled. For more information about using this button, see the section titled Configuring Your Remote to Control Other Devices.
CHAPTER 2 – Connections and Remote • NOW PLAYING BUTTON 13 The Now Playing button is used to view the Now Playing screen for the currently selected output. Pressing this button stops the movie currently playing. NAVIGATION S,T,U,V BUTTON 14 The Navigation buttons are used to move Up, Down, Left or Right through the menu pages. O SELECT BUTTON 15 Select is used to activate the currently highlighted option. When browsing the libraries, this button will start playback of the selected item.
CHAPTER 2 – Connections and Remote Volume Control Reassigning Volume Control Your TGM-100 remote control is capable of controlling the volume of the music you are listening to by reassigning the volume control buttons to control the output of your amplifier. The rVolume and sMute buttons on the remote control can be configured to control the volume on your amplifier while the Audio Server device is selected.
CHAPTER 2 – Connections and Remote Power On and Off Emergency Shutdown The TGM-100 is designed to remain switched on continuously. However, if you are not planning to use it for an extended period, you may want to switch it off. Holding down the ; button on the front panel for 5 seconds will force the unit to shut down immediately. This must only be performed if the unit becomes unresponsive and cannot be shut down correctly. Data corruption may occur as a result of improper shutdown.
CHAPTER 2 – Connections and Remote Configuring Your Remote to Control Other Devices The TV and Amp buttons on the remote control may be individually configured to control a range of televisions, receivers and amplifiers from well known manufacturers. Configuring the Remote to Control a Television Press the TV and OSelect buttons simultaneously; hold them down for one second. The TV button will remain lit for 20 seconds; the configuration process must be completed during this time.
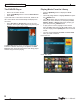
CHAPTER 3 – TV User Interface User Interfaces Your TGM-100 can play high quality audio or video from a networked external storage device or from its disc slot. By combining a server with one or more clients as shown below, you can direct different outputs to various inputs (like in a multi-room controller-based system), providing entertainment throughout your home.
CHAPTER 3 – TV User Interface Main TV User Interface Home Screen Set Up Select this option to display the Set Up screen. The main functions of the system are accessible via the Home Screen. The Home Screen is the first screen to be displayed when your unit is powered on. To access the Home Screen: From any screen of the TV UI, press the àLibrary button on your remote control. The Home Screen will be displayed. • The following options are available on this screen.
CHAPTER 3 – TV User Interface The Disc Player Your TGM-100 can play CDs and DVDs directly from the disc slot. It therefore functions not only as a music and video system, but also as a CD and DVD player. Playing a CD from the Disc Player • • Place a CD in the disc slot. Press the àLibrary button to display the Home Screen. • Use the S or T buttons to select the Disc option. • Press the OSelect button.
CHAPTER 3 – TV User Interface Automatic Recording The TGM-100 can be configured so that CDs & DVDs can be recorded with minimal user interaction. • • • • Press the àLibrary button to display the Main Menu. Use the U or V buttons and press the OSelect button to highlight Set Up and display the Set Up screen. Using the U or V buttons again, choose User Settings and press OSelect. Highlight Recording Settings and press OSelect.
CHAPTER 3 – TV User Interface The Recording Information screen is displayed: Music Library The TV UI has been designed to allow easy navigation through the Music Library and therefore give quick and easy access to your complete music collection in a number of different ways. Each screen in the Music Library is carefully constructed to provide the most important information about the items you are viewing.
CHAPTER 3 – TV User Interface The TV screen will display the Genres in your Music Library: To play a Track in a selected Genre: Select an individual Album, choose Tracks, to display a list of Tracks contained within the highlighted Album. Highlight Tracks, then press OSelect. Choose a Track and select Play Track.You may immediately play a selected Track, or add the Track to the Play Queue. (see page 22) • Use the U or V buttons to step between genres.
CHAPTER 3 – TV User Interface Playing the Entire Library The Play Queue In addition to the ability to select individual items in the Music Library, you can also choose to play your entire music collection. Many selections have an "Add..." option to add the selection to the current Play Queue. (e.g. Add Track, Add Album, Add Artist, etc.). To Play the entire Library From an Album, select Add Album and select Yes when prompted to add the Album to the Play Queue.
CHAPTER 3 – TV User Interface Removing Selections from the Play Queue Playlists • Your TGM-100 allows you to create your own music selections, called Playlists, and identify them with a name of your choice. For example, you could select your favorite party tracks from a number of different albums and include them in a Playlist called Party Music. You can then play your selection simply by choosing the appropriate playlist from the Playlist screen.
CHAPTER 3 – TV User Interface The Now Playing Screen (Audio) Shuffle and Repeat playback The illustration below shows the Now Playing screen when music is playing from the Music Library. Whenever you select an item in the Music Library for playback, this screen is displayed. You can also choose to display a Now Playing screen at any time by pressing the • Now Playing button on your remote control or from the Home Screen by selecting Now Playing.
CHAPTER 3 – TV User Interface Movie Library Playing Movies from the Library The TV UI has been designed to allow easy navigation through the Movie Library and therefore give quick and easy access to your complete movie collection in a number of different ways. Each screen in the Movie Library is carefully constructed to provide the most important information about the items you are viewing. Displaying the Movie Library Press the àLibrary button to view the Home Screen.
CHAPTER 3 – TV User Interface Controlling Movie Playback The Now Playing Screen (Movie) When a DVD is selected for playback, the unit will automatically switch to full screen mode. Depending on the particular movie, the DVD menu options will normally be displayed. When using the TV UI, the movie will begin playback in full screen. To view the Now Playing screen, press g Stop or •Now Playing on your remote control. To resume playback press aPlay.
CHAPTER 4 – Admin User Interface Admin User Interface Editing the Audio Library The Admin UI is designed to allow access to all functions of the TGM-100 including playback, recording and advanced Installer Settings. This UI may be accessed from the Main TV or web browser. Your TGM-100 labels the Albums, Artists and Tracks in your Music Library with names which identify the album you are listening to, and these help you locate items when you are browsing through the Library.
CHAPTER 4 – Admin User Interface the Genres attribute, scroll to the end of the word Indie, then press the R Return button before entering Indie Rock. Press R Return again and enter Alt Country. Note that on the Edit Album Details screen, multiple genres are separated by a semi-colon, but when entering them, you must use the R Return button, otherwise a new genre consisting of all the words you entered will be created.
CHAPTER 4 – Admin User Interface Deleting Items in the Audio Libraries Marking Items in the Audio Library Deleting items is similar to editing them, in that you first select the item you wish to delete, then select äOptions and finally select the Delete option. The Mark function can be used to select multiple items within a list in the Audio Library on the Admin UI screen. You can then perform a single action on all the marked items rather than performing the same action on each item individually.
CHAPTER 4 – Admin User Interface • Press the äOptions button and choose Mark all. • Press the OSelect button. • Press the äOptions button again and choose Delete marked albums. • Press the OSelect button. The mark function can also be used when adding multiple Audio Library items to a Playlist. Editing and Renaming Playlists To edit a Playlist name: Navigate to the Admin UI and select Audio Library. Press the U or V buttons to select Playlists and press the T button.
CHAPTER 4 – Admin User Interface To remove an item from a playlist Editing the Video Library • Use the U or V buttons to highlight the item you would like to remove from the playlist. • Press the PDelete button. To delete multiple items from a playlist use the pMark button to mark the items you wish to remove and then follow the process described above.
CHAPTER 4 – Admin User Interface The following screen is displayed: • • Use the U or V buttons to select the closest match for the movie you wish to record. Press the OSelect button. Editing Artist, Director, Genre, and Year names in the Video Library • • • • • Press the OAuto button to perform an automatic search for the movie details online. Or: • Press the MManual button to perform a manual search for the movie details online.
CHAPTER 4 – Admin User Interface • Use the U or V buttons to scroll through the cover art images. Press the OSelect button to associate a piece of artwork with your chosen movie. It is also possible to upload images from your PC to your TGM-100 and apply these to items in the media libraries (see pg. 38). Deleting movies from the Video Library Deleting items is similar to editing items and, again requires you to select the item you wish to delete and then use the äOptions button.
CHAPTER 4 – Admin User Interface Setup The Setup screen provides access to advanced installation and setup functions that are normally not required for dayto-day functionality. Functions detailed here include: • • • • • Settings: This screen is comprised of items used specifically for installation purposes and advanced settings (refer to Installation Manual). Look Up Media Details: Use this screen to look up missing media details (same as the Main TV UI).
CHAPTER 4 – Admin User Interface • Use the U and V buttons to highlight the option you wish to edit. • Use the S and T buttons to increase or decrease the highlighted value. • Alternatively, press the OEdit button to enter a value using the alphanumeric keypad. The panel on the right of the screen shows the original color in the top half of the square, and the new color below it. • After making any changes, use the MSave button to commit them.
CHAPTER 5 – Web User Interface Web UI browser with the addition of /admin at the end. (e.g. http://192.168.0.1/admin). Your TGM-100 can display any of the three UIs on a computer connected to your home network. The Web UI gives you complete control of your TGM-100 using a keyboard and mouse as opposed to a remote control, and makes editing items in the Library much easier.
CHAPTER 5 – Web User Interface display the text entry screen just as the other UIs do. However, instead of using the alphanumeric keypad on your TGM-100 remote control, you can use your computer keyboard to enter text and numbers. Note: If you make any changes to the Connection Settings via the Web UI, such as changing the IP Address, you may need to reconnect using the new connection details.
CHAPTER 6 – Using a Computer Use With a Home Computer Your TGM-100 has a number of advanced features which can be accessed via a computer connected to your home network. Manual Media Transfer In addition to recording directly from the CD tray, it is also possible to transfer music and cover art images to and from your TGM-100, using a computer on your home network.
CHAPTER 6 – Using a Computer To Import Cover Art Files • Navigate to the location of the cover art files on your computer. • Use your mouse to select the files you wish to import and either drag or copy and paste them into the Import window. The files will appear briefly in the Import window but after a few seconds will disappear. These files will now be available when selecting cover art for an album in the Audio Library via the Admin UI. Files will be resized automatically.
CHAPTER 6 – Using a Computer The transfer process will begin shortly afterwards. Updating the iTunes Library If you have removed music from your TGM-100 or edited the names of any items in the library you will need to update the iTunes Library to remove any broken links. To do this, you should first delete all the TGM-100 albums from the iTunes Library as follows: Select the View Options item from the View menu. Check the Grouping option, then click the OK button to confirm your changes.
APPENDIX Software Updates Checking for Software Updates As part of a policy of ongoing development, Sunfire is constantly improving the system’s operating software. To allow you to take advantage of these improvements, the TGM-100 can download and install software updates via the Internet. • Note: You may want to contact your dealer or installer before attempting a software update. • • Navigate to the TV UI Set Up screen as described previously.
APPENDIX Touch Panel User Interface Depending on the configuration of your installation, you may choose to control the TGM-100 using touch panel displays. The TGM-100 is designed specifically to work with all current ELAN wired and wireless touch panels. If your setup does not currently incorporate touch panel displays and you would like more information, please contact your dealer or installer. A TGM-DVC is required when using ELAN wired touch panels.
APPENDIX Troubleshooting Guide This section provides information to help solve common problems you may encounter with your system. Display Help Although the unit’s video settings will be configured correctly when installed, it is possible that subsequent changes in your hardware configuration (for example, the installation of a new television) may affect the configuration and, in extreme circumstances, may cause the User Interface to be displayed incorrectly or not at all.
APPENDIX Surround Sound To take advantage of the TGM-100’s Surround Sound Audio Format, it is necessary to connect the audio output to a device capable of decoding the surround sound signal. • • • If your digital TV can decode the signal, simply connect it to the HDMI socket on the back of the TGM-100. If your digital TV does not decode the signal, noise will be emitted by the TV’s speakers.
APPENDIX Remote Control Codes HDD AUDIO Output 1 Output 2 Output 3 Output 4 Output 5 001 002 003 004 005 TV ADMIRAL ADYSON AIWA AKAI AKURA ALBA ALBIRAL AMSTRAD ANITECH ARC EN CIEL ARISTONA ARTHUR MARTIN ASA ASORA ATLANTIC AUCHAN AUDIOSONIC AUSIND AUTOVOX BAIRD BEKO BESTAR BLAUPUNKT BOSCH BRANDT BRANDT ELECTRONIQUE BRION VEGA BROTHER BRUNS BSR BUSH CENTURY 157, 146, 010, 125 111 059 001, 002, 003, 004, 005, 006, 007, 008, 151, 016, 009, 010, 011, 012, 013, 014, 015 001, 002, 003, 004, 005, 006, 007,
APPENDIX EXPERT(F) FENNER FERGUSON FIDELITY FINLANDIA FINLUX FIRST LINE FISHER FORMENTI FRABA FRONTECH FUJITSU FUJITSU GENERAL FUNAI GALAXIS GALAXY GALERIA GBC GENAT CASIONO GEC GELOSO GENERAL GENERAL TECHNIC GENEXXA GOLDHAND GOLDSTAR GOODMANS GORENJE GPM GRAETZ GRANADA GRANDIN GREAT WALL GRUNDIG HANSEATIC HCM HIFI VOX HINARI 46 010 018 035, 106, 107, 136, 022, 044, 033 031 061, 106, 132 157, 149, 021, 020, 022, 023, 043, 081, 010, 095, 032, 025, 026, 048, 158, 132 158 055, 108, 146, 028, 081, 012,
APPENDIX LOEWE LUMA LUXOR MAGNADYNE MAGNAFON MAGNASONIC MARANTZ MARSHAL MATSUI McMICHAEL MEDION MEMOREX METZ MINERVA MITSUBISHI MIVAR MTC MULTITECH MURPHY NAONIS NATIONAL NEC NECKERMANN NEI NIKKAI NISSAN NOBLEX NOBLIKO NOGAMATIC NOKIA NORDMENDE NORMN NOVA 001, 002, 003, 004, 005, 006, 007, 146, 009, 032, 013, 014, 015, 016 007, 109, 010, 161, 125 146, 073, 118, 010, 120, 161, 011, 012, 123, 126, 036, 049, 132, 114, 116 146, 081, 158 031, 021 001, 002, 003, 004, 005, 006, 007, 009, 013, 014, 015, 016
APPENDIX RADIOMARELLI RADIOTONE RANK RANK/BUSH/MURPHY RBM REDIFUSION REVOX REX ROADSTAR ROBOTRON ROSITA RTF SABA SAISHO SAKIO SALORA SAMBERS SAMPO SAMSUNG SANY SANYO SAOLRA SBR SCHAUB LORENZ SCHNEIDER SCHNEIDER(F) SEG SEI SEI SINUDYNE SELECO SENTRA SHARP SIAREM SICATEL SIEMENS 48 146, 081, 045, 158 001, 002, 003, 004, 005, 006, 007, 008, 009, 013, 014, 015, 016, 018, 086 026 078 026 045, 012, 125 005 088, 089, 109, 092, 010, 125 001, 002, 003, 004, 005, 006, 007, 009, 013, 014, 015, 016 108, 146 01
APPENDIX TOSHIBA 060, 055, 067, 068, 026, 077, 078 TOWADA 158 TRANS CONTINENTS 021, 125 TRISTAR 017 TRIUMPH 098, 111 UHER 001, 002, 003, 004, 005, 006, 007, 028, 041, 109, 074, 009, 119, 013, 014, 015, 016 ULTRAVOX 001, 002, 003, 004, 005, 031, 006, 007, 146, 081, 009, 010, 161, 013, 014, 015, 016 UNIVERSUM 157, 008, 027 UNIVOX 146, 033 VEGAVOX 048 VESTEL 001, 002, 003, 004, 005, 006, 007, 009, 047, 013, 014, 015, 016 VICTOR 163 VIDEOTON 042, 118, 158 VISION 001, 002, 003, 004, 005, 006, 007, 009, 119, 013
APPENDIX HARDWARE SPECIFICATIONS General System Power Requirements Power Consumption Current Weight Dimensions Ambient operating temperature Operating humidity Discless Media Player AC 110-240V~50Hz/60Hz 60W Max 0.3-0.6A 10.
APPENDIX Analogue Audio Characteristics (typical) Frequency response S/N ratio (@1KHz) Dynamic range Total harmonic distortion (@1kHz) Channel separation (@1KHz) 20Hz to 20kHz ± 0.5dB 100dB (A weight) better than 96dB 0.003% 110dB Communications Ethernet Connector RJ45(10BaseT/100BaseT)/1000BT IR Input Maximum input leve Connector 5V 3.5mm jack USB 1.1 / 2.
APPENDIX XiVA™ SOFTWARE CUSTOMER SERVICE AGREEMENT Your next-generation XiVA™ home media appliance (your TGM-100) is powered by XiVA™ Software brought to you by Imerge Limited (“Imerge”). This agreement explains the terms and conditions that will apply to your use of XiVA™ Software.
APPENDIX XiVA™ Software Service Privacy Policy systems properly, or to protect itself or its users. Please read the following to learn more about our XiVA™ Software Service privacy policy and data-protection practices. How you can learn what personal information we have? Imerge values the privacy of its registered users. We are strongly committed to protecting the privacy of users of our interactive products and services as well as to respecting the Data Protection Act 1998.
APPENDIX MICROSOFT End-User License Agreement • You have acquired a device (“DEVICE”) that includes software licensed by Sunfire Ltd. from an affiliate of Microsoft Corporation (“MS”). Those installed software products of MS origin, as well as associated media, printed materials, and “online” or electronic documentation (“SOFTWARE”) are protected by international intellectual property laws and treaties.
APPENDIX Authenticity label with a genuine copy of the SOFTWARE identifies a licensed copy of the SOFTWARE. To be valid, the label must be affixed to the DEVICE, or appear on Imerge Ltd’s software packaging. If you receive the label separately other than from Sunfire Ltd., it is invalid. You should keep the label on the DEVICE or packaging to prove that you are licensed to use the SOFTWARE. • Product Support.
APPENDIX Customer or any of its agents or employees. 7. MISCELLANEOUS The United Nations Convention on Contracts for the International Sale of Goods is specifically disclaimed. If any provision of this LICENSE is inconsistent with, or cannot be fully enforced under, the law, such provision will be construed as limited to the extent necessary to be consistent with and fully enforceable under the law.
APPENDIX 6. Export Law Restrictions. You agree that the Sonic Software will not be exported outside the United States except as authorized by United States law. You also agree that Sonic Software that has been rightfully obtained outside of the United States shall not be exported except as authorized by the laws of the United States and of the jurisdiction in which the Sonic Software was obtained. 7. Controlling Law and Severability.
APPENDIX Finally, any free program is threatened constantly by software patents. We wish to avoid the danger that redistributors of a free program will individually obtain patent licenses, in effect making the program proprietary. To prevent this, we have made it clear that any patent must be licensed for everyone’s free use or not licensed at all. The precise terms and conditions for copying, distribution and modification follow. TERMS AND CONDITIONS FOR COPYING, DISTRIBUTION AND MODIFICATION 0.
APPENDIX copies, or rights, from you under this License will not have their licenses terminated so long as such parties remain in full compliance. 5. You are not required to accept this License, since you have not signed it. However, nothing else grants you permission to modify or distribute the Program or its derivative works. These actions are prohibited by law if you do not accept this License.
APPENDIX the AMG Services or any component thereof; (iii) remove any copyright, trademark, trade names, logos or other intellectual property notices in the AMG Services; or (vi) sell, distribute, publish, disclose lease, license transfer or otherwise use the AMG Services, or any portion thereof, other than as expressly provided in these Terms of Use. You agree that the license to use the AMG Services granted herein will terminate if you violate these restrictions.
APPENDIX Limited Warranty Sunfire Limited Warranty Sunfire, a division of Elan Home Systems, LLC, is proud of its products which have been built with care using advanced technology and premium component parts. Your unit has been crafted to perform properly for many years. Sunfire offers the following Warranty to you, the original owner of a new Sunfire product: Sunfire warrants the TGM-100 to be free from defects in materials and workmanship for the period of TWO (2) years from the date of purchase.
APPENDIX 62 User’s Manual
APPENDIX User’s Manual 63
Theater Grand Media Player TGM-100 Server TGM-100C Client P/N 9900980 REV:A