DVD Theater Grand Processor TGP-5 and TGP-5(E)
SAFETY Important Safety Instructions 1. Read Instructions 2. Keep these Instructions 3. Heed all Warnings. 4. Follow all Instructions 5. Do not use this apparatus near water. 6. Clean only with dry cloth. 7. Do not install near any heat sources such as radiators, heat registers, stoves, or other apparatus (including amplifiers) that produce heat. 8. Unplug this apparatus during lightning storms or when unused for long periods of time. 9. Refer all servicing to qualified service personnel.
SAFETY 16. To prevent electric shock, do not use this polarized plug with an extension cord, receptacle or other outlet unless the blades can be fully inserted to prevent blade exposure. Pour préevenir les chocs électriques ne pas utiliser cette fiche polariseé avec un prolongateur, un prise de courant ou une autre sortie de courant, sauf si les lames peuvent être insérées à fond sans laisser aucune parIVe à découvert. 17.
CHAPTER 1 Contents Important Safety Instructions ................. 2-3 Chapter 1: Introduction ...............................5 Unpacking and Features ...........................6 Overview.....................................................7 Quick Start Guide .......................................8 Front Panel Features................................10 Rear Panel Features ................................12 Installation ................................................14 Chapter 2: System Configurations ..
CHAPTER 1 Introduction Bob Carver, Audio Designer, Physicist Dear Friend, Thank you for purchasing a Sunfire Theater Grand Processor TGP-5. We hope that you enjoy it and the music it makes as much as we have enjoyed creating it for you. As with our entire line of Sunfire products, the TGP-5 is brimming with exclusive, high-performance technology that will help you get the highest level of enjoyment from your Home Theater system.
CHAPTER 1 Unpacking Your TGP-5 should reach you in perfect condition. If you do notice any shipping damage, please contact your Sunfire Dealer immediately. Gently lift out the unit and remove all the packing material and accessories. It is important to save all the packing materials and the box in case your TGP-5 ever needs to be moved or shipped for repair. Make sure that you keep your sales receipt.
CHAPTER 1 Overview Most features of the TGP-5 can be operated by the remote control’s TGP5 section. For the best Home Theater performance, you should calibrate your speakers and customize the TGP-5 settings for your system. Press the MENU button on the remote control to activate the On Screen Display (OSD). This has several menus which will allow you to set up your speakers and calibrate your system correctly. The remote can also be used to activate and control all features of the second zone.
CHAPTER 1 Quick Start Guide We hope that the following details will help you get started using your TGP-5. 1. Take care to read and follow the safety instructions on pages 2-3. Also make sure that you read the notes and details throughout the manual, especially notes marked with a warning triangle ( ). 8. Press the remote MAIN button a few times to make sure you are on the Main Menu in the remote's display. 9. Set the remote to operate the TGP-5 by pressing this button.
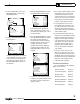
CHAPTER 1 13.3 In the MAIN Menu, select the SETTINGS Menu, and then the SPEAKERS Menu. SPEAKER POSITION L MAIN/SIDE R MAIN/SIDE CENTER L SURR R SURR L SURR BACK R SURR BACK SETTINGS MAIN ZONE ZONE 2 SPEAKERS VIDEO SOFTWARE CONTROL 13.5 In the SPEAKERS Menu, select the SPEAKER POSITION Menu. 4 4 3 4 4 5 5 ft ft ft ft ft ft ft 6in 6in 0in 0in 0in 0in 0in SPEAKERS SIZE POSITION CALIBRATION L-R CROSSOVER C-SURR CROSSOVER SUBWFR MODE 110 HZ 90 HZ NORMAL 13.4 In the SPEAKERS Menu, select the SIZE Menu.
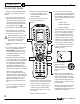
CHAPTER 1 Front Panel Features 1 2 6 1. Power This button turns the TGP-5 on (fully powered up) or into Standby mode (asleep, but can be turned on remotely). If you press ZONE TWO first, it can turn on Zone 2 (even if the Main Zone is off). The red Standby LED is on when the TGP-5 is in Standby mode. When the TGP-5 is turned on, the LED will go out. To fully turn off power to the TGP5, for example if you are going on vacation to Boise for a week or two, then use the rear panel power switch. 2.
CHAPTER 1 Front Panel Features 5. Volume Rotate this manual control clockwise to increase the volume. The dB level will appear in the front panel display. Note that the control knob does not rotate when the remote is used. When turning on a new source, make sure the level is low, such as -80 dB and increase it slowly. The dB display becomes less negative as the volume increases.
CHAPTER 1 Rear Panel Features 1 2 3 4 5 6 7 8 9 10 11 12 13 1. Audio/Video Inputs These audio, composite-video and Svideo inputs connect to the outputs of your audio video components. When these inputs are selected, the audio will be heard in your system and the video will be seen on the TV screen. VID2 can be used for a second VCR. 2. Audio/Video Outputs MAIN: connects to the inputs of a TV monitor, where the video of any selected input and the On Screen Display (OSD) can be viewed.
CHAPTER 1 Rear Panel Features surround back, right surround back, right surround and one subwoofer (LFE) output. input from the front panel or remote control. The eight channels of analog audio will then pass into the TGP-5. If your amplifier has a choice of inputs, we recommend using the XLR balanced type. This gives better noise rejection, especially for longer cable runs. Note: This is designed to be a very short analog-only signal path.
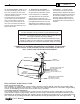
CHAPTER 1 Installation Observe the following precautions when choosing a location for your TGP-5: • • • • Protect it from prolonged exposure to direct sunlight and other direct sources of heat, such as heating vents and radiators. Do not expose the unit to rain or moisture. If fluid or a foreign object should enter the unit, immediately turn off the power and contact your Sunfire Dealer. • • Some audiophile cables should be hooked up in one direction, these are usually marked with arrows.
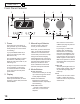
CHAPTER 2 System Configurations The following pages show some typical connections that you might make in your installation. They show how the inputs and outputs of the TGP-5 are connected to various audio and video components. Analog audio and composite video Composite video signal from TGP-5 MAIN composite video output to TV Monitor's composite video input MANUFACTURED UNDER LICENSE FROM DOLBY LABORATORIES. "DOLBY", "PRO-LO GIC" AND THE DOUBLE-D SYMBOL ARE TRADEMARKS OF DOLBY LABORATORIES.
CHAPTER 2 Digital audio and component video connections Component video signals from TGP-5 Component video outputs to TV Monitor's Component video inputs MANUFACTURED UNDER LICENSE FROM DOLBY LABORATORIES. "DOLBY", "PRO-LO GIC" AND THE DOUBLE-D SYMBOL ARE TRADEMARKS OF DOLBY LABORATORIES. DVD IN SAT IN MANUFACTURED SYSTEMS, INC. UNDER LICENSE FROM 5,978,762 AND US PAT. NO. 5,451,942, DIGITAL THEATER 5,956,674 OTHER WORLD-W PENDING.
CHAPTER 2 LD connections: external RF Demodulator and S-Video S-video signals from TGP-5 MAIN S-video output to TV Monitor's S-video input MANUFACTURED UNDER LICENSE FROM DOLBY LABORATORIES. "DOLBY", "PRO-LO GIC" AND THE DOUBLE-D SYMBOL ARE TRADEMARKS OF DOLBY LABORATORIES. DVD IN SAT IN MANUFACTURED SYSTEMS, INC. UNDER LICENSE FROM 5,978,762 AND US PAT. NO. 5,451,942, DIGITAL THEATER 5,956,674 OTHER WORLD-W PENDING.
CHAPTER 2 VCR connections: analog audio and composite video Composite video signal from TGP-5 MAIN composite video output to TV Monitor's composite video input MANUFACTURED UNDER LICENSE FROM DOLBY LABORATORIES. "DOLBY", "PRO-LO GIC" AND THE DOUBLE-D SYMBOL ARE TRADEMARKS OF DOLBY LABORATORIES. DVD IN SAT IN MANUFACTURED SYSTEMS, INC. UNDER LICENSE FROM 5,978,762 AND US PAT. NO. 5,451,942, DIGITAL THEATER 5,956,674 OTHER WORLD-W PENDING.
CHAPTER 2 CD and Antenna connections AM Loop Antenna Position this to get the best reception before fixing it in place. The supplied loop antenna has been carefully matched to the AM tuner. Larger Loop antennas may improve reception, provided that their inductive value is around 18 uH. FM Antenna The supplied dipole antenna and its adaptor push onto the rear panel’s F-type connector as shown. First screw the spade terminals of the dipole antenna onto the adaptor.
CHAPTER 2 Turntable connections MANUFACTURED UNDER LICENSE FROM DOLBY LABORATORIES. "DOLBY", "PRO-LO GIC" AND THE DOUBLE-D SYMBOL ARE TRADEMARKS OF DOLBY LABORATORIES. DVD IN SAT IN MANUFACTURED SYSTEMS, INC. UNDER LICENSE FROM 5,978,762 AND US PAT. NO. 5,451,942, DIGITAL THEATER 5,956,674 OTHER WORLD-W PENDING. "DTS", IDE PATENTS , 5,974,380, "DTS-ES EXTENDE ISSUED "NEO:6" ARE D SURROUND" AND TRADEMARKS AND SYSTEMS, INC. OF DIGITAL SYSTEMS, INC.
CHAPTER 2 Tape Player connections MANUFACTURED UNDER LICENSE FROM DOLBY LABORATORIES. "DOLBY", "PRO-LO GIC" AND THE DOUBLE-D SYMBOL ARE TRADEMARKS OF DOLBY LABORATORIES. DVD IN SAT IN MANUFACTURED SYSTEMS, INC. UNDER LICENSE FROM 5,978,762 AND US PAT. NO. 5,451,942, DIGITAL THEATER 5,956,674 OTHER WORLD-W PENDING. "DTS", IDE PATENTS , 5,974,380, "DTS-ES EXTENDE ISSUED "NEO:6" ARE D SURROUND" AND TRADEMARKS AND SYSTEMS, INC. OF DIGITAL SYSTEMS, INC.
CHAPTER 2 8-Channel Input connections (analog audio) Composite video signal from:TGP-5 MAIN composite video output to: TV Monitor's composite video input MANUFACTURED UNDER LICENSE FROM DOLBY LABORAT "DOLBY", "PRO-LOG ORIES. DOUBLE-D SYMBOL IC" AND THE ARE TRADEMARKS OF DOLBY LABORATORIES. DVD IN SAT IN MANUFACTURED SYSTEMS, INC. UNDER LICENSE FROM 5,978,762 AND US PAT. NO. 5,451,942, DIGITAL THEATER 5,956,674, OTHER WORLD-W PENDING.
CHAPTER 2 Amplifier connections MANUFACTURED UNDER LICENSE FROM DOLBY LABORAT "DOLBY", "PRO-LOG ORIES. DOUBLE-D SYMBOL IC" AND THE ARE TRADEMARKS OF DOLBY LABORATORIES. DVD IN SAT IN MANUFACTURED SYSTEMS, INC. UNDER LICENSE FROM 5,978,762 AND US PAT. NO. 5,451,942, DIGITAL THEATER 5,956,674, OTHER WORLD-W PENDING. "DTS", IDE PATENTS 5,974,380, "DTS-ES EXTENDE ISSUED AND "NEO:6" ARE D SURROUN TRADEMARKS D" AND SYSTEMS, INC. OF DIGITAL SYSTEMS, INC.
CHAPTER 2 Zone 2 connections MANUFACTURED UNDER LICENSE FROM DOLBY LABORAT "DOLBY", "PRO-LOG ORIES. DOUBLE-D SYMBOL IC" AND THE ARE TRADEMARKS OF DOLBY LABORATORIES. DVD IN SAT IN MANUFACTURED SYSTEMS, INC. UNDER LICENSE FROM 5,978,762 AND US PAT. NO. 5,451,942, DIGITAL THEATER 5,956,674, OTHER WORLD-W PENDING. "DTS", IDE PATENTS 5,974,380, "DTS-ES EXTENDE ISSUED AND "NEO:6" ARE D SURROUN TRADEMARKS D" AND SYSTEMS, INC. OF DIGITAL SYSTEMS, INC.
CHAPTER 3 Remote Control Think of the TGP-5 remote control as ten remotes in one. There are ten DEVICE buttons, five on either side of the display, and each allows the remote to operate one piece of equipment. From the factory, the device buttons are labeled: CD, TAPE, AUX, ZONE2, TGP-5, DVD, VCR, SAT, TV and CABLE. Only the TGP-5 and ZONE2 buttons are pre-programmed, and these allow the remote to operate your TGP5. The remote can be set to operate your other remote controlled equipment.
CHAPTER 3 Operating the TGP-5 with the Remote 1. Press the remote's MAIN button to make sure the display is on the main display menu. SYSTEM 2. Press the TGP-5 device button to set the remote to operate your TGP-5. The display changes to show the TGP-5 input selections: MAIN CD TAPE AUX ZONE 2 4. The following buttons with fixed labels are also programmed: Power, Volume up, down and Mute. The number pad accesses the tuner presets directly, and CH+/- steps through them.
CHAPTER 3 Remote Setup You must enter the SETUP mode to program the remote control for the other components in your system, and to customize it for your convenience. There is only one way to enter the SETUP mode: Hold down both the MAIN and ENT buttons for a few seconds until SETUP appears in the display. The SETUP display shows 10 options. These are described in more detail as follows: P-PRO The remote is pre-programmed to operate many types of equipment.
CHAPTER 3 Remote Setup continued PUNCH This mode allows you to set up the volume, channel up/down and transport buttons so they will work for your main devices, no matter which device the remote is set for. For example, the volume buttons can operate the TV, even if the remote is set to VCR. The channel buttons can operate the VCR, even if the remote is set to TV. 1. In SETUP, select PUNCH and the display changes to show VOL, CH, and PLAY.
CHAPTER 3 Remote Setup continued MACRO The macro mode allows you to set up certain buttons to transmit up to 20 commands in sequence. For example, a single button press could turn on all of your home theater equipment, and set the TGP-5 to DVD, set the TV to channel 3, and set the DVD to play, make the tea and put the cat out. The buttons which can be programmed as macros are: M1, M2 and M3 at the bottom of the remote, and Power and System at the top.
CHAPTER 4 On Screen Display (OSD) Video Connections MAIN MON2 MAIN The On Screen Display (OSD) is present at the composite video or S-video MAIN outputs, and the component video MAIN and MON outputs. It is also present at the output labeled VID2/MON2, but only if it is set to MON2. This is set in the OSD Video menu (see page 37). Make sure that your TV monitor's video input is connected correctly to one of these outputs.
CHAPTER 4 OSD Menus Trim (Page 32) Main Menu The first menu of the TV On Screen Display looks like this MAIN MENU TRIMS MODES TONE INPUTS SETTINGS TRIM MENU SUB CENTER SURROUND SUR BACK SIDE AXIS TRIM MEMORY +2.5 0.5 -2.5 -1.0 0.0 OFF Modes (Page 33) MODES Navigation DOLBY SETUP DTS SETUP PARTY JZCLUB AMBIENCE Adjust the volume of each speaker "on-the-fly." Adjust the settings of the surround modes. 3 Use the joystick pad left, right, up and down buttons to navigate through the menus.
CHAPTER 4 Trim and Tone Menus Trim Menu MAIN MENU TRIM MENU TRIMS MODES TONE INPUTS SETTINGS SUB CENTER SURROUND SUR BACK SIDE AXIS TRIM MEMORY +2.5 0.5 -2.5 -1.0 0.0 OFF This menu allows you to adjust the individual volume level of your speakers "on-the-fly." Although careful calibration is key to a good home theater, the trims allow fine adjustment of the current program playing. The trims add or subtract from the reference levels set during calibration using the Speaker Calibration menu.
CHAPTER 4 Modes Menu DOLBY MAIN MENU TRIMS MODES TONE INPUTS SETTINGS DOLBY D DYN RNG PRO LOGIC IIx MODE DOLBY SUB TRIM MODES DOLBY SETUP DTS SETUP PARTY SETUP JZCLUB AMBIENCE ON 0.0 PRO LOGIC IIx MODE 3 MODE CENTER WIDTH PANORAMA DIMENSION Modes Menu MUSIC 0 ON 4 Dolby Setup Dynamic Range This is the range in level between the loudest sound and quietest sound during Dolby Digital and DTS playback only. The options are Quiet (narrow range), Medium (average range) and Large (wide range).
CHAPTER 4 Input Menus Input Configuration Menus Input Menus MAIN MENU These menus let you select which input you would like to configure. Pressing the joystick right on each input brings up a second menu which allows you to configure what happens when each input is selected. TRIMS MODES TONE INPUTS SETTINGS INPUTS DVD INPUT CONFIGURE DVD CD SAT VID1 VID2 VCR NAME GAIN TRIM DEFLT MODE VIDEO TYPE MAIN ZONE TRIG RELAY ZONE 2 FULL AUTO DVD 0.
CHAPTER 4 Tuner Preset Menus MAIN MENU TRIMS MODES TONE INPUTS SETTINGS INPUTS DVD CD SAT VID1 VID2 VCR INPUTS P2 TUNER TUNER PRESETS TAPE PHONO 8-CHANNEL Tuner Preset Menu TUNER PRESETS PAGE 1 01 02 03 04 05 06 FM FM FM FM AM FM 107.5 99.9 97.3 104.1 1250 107.5 NR ON NR OFF NR ON NR OFF MONO NR OFF This allows you to set the AM/FM band and frequency of up to 40 radio stations. They can be recalled quickly and set as favorite stations on the remote control. See page 45.
CHAPTER 4 Main Zone and Zone 2 Menu be adjusted to any level afterwards. MAIN MENU TRIMS MODES TONE INPUTS SETTINGS Power Up Volume This allows you to set the PRESET volume level mentioned above. You might want to set it to a low level to avoid any surprises upon turn-on, especially if other users like loud music.
CHAPTER 4 Video, Software and Control Menus SOFTWARE MAIN MENU TRIMS MODES TONE INPUTS SETTINGS SETTINGS MAIN ZONE ZONE 2 SPEAKERS VIDEO SOFTWARE CONTROL Video Menu OSD POP UP (VOL, SOURCE, and MODE) When enabled, an on-screen message appears any time the Volume (or Mute, on-the-flyTrims), Source, and Surround Mode are changed. The OSD popups can be set to show only Volume, only Source, only Mode, or any combination of the three, by setting the menu item to Enable.
CHAPTER 4 Speaker Size Menu MAIN MENU TRIMS MODES TONE INPUTS SETTINGS SETTINGS MAIN ZONE ZONE 2 SPEAKERS VIDEO SOFTWARE CONTROL SPEAKERS SIZE DISTANCE CALIBRATION L-R XOVER C-SURR XOVER SUBWFR MD Speaker Size Menu This menu allows you to enter the size of your speakers. The TGP-5's bass management will then automatically assign each speaker a frequency range: either full range for large speakers or high-pass for small speakers. In the latter case, the low frequency range is sent to the subwoofer.
CHAPTER 4 Speaker Position Menu MAIN MENU TRIMS MODES TONE INPUTS SETTINGS SETTINGS MAIN ZONE ZONE 2 SPEAKERS VIDEO SOFTWARE CONTROL Speaker Position SPEAKERS SIZE POSITION CALIBRATION L-R CROSSOVER C-SURR CROSSOVER SUBWFR MODE This menu allows you to enter the distance from your listening position to the various speakers. The TGP-5 will then automatically adjust and correct the speaker delay times. The sound from each speaker should arrive at the listener at the correct time.
CHAPTER 4 Speaker Calibration Menu MAIN MENU TRIMS MODES TONE INPUTS SETTINGS SETTINGS MAIN ZONE ZONE 2 SPEAKERS VIDEO SOFTWARE CONTROL Speaker Calibration The calibration procedure allows you to adjust the volume level of each speaker in turn until they are all equal. This will give you the best Home Theater performance. You should only do this calibration when you are sitting in your usual listening/viewing position. Preliminary: Play a movie and adjust the volume for a comfortable listening level.
CHAPTER 4 Speaker Crossover Menu MAIN MENU TRIMS MODES TONE INPUTS SETTINGS SETTINGS MAIN ZONE ZONE 2 SPEAKERS VIDEO SOFTWARE CONTROL SPEAKERS SIZE POSITION CALIBRATION L-R CROSSOVER 80 HZ C-SURR CROSSOVER 80 HZ SUBWFR MODE ENHANCED BASS Crossover adjustment Subwoofer Mode The subwoofer output can be set to Normal, or to an Enhanced Bass mode. The Enhanced Bass mode provides an output to your subwoofer even when you are listening to a stereo source with main speakers set to LARGE.
CHAPTER 5 Using the TGP-5 Bass Management Unlike higher frequencies, it is difficult to discern exactly from which direction lower bass is coming from. The TGP-5 has a bass management system which takes advantage of this effect. It allows you to choose whether your speakers will play the full frequency range, or if the bass will be redirected to the subwoofer.
CHAPTER 5 Surround Modes for 2-Channel Sources For 2 channel input sources, you can choose from the following modes: STEREO DOLBY PRO LOGIC II DOLBY PRO LOGIC IIx PARTY JAZZ CLUB DTS Neo:6 SOURCE DIRECT The mode selection can be made from the front panel MODE buttons, or from the remote control.
CHAPTER 5 Surround Modes for Multi-Channel Sources For multi-channel sources, the TGP-5 will automatically select the correct mode from one of the following: DOLBY DIGITAL DOLBY DIGITAL EX DTS DTS-ES MATRIX DTS-ES DISCRETE Dolby Digital and DTS are “5.1” surround systems with five main channels: left front, center, right front, left surround, and right surround. Each channel can play the full frequency range and is independent of the other channels. The “.
CHAPTER 5 Tuner Operation The Tuner is selected either by rotating the manual input selector on the front panel, or by touching the TUNER button in the remote’s TGP-5 mode. The front panel display shows the frequency of the last station you were listening to. The FM Tuner can tune stations from 87.5 MHz to 108.0 MHz in 0.2 MHz steps (.05 MHz steps for some international models). The AM Tuner range is 530 kHz to 1710 kHz in 10 kHz steps (531 kHz to 1710 kHz in 9 kHz steps for some international models).
CHAPTER 5 Recording Recording to a Tape Player Input signals from an audio source playing in the TGP-5 can be recorded using the left and right audio outputs. The tape player will receive a straight copy of the analog source signal going in, unaffected by the volume, tone or any surround modes. If you are playing a digital source, the tape player will receive a downmixed stereo analog signal for recording. • Turn OFF the Fully Automatic mode.
CHAPTER 5 Zone 2 Operation Note: Zone 2 must first be enabled using the OSD (see page 36), or it will not work. Zone 2 can be turned on even if the Main Zone is off. If you have an amplifier and a pair of speakers in a second room or area (Zone 2), they can play a stereo source independent of what is playing in the Home Theater room (Main Zone). You can also play the same source as selected in the Main Zone.
CHAPTER 5 Sonic Holography Sonic Holography is a unique process which enhances the threedimensional effects and realism of stereo sound. This is modeled in DSP, from a design based on Bob Carver's legendary (and much sought after) Carver C-9 Sonic Holography Generator. This circuit was designed to overcome a problem in obtaining accurate sound reproduction: In a stereo system, both ears will hear the output from both speakers. The left ear hears sound from the left speaker and from the right speaker.
APPENDIX Appendix Speaker Placement Side speakers Side speakers Pair A are surround speakers, pair B and C are surround back options, and pair D are side-axis speakers, see the next page. The Front Speakers You should closely follow the placement recommendations of your speaker manufacturer, with the addition of the following points: The left and right front speakers should be positioned so that your TV is exactly centered between them. This will help focus your attention towards the screen.
APPENDIX ....Speaker Placement continued In some systems, two center speakers are used; one on either side of the TV. As they are in mono, the result is a sound image that is positioned exactly at the screen center. Side-Axis Speakers The TGP-5 has two side-axis channels which are matrixed from the left and right front channels, so they are available in stereo as well as surround modes. Use the OSD SPEAKER SIZE menu to turn the SIDE-AXIS channels ON or OFF (see page 38).
APPENDIX The RS-232 Port The TGP-5 has a rear panel RS-232 Serial communication port. This allows the FLASH memory to be upgraded to the latest software by connecting to a PC. The TGP-5 software may be updated to refine operational details and to include new features. Downloadable updates will be posted on our website: www.sunfire.com.
APPENDIX Troubleshooting Guide The Sunfire TGP-5 is expertly designed and built to provide years of trouble-free performance. Most problems that occur can usually be solved by checking your setup or making sure that the audio and video components connected to the TGP-5 are on and fully operational. The following information will help you deal with common setup problems you may experience during normal use of your unit. If problems persist, contact your Sunfire Dealer for help.
APPENDIX No Tone Controls source has been selected. • They will not work if you are using the 8-CH input, Source Direct mode, or in Zone 2. • There is no pop-up text for component video connections, but there is full-page OSD. No Dolby Digital, DTS playback On Screen Display flickers when engaged • See page 44 • Make sure your player's digital output is set to BITSTREAM for Dolby Digital or DTS. This is often a player's setup menu item, not the disc's menu.
APPENDIX Your amplifiers shut down often Check the following: • Make sure each speaker's average impedance is not less than your amplifiers can safely handle. • The amplifiers have good ventilation, no vents are covered. • Try setting all the speakers to Small, and let your subwoofers handle the heavy bass. • Check that the amplifier power output is a good match for your speakers. If your speakers are inefficient, consider using larger power amplifiers.
Remote Control Codes Audio Components ADC 007 Adcom 082, 092, 225, 161, 269 Aiwa 018, 104, 170, 202, 203, 213, 211, 188 Akai 138, 189 AMC 125, 126, 167, 128, 258, 281, 282 Amend 054 AMX 196 Angstrom 142 Arcam 141 Audio Access 147 Audio Alchemy 135 Audio Design 194, 221, 011 Audio Ease 021, 196, 207 Audio File 071 Audio Matrix 167 Audio Source 273 Audio Technica 134 B&K 096, 097 Bose 070, 170, 224 Bryston 023 Carver 006, 028, 061, 071, 201, 214, 226, 180, 185, 022, 029,077,284 Casio 076 Chiro 140 Cinema Soun
APPENDIX more Satellite/DSS receivers: Hitachi 139, 140 Home Cable 080, 044, 029 Houston Tracker 033, 037, 039, 104, 057, 051 Hughes 068, 154 Hytek 053 Hyundai 149 ICR 023 Janiel 060, 147 Kathrein 108 Legend 057 Lutron 132 Luxor 144, 062 Macom 010, 059, 063, 064, 065 Memorex 057 Nextwave 028, 124, 125 Norsat 069, 070 Pace 143 Panasonic 142, 060 Pansat 121 Personal Cable 117 Philips 071, 152, 153 PL 023, 026 President 019, 102 Primestar 110, 030 Prosat 072 Proscan 151, 106, 150 RCA 151, 106, 150 Realistic 04
APPENDIX Favorite Settings Use this page to record some of your favorite OSD settings and system details.
APPENDIX Specifications Line Level Inputs Sensitivity (for 0.5 V output): Phono: FM Tuner Section FM range: 125 mV 1.6 mV Frequency response: 20 Hz-20 kHz +/- 0.5 dB Signal to Noise (relative to 2V out): Analog 97 dB Digital 105 dB Distortion (THD): < 0.
APPENDIX Limited Warranty Sunfire Corporation is proud of its products which have been built with care using advanced technology and premium component parts. Your unit has been crafted to perform properly for many years. Sunfire Corporation offers the following Warranty to you, the owner of a new Sunfire product: The Sunfire Corporation Warranty for the TGP-5 is in effect for THREE years from the date of original retail purchase. The Sunfire Corporation Warranty covers defects in materials and workmanship.
MANUFACTURED UNDER LICENSE FROM DOLBY LABORATORIES. "DOLBY", "PRO-LOGI DOUBLE-D SYMBOL C" AND THE ARE TRADEMARKS OF DOLBY LABORATORIES. DVD IN SAT IN MANUFACTURED SYSTEMS, INC. UNDER LICENSE FROM 5,978,762 AND US PAT. NO. 5,451,942, DIGITAL THEATER 5,956,674, OTHER WORLD-WI PENDING. "DTS", DE PATENTS 5,974,380, "DTS-ES EXTENDED ISSUED AND "NEO:6" ARE SURROUND TRADEMARKS " AND SYSTEMS, INC. OF DIGITAL SYSTEMS, INC. COPYRIGHT 1996, 2000, THEATER DIGITAL THEATER ALL RIGHTS RESERVED.
Addendum Surround Modes for Multi-Channel Sources This addendum sheet replaces page 44 of your owner's manual. A new feature has been added to the TGP-5, see DTS(5.1), third paragraph. For multi-channel sources, the TGP-5 will automatically select the correct mode from one of these: DOLBY DIGITAL DOLBY DIGITAL EX DTS DTS-ES MATRIX DTS-ES DISCRETE Dolby Digital and DTS are “5.1” surround systems with five main channels: left front, center, right front, left surround, and right surround.