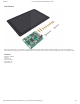
3/1/2018 10.1 Inch Touch Screen for Raspberry Pi - Wiki Introduction Italic text This SunFounder 10.1" IPS monitor is a 10-point capacitive touch screen with a resolution of 1280x800, bringing you perfect visual experience. It works with various operating systems including Raspbian, Ubuntu, Ubuntu Mate, Windows, Android, and Chrome OS(you may need an USB extension cable). Features Resolution: 1280x800 Size: 10.1" LCD Type: IPS Power: DC12V/2A Consumption: 5W Capacitive touch http://wiki.sunfounder.
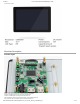
3/1/2018 10.1 Inch Touch Screen for Raspberry Pi - Wiki 10-point touch screen Functions Description Indication Lights There are 2 LED indicators on the main board of the screen to show different signals: Power on the screen and both the 2 LEDs will light up immediately. If there's no HDMI signal, then only the green LED will be on. If there's an HDMI signal, then only the red LED will be on. Press and hold the switch to power off the display, and both LEDs will be off.
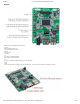
/1/2018 10.1 Inch Touch Screen for Raspberry Pi - Wiki Buttons Buttons on the main board and their functions: a. Power Press and hold to switch it off Press to sleep/awake the device b. Menu To show menus To confirm c. VTo go down on the Menu interface Volume down on other interfaces d. V+ To go up on the Menu interfacev Volume up on other interfaces d. Exit To exit On one side of the main board there are ports for HDMI input, 12V/2A power input, and 5V/2.5A USB power output. http://wiki.sunfounder.
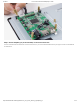
3/1/2018 10.1 Inch Touch Screen for Raspberry Pi - Wiki On the other side, you can see ports for 30-pin LVDS ribbon cable, 6-pin backlight control and 4-pin speaker. Installation The screen comes with seven 2.5*14.4 standoffs, two 2.5*22 ones, seven 2.5*6 ones, and some nuts for installing the Raspberry Pi to the screen. Take the following steps to complete the assembly. Step 1. Fix the main board to the screen. Place the main board onto the 4 2.
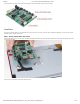
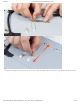
3/1/2018 10.1 Inch Touch Screen for Raspberry Pi - Wiki Step 2. Fix the Raspberry Pi (or other boards) on the screen back case. There are a vertical slot and a horizontal one on the back of the screen, so you can fix boards with different sizes by moving the nuts and 2.5*6 standoffs with the small wrench. http://wiki.sunfounder.cc/index.php?title=10.
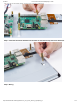
3/1/2018 10.1 Inch Touch Screen for Raspberry Pi - Wiki If you want to use a Raspberry Pi with the screen, then you don't need to adjust the standoffs since they are preset for it. Just place the board onto the case with http://wiki.sunfounder.cc/index.php?title=10.
3/1/2018 10.1 Inch Touch Screen for Raspberry Pi - Wiki holes on the RPi and the standoffs aligned, insert the 2.5*14.4 standoffs and fasten them. Step 3. Insert the two 2.5*22 standoffs into the holes on the back to keep the screen balanced. Step 4. Wiring. http://wiki.sunfounder.cc/index.php?title=10.
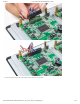
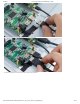
3/1/2018 10.1 Inch Touch Screen for Raspberry Pi - Wiki 1) Plug in the 6-pin backlight control cable into the LED BS port. 2) Plug the 30-pin LVDS ribbon cable into the 30-pin headers (note that the red wires should be near the buttons side) http://wiki.sunfounder.cc/index.php?title=10.
3/1/2018 10.1 Inch Touch Screen for Raspberry Pi - Wiki 3) Connect the power port of the RPi to the USB port of the main board via a USB cable. http://wiki.sunfounder.cc/index.php?title=10.
3/1/2018 10.1 Inch Touch Screen for Raspberry Pi - Wiki 4) Connect the HDMI port of the RPi and the screen via an HDMI cable. 5) Connect the USB port of the RPi and the screen with a 4-pin USB cable. http://wiki.sunfounder.cc/index.php?title=10.
3/1/2018 10.1 Inch Touch Screen for Raspberry Pi - Wiki 6) Connect the power cable of the supply to power the main board of the screen. Then power it on and the boot screen will appear. http://wiki.sunfounder.cc/index.php?title=10.
3/1/2018 10.1 Inch Touch Screen for Raspberry Pi - Wiki Install the Virtual Keyboard Open a terminal and run the command: sudo apt-get install matchbox-keyboard After the installation is done successfully, the keyboard will appear on the screen: Using as Extension Screen for PC http://wiki.sunfounder.cc/index.php?title=10.
3/1/2018 10.1 Inch Touch Screen for Raspberry Pi - Wiki Connect the computer and the main board via an HDMI cable, and the USB port of the PC and the screen with a 4-pin USB cable(you may need an USB extension cable for connection). Now you can use the screen as an extension one for your computer. http://wiki.sunfounder.cc/index.php?title=10.


