Contents Overview............................................................................................................................................... 1 Features................................................................................................................................................ 1 Download the System....................................................................................................................... 3 Mount the Raspberry Pi...............................
Overview This 7 inch IPS LCD Monitor with a high resolution of 1024×600 pixels supports key operation and remote control. It is protected by a case with stand which is made of high quality black acrylic. The monitor supports HDMI and VGA input interfaces. Besides, an HDMI cable is included so you can start the screen quickly and conveniently. With the keys on the monitor back, you can choose to control the screen by pressing the keys.
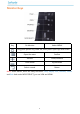
Monitor Keys Key On Monitor Under MENU Long press: power on/ power off, Short press: Open up/Close screen Open the menu Confirm Volume Down/Increase Color Mode Up/Decrease Select a mode Return Note: Under MENU, there are many functions: Color, Adjust, OSD, Function, Sound and Exit. And under MODE SELECT, you can VGA and HDMI.
Download the System Note: If your Raspberry Pi has been installed the system, you can skip this chapter and turn to next chapter Mount the Raspberry Pi. Step 1 To download NOOBS from your PC, you can choose NOOBS or NOOBS LITE - the only difference is that there is a built-in offline Raspbian installer in NOOBS, while the NOOBS LITE can only be operated online. Here, you are suggested to use the former. Here is the download address of Noobs: https://www.raspberrypi.
Step 4 All the files transferred, the Micro SD card pops up. Insert the Micro SD card into the Raspberry Pi. Mount the Raspberry Pi You'll see 4 sets of acrylic plates in the package. The three bigger ones are to protect the Raspberry Pi 4 Model B, and the much smaller one is an Micro SD card removing assistant. To protect the plates, sticker is added to both sides. To unveil the real face of the acrylics, you need to remove these "masks".
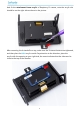
And fix the attachment frame acrylic of Raspberry Pi camera, note the acrylic slot should be on the right side as shown in the picture. After removing the 4 standoffs on top, make sure the 4 ones at bottom are tightened, and then place the blue acrylic onside. Pay attention to the direction: place the acrylic with the opening at your right side, the arrow indicates that the side need to close to the top of the monitor.
So now put the Raspberry Pi on the acrylic. You're suggested to plug in the SD card before fixing, or else it will be tricky to do so after installation is done. Accordingly, note that pins at the bottom and SD card at the right side. Then cover the transparent acrylic plate. As aforementioned, the middle parts are thin and fragile, so when placing, BE GENTLE! Otherwise they may be broken. There are three heat sinks equipped in the kit, you can attach them to the Raspberry Pi.
After that, place the yellow-green acrylic onside and screw back the 4 copper standoffs. At this time, if you cannot screw the nut back because the screw is "too short", it indicates that you've assembled the acrylics wrong which results in a higher prop height than supposed. Check whether they are done correctly based on the steps above. So now the assembly is done! You should notice the small hook-shape acrylic, which is to remove the SD card and also can be used to hook the FFC connector of CSI/DSI.
Fix the camera Attachment frame of Raspberry Pi official camera is provided in the kit, if you have the Raspberry Pi official camera (not provide in the kit), then you can assemble it in. Insert the connection cable of camera into the interface of Raspberry Pi CSI interface. Note the direction. You can disassemble the yellow acrylic, then open up the CSI interface to insert the connection cable of camera and assemble the acrylic back. Put the camera as shown in the picture to the acrylic.
Insert cables Insert HDMI cable, power cord of Raspberry Pi and screen power cord. Now the screen is all set and power it on. If you find that the screen hasn't been lighten up. Long press the power key at the back for about 5 seconds until the screen is light up.
Install the System Step 1 It will go to the NOOBS interface after starting up. If you use NOOBS LITE, you need to select Wi-Fi networks (w) first. Tick the checkbox of the Raspbian and click Install in the top left corner. The NOOBS will help to conduct the installation automatically. This process will take a few minutes. Step 2 When the installation is done, the system will restart automatically and the desktop of the system will appear.
Step 3 Set your Country, Language, and Timezone, then click Next again. Step 4 Enter a new password for your Raspberry Pi and click Next. In this step, you need to plug a keyboard into the Raspberry Pi to help you input the new password.
Step 5 Connect to your WiFi network by selecting its name, entering the password, and clicking Next. Step 6 Click Next let the wizard check for updates to Raspbian and install them (this might take a little while).
Adjust the Resolution Step 1: Open the config.txt file. Click the terminal icon in the upper left corner to open it, then enter the following command to open the config.txt file. sudo nano /boot/config.txt Step 2: Modify the /boot/config.txt file. 1) Define a custom CVT mode (since Raspberry Pi uses the standard rate when 1024x600 is not included, you need to set the aspect ratio close to 16:9) and add the following lines below #hdmi_force_hotplug=1.
After the modification is done, save and exit. For more details about configuring config.txt, refer to Raspberry Pi official website: https://www.raspberrypi.org/documentation/configuration/config-txt.md. Step 3: Reboot Raspberry Pi. Reboot the Raspberry pi with the command sudo reboot. sudo reboot Note: 1) If your display has no sound, you need to confirm the current Audio output mode. Analog mode is used to output to the headphones, and HDMI mode is output to the speakers.