
User Manual


13
Adjust the Resolution
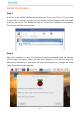
Step 1: Open the config.txt file.
Click the terminal icon in the upper left corner to open it, then enter the following
command to open the config.txt file.
sudo nano /boot/config.txt
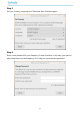
Step 2: Modify the /boot/config.txt file.
1) Define a custom CVT mode (since Raspberry Pi uses the standard rate when
1024x600 is not included, you need to set the aspect ratio close to 16:9) and add the
following lines below #hdmi_force_hotplug=1.
hdmi_cvt=1024 600 60 3 0 0 0
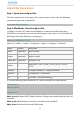
hdmi_cvt=<width> <height> <framerate> <aspect> <margins> <interlace>
Value Default Description
width (required) width in pixels
height (required) height in pixels
framerate (required) framerate in Hz
aspect 3
aspect ratio 1=4:3, 2=14:9, 3=16:9, 4=5:4, 5=16:10,
6=15:9
margins 0 0=margins disabled, 1=margins enabled
interlace 0 0=progressive, 1=interlaced
rb 0 0=normal, 1=reduced blanking
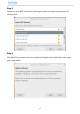
2) Find the following lines, delete the "#" mark and modify the value like this:
hdmi_group=2
hdmi_mode=87
....
hdmi_drive=2
hdmi_group=2 means DMT (Display Monitor Timings, the standard typically used on
monitors)
hdmi_mode=87 indicates we create a new hdmi mode named 87.
hdmi_drive=2 selects the Normal HDMI mode.