
User Manual


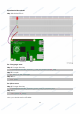
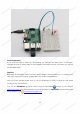
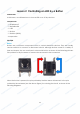


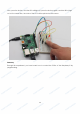
Table Of Contents

22
Lesson 1 Blinking LED
Introduction
In this lesson, we will learn how to program Raspberry Pi to make an LED blink. You can play
numerous tricks with an LED as you want. Now get to start and you will enjoy the fun of DIY
at once!
Components
- 1 * Raspberry Pi
- 1 * Breadboard
- 1 * LED
- 1 * Resistor (220Ω)
- Jumper wires
Principle
Semiconductor light-emitting diode is a type of component which can turn electric energy
into light energy via PN junctions. By wavelength, it can be categorized into laser diode,
infrared light-emitting diode and visible light-emitting diode which is usually known as light-
emitting diode (LED).
When 2V-3V forward voltage is supplied to an LED, it will blink only if forward currents flow
through the LED. Usually there are red, yellow, green, blue and color-changing LEDs which
change color with different voltages. LEDs are widely used due to their low operating
voltage, low current, luminescent stability and small size.
LEDs are diodes too. Hence they have a voltage drop which usually varies from 1V to 3V
depending on their types. Generally they brighten if supplied with a 5mA–30mA current,
and we usually use 10mA–20mA. Thus when an LED is used, it is necessary to connect a
current-limiting resistor to protect it from being burnt.
In this experiment, connect a 220Ω resistor to the anode of the LED, then the resistor to 3.3 V,
and connect the cathode of the LED to GPIO0 (See Raspberry Pi Pin Number Introduction).
Write 1 to GPIO0, and the LED will stay off; write 0 to GPIO0, and then the LED will blink, just
as indicated by the principle above.