Cyberus -- Tablet PC User Manual MODEL: ID710WTA For ongoing product improvement, this manual is modification without prior notice.
CONTENTS Safety Precautions 2 Product Overview Functions of Button and Port Battery Charge Accessories 3 Getting Started Application Introduction Status Icon Briefing Touch Screen Operation Home Screen Management Keyboard User Guide 5 Connectivity Insert Micro SD Card Connect to PC 10 Setting 12 Wi-Fi Setting Language Setting Screen Rotation Sleep Mode Web 15 Browser Managing Application Troubleshooting 19 Limited Warranty 20
Safety Precautions For advanced operations such as Dev tools, it is suggested to be operated by professional engineers. Images and screenshots used in this user manual may differ in appearance from the actual product. Content in this user manual may differ from the product, or from software provided by service providers or carriers, and is subject to change without prior notice. Keep your device dry. Do not use or store your device in dusty, dirty areas. Do not place your device on slopes.
Product Overview This section is to tell you functions of each button and port, battery charge. Functions of Button and Port 5 Camera Volume up 6 Volume down 7 Power on/off 8 15 TF card 1 2 3 4 Menu Main menu 9 Indicator light 10 MIC Earphone Return Reset 11 12 13 14 DC IN USB HDMI slot 1. Go to Menu Options 2. Go to Home Screen 3. Press to return to the previous screen. 4. Indicator Light 5. Front-facing camera 6. Press to increase the volume level 7.
Product Overview Battery Charge Use the power adapter or USB cable to charge the battery of your Cyberus. The indicator light will show blue light when charging and light off when charging finished.
Getting Started This section is to introduce general application of main menu, touch screen, keyboard, etc. 1. Press and hold the power button for more than 3 seconds to boot up. The Android booting image will appear on the screen, booting needs about 45 seconds. After booting finished, below screen will appear. 2. Slide the Lock icon to unlock the screen, 3.
Getting Started 4. Now, you can touch on the icons to enjoy your photos, music, video, ebooks, games..., Touch the icon ( ) listing on the top right screen, you can enjoy more APPs. Application Introduction Photo: Display your favorite pictures. Music: Meditate in your beloved songs. Kindle: Read ebooks in various formats. Browser: Browse websites on the internet, search content you want to know. YouTube: Watch YouTube videos updated everyday, register or log in to YouTube.
Getting Started Touch Screen Operation Touch: Simply touch an icon to select and run an item. Touch and hold: Touch and hold some items to show an alternate action. Slide: Use your finger or stylus to gently slide on the screen to up or down, right or left horizontally to change the view on some screens. To slide, touch the screen and quickly move your finger across the screen without lifting your finger. Do not pause on the screen with your finger or you may accidentally enter an item by mistake.
Getting Started 4. Home screen overview: 2 1 3 9 8 4 5 7 6 1 Google Search: Touch to search with Google browser. 2 Sound recorder: Touch to turn on the sound recorder. 3 All Apps: Touch to view the list of all Apps and Widgets installed on the tablet. 4 Return: Touch to return to the previous screen. 5 Home screen: Touch to return to the home scree. 6 Recent Apps: Touch to display the list of Apps that you have worked recently.
Getting Started Keyboard User Guide Tap ( Tap ( Tap ( ) to switch between lowercase letters and capital letters. ?123 ) to switch to numbers and symbols. ) to delete data.
Connectivity This section is to tell you about connecting with external device such as Micro SD card and computer. Insert Micro SD Card Insert a Micro SD Card into the card slot with the label side face down, push the card until it locks into place, and “SD card is mounted” will appear on the left bottom corner of the screen, then an SD card icon will appear in the Notification bar.
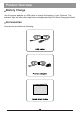
Connectivity Connect to PC After booting up, connect the device to computer with the USB cable. When your tablet is connected, a USB icon will appear in the Notification bar. Then a dialogue box appears as following: Touch “Turn on USB storage” and then you can copy files to/from your PC or other external devices. Note: For the first time you connect this device to your computer, you might be asked to install driver of your device so that it can be recognized by your computer.
Setting This section is to tell you settings like Wi-Fi, language, screen rotation, and sleep mode. Wi-Fi Setting For networked functions, such as Browser, Map, Email, YouTube, Market Place…, you need to link to internet firstly.
Setting If you did not set a password for your router, the tablet will link to internet automatically. If you have set a password for your router, the below square will appear on screen, touch on the Password bar, Soft Keyboard will appear on screen, input the password you set for your router, then, touch “Connect”.
Setting Now, you can see your router has been connected, which means your tablet has been linked to internet. Now, you can enjoy all networked functions. Language setting In the App list page, touch “Settings” slide and touch “Language & input” touch “Language” slide downwards or upwards to find the language that you want and touch the language. Tap to return after setting. Screen Rotation This device has built-in motion sensor to automatically adjust screen display between portrait and landscape.
Web This section is to tell you some operation about Browser, Market and App store, etc. Please note that all these applications need Wi-Fi connection, for how to link to Wi-Fi, please refer to “Setting Wi-Fi Setting” section. Browser Touch the Browser icon on the Home screen to open browser. To go to a webpage, touch the Address bar at the top of the Browser screen. The keyboard will open automatically. If the Address bar is not visible, slide the page down to return to the top of the page.
Web Refresh: Refresh the current webpage. Forward: Go to the next webpage. Bookmarks: Show bookmark list. Save to bookmarks: To bookmark your favorite webpages in order to visit them quickly without entering a URL. (You can modify the name of the bookmark or its URL address. Otherwise, touch OK to finish adding the bookmark.) Share Page: Use Email to send the webpage URL. Find on Page: Search for content on the current page. Request desktop site: Set a webpage as the desktop site.
Web Managing Bookmark Once open browser, press Menu ( to go to the bookmark list: ) touch key to show menu, touch “Bookmark” Touch a bookmark tile to open it. To delete a bookmark, hold and touch a bookmark tile for 3s to open an option menu: Touch “Delete bookmark” and touch “OK” to confirm. Managing Application Download and Install Applications In the home screen, tap “Market” tap “Next” to set up your google account. Sign in your Google account or create a google account and then sign in.
Web To Uninstall an Application Go to “Settings” “Apps”, touch the application that you want to uninstall, the application info screen will open: Touch “Uninstall” icon, then touch “OK” to confirm. To Clear App History Date To clear App history data that have been made on your Tablet, go to “Settings” “Apps”, touch the application whose data that you want to clear tap “Clear data” and “OK” and the related data will be deleted from your device.
Trouble shooting FAQs: Q 1: Why can't I link to Wi-Fi? A: Please check if you have turned on Wi-Fi. Go to Networks” Slide “off” to “on”. “Setting” “Wireless & Please check if you have input the right password of Wi-Fi router. For more Wi-Fi related questions, please go to www.sungale.com and find Support Wi-Fi related FAQ.
LIMITED WARRANTY The limited warranty set forth below is given by the manufacturer with respect to Sungale brand Tablet players and other consumer electronics products purchased and used in the United States of America. The manufacturer warrants this product against defects in material or workmanship as follows: LABOR: For a period of ninety (90) days from the date of purchase, if this product is, defective, the manufacturer will repair or replace the product, at its option, at no charge.