Assembly Instructions Item# D-GZ105PST-C
SAFETY INFORMATION Please read and understand this entire manual before attempting to assemble, operate or install the product. WARNING: 1. When installing and assembling your gazebo, it is recommended that 2 or more adults are involved. 2. This product is intended for outdoor use only and should be placed on flat, horizontal ground. 3. Ensure enough clearance around the product. 4. Do not use the unit during an electrical storm, as there is a remote chance of getting struck by lightning. 5.
Parts List Description Part Quantity Finial A 1 Top connector B 1 Short oblique beam C 4 Connector D 1 Top Hook E 1 Middle beam F 4 Long oblique beam G 4 Oblique beam H 4 Beam I 4 Shelf J 4 Screen K 4 Big canopy L 1 Small canopy M 1 Hardware Pack FF Dia.
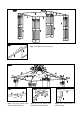
Fig.1: Insert Beam (I) into Screen (K). Fig.2: Insert Long oblique beam Fig.3: Insert Long oblique beam (G) into Oblique beam (H). (G) into the Connect tube (D). Fig.4: Insert Oblique beam (H) into Screen (K).
Fig.6: Insert Middle beam (F) into Fig.7: Insert Short oblique beam Connector (D), then assemble the Beam (I). Put on the Big canopy (C) into Top connector (B). Top hook (E) on the connector (D). (L) and do not unfold first. Fig.8: Put on the Small Fig.9: Insert Finial (A) into Top Fig.5: Insert Middle beam (F) into canopy (M) on small top. connector (B). Fig.10: Insert the assembled small dome into Long oblique beam (G) by Short oblique beam (C).
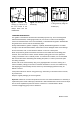
Fig.11: Expand Big canopy (L), secure it to Fig.12: Put Shelf (J) on Screen (K). the four corners of the Fig.13: Secure the gazebo to the ground by using the Stakes (FF). oblique beam and the middle beam. CARE AND MAINTENANCE This gazebo is intended for decorative and sunshade purposes only, and is not designed to withstand hard weather, including high winds, rain, and snow. In order to avoid damages, remove accumulated water on the roof immediately, or disassemble the gazebo.