Assembly Instructions Item#:D-GZ940PST 1/8
Important: 1. Keep all children and pets away from assembly area. Children and pets should be supervised when they are in the area of gazebo construction. 2. The area for assembly should not be less than 6 feet from any obstruction such as fence, garage, house, overhanging branches, laundry line or electrical wires. 3. This unit is heavy. Do not assemble this item alone. Six people are recommended for safe assembly. 4. Some parts may contain sharp edges. Wear protective gloves if necessary during assembly.
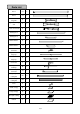
Parts List Post 1 A1 4 Post 2 A2 4 Short screen of long side B 4 long screen of long side C 2 Screen of short side D 4 Slanting bar 1 E 4 Slanting bar 2 F 4 Middle beam 1 G 4 Middle beam 2 H 4 Middle beam connector I 4 J 2 K 2 L 4 M 4 N 1 O1 4 O2 4 Hook P 1 Small canopy Q 1 Large canopy R 1 Mosquito netting S 1 Curtain T 1 Long beam of the large top Short beam of the large top Connector Slanting bar of small top Small top connector Long mosquito net
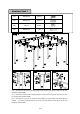
Hardware Pack 1 AA M6X20 Bolt 58 PCS BB M6 Washer 58 PCS DD M6 Nut 2 PCS W1 M6 Wrench 1 PC Fig.1:Assemble the Short screen of long side(B), Screen of short side (D) to the Post 1(A1) by using Bolt(AA) and Washer(BB). Fig.2:Assemble the Short screen of long side (B) and Long screen of long side (C) to the Post (A2) by using Bolt (AA) and Washer(BB) . Fig.
Fig.4:Assemble the Middle beam connector (I) to the Long screen of long side(C) by using Bolt(AA) and Washer(BB). Fig.5:Assemble the Long mosquito netting bar (O1) to the Short screen of long side (B) and Long screen of long side (C) by using Bolt(AA) and Washer(BB). Assemble the Short mosquito netting bar (O2) to the Screen of short side (D) by using Bolt (AA) and Washer (BB). Hardware Pack 2 BB M6 Washer 16PCS CC M6X40 Bolt 8 PCS DD M6 Nut 8 PCS Fig.
Fig.9:Attach the Slanting bar2 (F) to the Post 1(A1) by using Bolt (CC), Washer (BB) and Nut(DD). Fig.10:Insert the Middle beam 1(G) into the Middle beam 2(H). Fig.11:Insert the Middle beam 1 (G) into the tube of the Long beam of the large top (J) and Short beam of the large top (K). Fig.12:Assemble the Middle beam 2 (H) to the Middle beam connector (I) by using Bolt (CC), Washer (BB) and Nut (DD). Fig.13:Insert the Slanting bar of small top (M) into the Small top connector (N). Fig.
Fig.16:Attach the small (Q) to the Slanting bar of small top (M). Fig.17:Attach the Large canopy (R) to the Slanting bar2 (F) and Middle beam 2. Fig.18:Hanging the mosquito Curtain(T)and Mosquito netting (S) to the Long mosquito netting bar (Q1)and short mosquito netting bar (O2). Fig.19:Fix the gazebo to the ground by using Stake (EE).
Maintenance: Our iron/steel components for garden accessories and patio items are coated with rust inhibiting paint that protects it from rusting. However, due to the nature of iron, surface oxidation (rusting) will occur once these protective coatings are scratched. This is a natural process and is not a defect! To minimize this condition, we recommend care when assembling & handling the product to prevent scratching the paint.