TTEM NO.:A101011200 WE HAVE YOU IN MIND, LET US SERVE YOU! Questions? Issues? CONTACT US 24 hours / 7 days a week www.sunjoyonline.com customer.care@sunjoygroup.
/9 Safety Information two people are required for this assembly. Some parts may contain sharp edges. Wear DANGER: This unit is heavy! Do not assemble protective gloves. this item alone. When assembling and using this product, basic safety precautions should always be WARNING: Do not leave the gazebo where there followed to reduce the risk of personal is a risk of high wind, as possible damage injury and damage to equipment. Please read will occur to the structure.
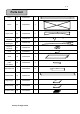
/9 Hardware AA M6*40 bolt H010020022 8 PCS BB Flat washer H050010020 28 PCS CC M6*20 bolt H010020012 20 PCS FF Ф6*230 Stake H070010008 12 PCS GG Ring P005100265 48 PCS WW Wrench H090010017 1 PCS Parts List Description Label Part# Qty Post 1 A6 P000200478 1 Post 2 A7 P000200479 1 Post 3 A8 P000200480 2 Country of Origin: China Image
/9 Parts List Post 5 A9 P000200481 2 Fence B1 P006200014 2 Upper beam C1 P000400930 6 D2 P000601431 6 E2 P000601430 6 F1 P000501233 1 Hook F4 P005800001 1 Shelf G1 P002100345 1 H1 P005000425 2 Adjustable tube L P005700693 12 Connect tube M P000501234 1 large canopy S P001100574 1 Small canopy S1 P001100575 1 Mosquito netting S2 P001200224 1 Corner connector Large top slanting bar Large top connecter Shelf support plate included(G) Country of Origin: Ch
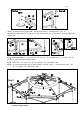
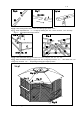
/9 Step1 Fig.1-1:By using bolt (AA) and washer(BB)attach fence(B1)to bottom of post(A8、A9)。 Fig.
/9 Fig.2-1:By using bolt(CC), washer(BB), attach connect tube(L)to bottom of post(A6、A7。 Fig.2-2:Insert upper beam(C1)to post(A6、A7),then fix upper beam(C1)to post(A6、A7),by using bolt(CC)and washer(BB). Fig.3:Insert upper beam(C1)into post(A6、A7、A8、A9), then fix upper beam(C1)to post(A6、A7、 A8、A9)by using bolt (CC) and washer(BB). Fig.4: attach shelf(G1)to post(A6、A7)by using bolt(CC)and washer(BB)。 Fig.5: Fix one end shelf support (H1) to bottom of shelf,as image(Fig.
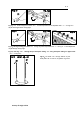
/9 Fig.6:Insert slanting bottom beam(D2)into slanting upper beam(E2)。 Fig.7:Attach adjustable tube (L) to large top slanting bar(E2)corner connector(D2)as image (Fig.7-1), then adjust tube length shortest。 Fig.8:Insert assembled slanting bar bottom end(D2)into post(A6、A7、A7、A9)。 Fig.9:Attach assembled slanting bar upper end(E2)to large top connector(F1),then attach hook(F4) to large top connector(F1),and put large canopy(S) to large top frame.
/9 Fig.10:Put small canopy four corner(S1) to small top frame end of adjustable tube(L)(as Fig.10-1) adjust tube length till the canopy tight. Fig.11:fix large canopy six corner(S) to large top frame adjustable tube(L)(as Fig.11-1)then adjust tube length till large canopy tight. Fig.12:Put ring(GG) through loop of mosquito netting(S2)hang mosquito netting on upper beam (C1)(inner post)。 Fig.
/9 Care and Maintenance Our steel components for garden accessories and furniture are treated with rust inhibiting paint that protects it from rusting. However, due to the nature of steel, surface oxidation (rusting) will occur once these protective coatings are scratched. This is not a defect and thus not covered by the warranty. To minimize this condition, we recommend care when assembling & handling the product to prevent scratching the paint.