ITEM NO.:A215000103 WE HAVE YOU IN MIND, LET US SERVE YOU! Questions? Issues? CONTACT US 24 hours / 7 days a week www.sunjoyonline.com customer.care@sunjoygroup.
Warning Some parts may contain sharp edges. When assembling and using this product, basic safety precautions should always be followed to reduce the risk of personal injury and damage to the product. Please read all instructions before assembly and use. Check all bolts for tightness before use, and periodically check and tighten bolts as necessary. Safe Information: This swing must be assembled by two adults or more. Tools are not included in packaging.
PARTS LIST Label Part Number A P005400384 Front leg 2 B P005400385 Back leg 2 C P000601297 Top support 2 1 D P000601296 Top support 1 1 E P000501123 Bottom support 2 F P000501124 Back support 1 1 G P000501125 Back support 2 1 I P001400211 Handrail 2 J P007700020 Seat 1 K P008200041 Canopy side support 2 L P008200040 Canopy support 2 M P001100527 Canopy 1 N1 P001700098 Back cushion 1 N2 P001800115 Seat cushion 1 Country of Origin: China Description
HARDWARE PACK Label Description QTY U H010030082 Bolt M6x90 4 T H010030081 Bolt M6x85 2 S H010030079 Bolt M6x68 4 R H010010035 Bolt M6x60 2 R1 H010030078 Bolt M6x62 4 Q H010030020 Bolt M6x50 4 P H010030077 Bolt M6x45 2 O H010030018 Bolt M6x30 1 Y P005100234 Knob 2 V H040050022 M6 Nut 23 W H050010037 Flat washer M6 23 X R070110010 Flat plastic washer M6 6 Z R070030006 Ball head nut M6 23 H P005800173 Hook 2 1 H090010002 Wrench M6 1 2 H090030002
ASSEMBLY STEPS Step1: Insert Top support 1 (D) into Top support 2 (C) as Fig.1shows and attach them together with Bolt (P), Flat washer (W), Nut (V) and Ball head nut (Z). Step 2: Attach Front leg (A), Back leg (B) and Top support (D/C) together with Bolt (U), Flat washer (W), Nut (V) and Ball head nut (Z). Attach Front leg (A) and Back leg (B) together with Bolt (T), Flat washer (W), Nut (V) and Ball head nut (Z).See Fig.2.
Step 4: Insert Back support 1 (F) into Back support 2 (G) and secure them with Bolt (O), Flat washer (W), nut (V) and Ball head nut (Z). See Fig.4. Step 5: Attach Back supports (F/G) and Back leg (B) together with Bolt (S), Flat washer (W), nut (V) and Ball head nut (Z). See Fig.5. Step 6: Attach Handrail (I) and Seat (J) together with Bolt (R), Flat plastic washer (X), Flat washer (W), nut (V) and Ball head nut (Z). See Fig.6.
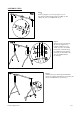
Step 7: Attach Handrail (I) and Seat (J) together with Bolt (R1), Flat plastic washer (X), Flat washer (W), nut (V) and Ball head nut (Z). See Fig.7. Step 8: Attach one end of Hook (H) to Handrail (I) and the other end to Top support (D/C). See Fig.8. Step 9: Attach Top support (D/C) and Canopy side support (K) together with Knob (Y). See Fig.9.
Step 10: Insert Canopy support (L) into Canopy (M) as Fig.10 show. Step 11: Insert Canopy support (L) into Canopy side support (K) following the arrow direction on Fig. 11, then spread Canopy (M). Step 12: Attach Cushion (N) on Seat (J).
Care & Maintenance: Before using, clean the product completely with a soft dry towel. When not in use, wipe free of any dirt or loose objects, wash with a mild solution of soap and water; rinse thoroughly and dry completely. Do not use strong detergent or abrasive cleaners. Steel components of garden accessories and furniture are treated with rust inhibiting paint. However, due to the nature of steel, surface oxidation (rusting) will occur if this protective coating is scratched.