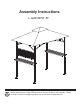
Assembly Instructions L-GZ238PST-5F Questions, problems, missing parts? Before returning to your retailer, call our customer service department at 1-866-578-6569 from 8:30 am to 5:30 pm, EST, Monday - Friday, or email to customer.care@sunjoydirect.com or visit www.sunjoydirect.com.
PACKAGE CONTENTS G E F D H J I L K A4 A3 M A1 C A2 N O B PART DESCRIPTION QUANTITY PART DESCRIPTION QUANTITY A1 Pole (1) 1 G Small beam 4 A2 Pole (2) 1 H Hook 1 A3 Pole (3) 1 I Long screen 2 A4 Pole (4) 1 J Short screen 2 B Base 4 K Shelf 2 C Base cover 4 L Shelf connecting bar 4 D Big beam 4 M Grid 1 E Small connector 1 N Big canopy 1 F Big connector 1 O Small canopy 1 1
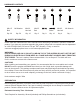
HARDWARE CONTENTS AA BB CC DD M6×15 Bolt M6 Washer M6×20 Hex bolt M6×35 Bolt Qty. 20 Qty. 56 Qty. 16 Qty. 8 EE FF Stake Qty. 8 Qty. 16 GG Z M6×35 Hex bolt M6 Wrench Qty. 4 Qty. 1 SAFETY INFORMATION Please read and understand this entire manual before attempting to assemble, operate or install the product. If you have any questions regarding the product, please call our customer service department at 1-866-578-6569 from 8:30 am to 5:30 pm, EST, Monday - Friday. or email to customer.
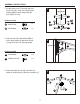
ASSEMBLY INSTRUCTIONS 1. Let the base cover (C) through the pole A1(A2, A3, A4),then use bolt (AA) and washer (BB) to connect base (B) and pole A1(A2, A3, A4). 1 A1(A2.A3.A4) C Hardware Used AA BB AA M6x15 Bolt x8 BB BB M6 Washer x8 B 2. Use Hex bolt (CC) and washer (BB) to fix the long screen (I) and short screen (J) to pole A1 (A2, A3, A4) separately. AA 2 BB CC A1(A2.A3.A4) I(J) BB CC Hardware Used BB M6 Washer x 16 CC M6x20 Hex bolt x 16 3.
ASSEMBLY INSTRUCTIONS 4. Attach the big beam (D) to top of pole A1 (A2, A3, A4) by using bolt (DD), washer (BB) and nut (EE). 4 D EE BB BB Hardware Used BB M6 Washer x8 DD M6x35 Bolt x4 EE M6 Nut x4 DD A1(A2.A3.A4) 5. Insert small beam (G) into small connector (E). 5 E G G G 6. First put the big Canopy(N) onto the big Beam(D), but do not spread out completely. Then install the small top(O) to big beam(D) by using bolt(DD), washer(BB) and nut(EE).
ASSEMBLY INSTRUCTIONS 7. First Fix the small canopy (O), and spread out the big canopy (N), then fasten the canopy and the beamso with the Velcro; attach the shelf connecting bar (L) to shelf (K) by using bolt (AA) and washer (BB). 7 Hardware Used K K AA BB AA M6x15 Bolt x4 BB M6 Washer x4 L 8. Attach the shelf (K) to the pole A1 (A2, A3, A4) by using bolt (AA), washer (BB). 8 K Hardware Used AA M6x15 Bolt x4 BB M6 Washer x4 AA BB L A1(A2.A3.A4) 9.
ASSEMBLY INSTRUCTIONS 10. Attach grid (M) to pole A1 (A2) by using hex bolt (GG) and washer (BB). 10 K BB BB M6 Washer x4 GG M6x35 Hex bolt x4 BB 11. Lift base cover (C), and fix the installed gazebo by using the stake (FF). 11 GG A1(A2.A3.A4) C Hardware Used M A1(A2) Hardware Used FF GG x 16 FF FF B CARE & MAINTENANCE To extend the life of grill gazebo, do not use when there are high winds.
REPLACEMENT PARTS LIST For replacement parts, call our customer service department at 1-866-578-6569 from 8:30 am to 5:30 pm, EST, Monday - Friday.