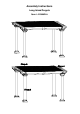
Assembly Instructions Long Island Pergola Item: L-PG096PAL
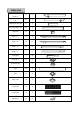
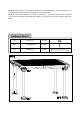
Parts List short supporting A 2 B 2 supporting beam joint C 4 long supporting beam D 4 connector E 4 beam(1) F 4 beam(2) G 6 beam(3) H 4 beam(4) I 6 beam joint J 10 post cover K 4 decoration ring L 8 post M 4 stake N 4 stake cover O 4 cover board P 4 cover board Q 1 fixing piece R 12 beam(1) short supporting beam (2)
Hardware Pack 1 AA M6*15 bolt 56PCS BB M6 flat washer 76 PCS CC M6*95 bolt 20 PCS EE M6 wrench 2 PCS
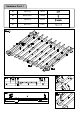
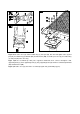
Fig.1: Attach connector (E) onto short supporting beam(1) (A) (short supporting beam(2) (B)); place supporting beam joint (C) onto middle of short supporting beam(1) (A) and short supporting beam(2) (B), then lock and tighten with bolt (AA) and flat washer (BB). Move connector (E) to the middle, lock and connect onto short supporting beam(1) (A) and short supporting beam(2) (B); assemble long supporting beam (D) in the same way. Fig.
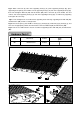
Fig.5: Spread and place a cover board (P) onto beam, then place fixing piece onto cover board (P), lock and tighten with bolt (AA) and flat washer (BB), do not fix another side. Fig.6: Spread and place another cover board (P) onto beam, separate and tighten it with assembled cover board by using bolt (AA) and flat washer (BB), do not fix another side at first. Tighten all the bolts finally.
Fig.7: Attach stake cover (O) and decoration ring (L) onto post (M), then lock and tighten stake (N) and post (M), decoration ring (L) with bolt (AA) and flat washer (BB); assemble post cover (K), decoration ring (L) onto post (M) in the same way. Fig.8: Uplift the assembled top with posts supported underneath, then connect and tighten short supporting beam(1) (short supporting beam(2)), long supporting beam (D) and the assembled top with bolt (AA) and flat washer (BB). Fig.