Assembly Instruction Item #: L-PG080PST-R IMPORTANT Thank you very much for choosing Sunjoy Group. Please take time to read these instructions thoroughly and follow each step carefully for safe and easy operation. Keep this manual for future reference. We would like to hear from you with any comments or suggestions. You can call us toll-free at 1-866-578-6569 anytime .Or send the email to customer.care@sunjoygroucom or visit www.sunjoyonline.com to get tech.
Cautions: •Keep all children and pets away from assembly area. Children and pets should be supervised when they are in the area of the production construction. •This package contains small items and plastic bags that should be kept away from children. •Keep assembly area at least 6 ft. from any obstruction such as a fence, garage, house, overhanging branches, laundry line or electrical wires. •Proper placement of your product is essential. Do not place the product underneath electrical lines.
Pre-Assembly (continued)
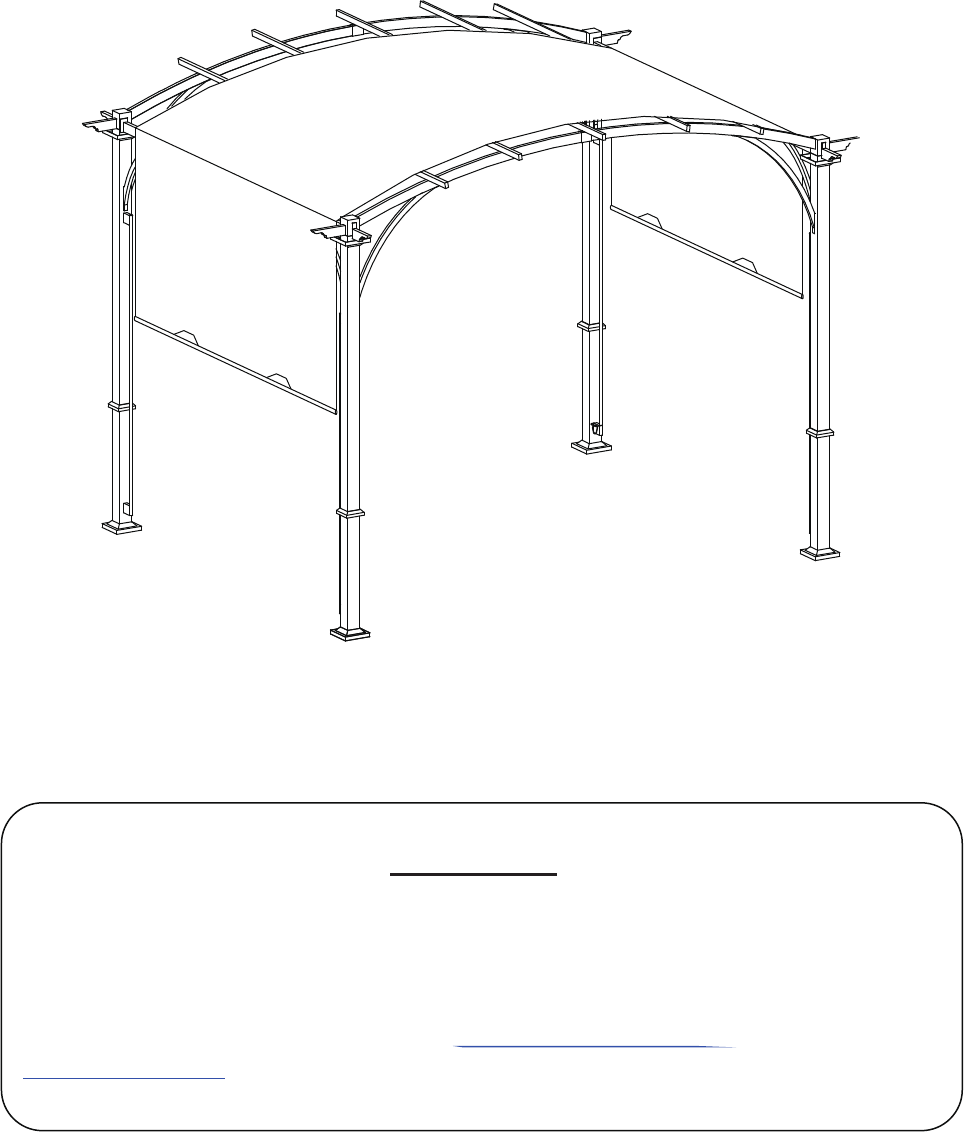
Pre-Assembly (continued) Parts List Description Part # Label Qty Beam PG0080XXR01 A 5 Beam 2 PG0080XXR02 B 5 Arc Beam 1 PG0080XXR03 C 2 Arc Beam 2 PG0080XXR04 D 2 PG0080XXR05 E 2 Support Beam 1 PG0080XXR06 F1 2 Support Beam 2 PG0080XXR07 F2 2 PG0080XXR08 G1 2 PG0080XXR09 G2 2 Post 1 PG0080XXR10 H1 2 Post 2 PG0080XXR11 H2 2 Stake Piece GZD8080X103 I 4 Stake Cap GZD8080S103 J 4 Arc Support 1 PG0080XXR12 K 4 Arc Support 2 PG0080XXR13 L 4 PG0080XXR14
Pre-Assembly (continued) Hardware Description Image Part # Label Qty M6x15 Bolt BM06015C AA 78 M6 Washer UD06C BB 148 M6x40 Bolt BM06040C CC 16 M6*15 Cross Bolt SM06015C DD 28 M6*75 Cross Bolt SM06075C EE 16 M6*45 Cross Bolt SM06045C FF 10 Φ8*180 Ground Stake DD08180C GG 16 M6 Wrench W10D HH 2
Assembly Instructions Fig.1:Attach Stake Cap (J) to Post (H1,H2), then fasten Stake Piece (I) to end of Post (H1,H2) by Cross Bolt (DD) and Washer (BB). Fig.2: Attach Decorative Connector 1 (G1) to Post 2(H2) by using Bolt (AA) and Washer (BB), and follow the same way to attach Decorative Connector 2 (G2) to Post 1 (H1), do not over tighten Bolts at this step. Fig.
Assembly Instructions Fig.4: Insert end of Support Beam (1) (F1) into Support Beam (2) (F2) and connect with Bolt (AA) and Washer (BB) Fig.5: Connect the assembled Arc Beam (C, D) to Decorative Connector (G1,G2) with Bolt (AA) and Washer (BB). Fig.6: Connect the assembled Support Beam (F1,F2) to Decorative Connector (G1,G2) with Bolt (AA) and Washer(BB). Fig.7: Connect Arc Support (K,L) to Post (H1,H2) with Bolt(AA) and Washer(BB). Fig.
Assembly Instructions Fig.10: Insert end of Beam 2 (B) into Beam 1(A), and connect by using Bolt (AA) and Washer (BB). Fig.11: Connect the assembled Beam (A,B) to Arc Beam (C,D) by Cross Bolt (FF) and Washer (BB). Fig.12: Insert Canopy Rod (O) into Canopy Rod 2 (P), by using Cross Bolt (DD) and Washer (BB) to fasten.
Assembly Instructions Fig.13: Firstly spread cover on assembled top frame, insert assembled Canopy Rod (P,O) into the bottom sleeve of the Canopy (R). Fig.14: Attach Rod Connector (N) to Canopy Rod (P,O) by Cross Bolt(DD) and Washer (BB). Fig.15: Cross Sliding Rail Rod (Q) into the ring of Rod Connector (N), insert end of Sliding Rail Rod (Q) into Sliding Rail Connector 1 (M1), and then attach to Post (H1, H2) by using Cross Bolt (EE) and Washer (BB). Fig.
Care & Maintenance •Before using, clean the product completely with a soft, dry towel. When not in use, wipe free of any dirt or loose objects, wash with a mild solution of soap and water; rinse thoroughly and dry completely. •Do not use strong detergent or abrasive cleaners. •Do not machine wash. •Bolts can loosen over time. Be sure to check bolts occasionally, tightening as needed. •Protecting furniture from the elements, when not in use is highly recommended.