
User Manual

BEFORE YOU START
SET UP DAY & TIME
PROGRAMMING / SCHEDULE
MODE SELECTION
○ You may program the timer for up to 16 events.
○ A time setting to Turn On, is an ON EVENT.
○ A time setting to Turn Off, is an OFF EVENT.
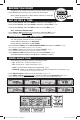
• Press & Release PROG to enter PROGRAMING MODE and select your EVENT. (Fig 04)
Note: Every time you press PROG you advance to the next EVENT.
• Press WEEK to select your day/s for your selected EVENT. (Fig 05)
Note: Press WEEK multiple times until you get the day combination you want.
• Press HOUR then MIN to select a time for your selected EVENT. (Fig 05)
○ Press R to clear the display. Press R again to restore the display.
• Press & Hold CLOCK, and Press WEEK to select the current DAY. (Fig 02)
• Press & Hold CLOCK, and Press HOUR to select the current HOUR. (Fig 02)
• Press & Hold CLOCK, and Press MIN to select the current MIN. (Fig 02)
○ DST - DAYLIGHT SAVING TIME
• Press HOUR & MIN simultaneously to activate or deactivate DST. (Fig 03)
Note: A small clock symbol will appear on the far right of the LCD screen, while DST is active.
○ Plug timer in for at least 5 minutes to re-charge before programing.
• Press RESET button (Using a pin), to reset the clock & timer.
○ Note: These steps MUST be taken before initial use, or when the
timer needs to be reset.
○ After setting up your timer, there are 4 operating modes:
• ON - Power is on - Timer is not active. (Fig 06)
• OFF - Power is off - Timer is not active. (Fig 07)
• AUTO - Uses the timer settings you programmed. (Fig 08)
• RANDOM - Adjusts your settings by random 2 minute increments of ± 30 minutes. (Fig 09)
This makes it look as if someone is in the house.
• Press ON/AUTO/OFF to select one of these modes. (Fig 06, 07, 08)
• Press WEEK & HOUR simultaneously to activate or deactivate the RANDOM mode. (Fig 09)
Note: A small hollow circle will appear on the far right side of the LCD screen, while RANDOM mode is active.
05005-SU-Timer Instructions02-flat.indd 205005-SU-Timer Instructions02-flat.indd 2 1/5/2015 11:13:44 AM1/5/2015 11:13:44 AM