
User Manual


Sunnex Inc. is ISO 9001-2000 certified
4
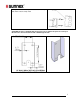
3. Bulb Replacement
1. 50W Halogen MR16 bulb, part#: 32146
2. Lens, part#: 32140
3. O-Ring, part#: 32135
4. Lens Cover, part#: 32141
5. Lens Cover screws T10 Torx head, part#: 32142
1. Unplug lamp from power source and wait at least one hour for lamp to cool.
2. Remove the three small screws (5) and remove the lens (2), o-ring (3) and lens cover (4).
3. Grip bulb (1) and firmly pull straight out from the bulb socket on the lamp back
4. Align the pins of the new bulb with the pin holes in the bulb socket and firmly push the new
bulb straight into socket. Note! Do not touch the halogen bulb with bare fingers as dirt and
oil from hands could cause a fire hazard.
5. Reposition lampshade and components on lamp back. Align the three screw holes in the lamp
back and shade. Reinstall the three screws and securely tighten them.
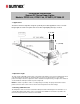
4. Mounting Instructions
4.1 PF Wall (PF2015-44)
Wall Mount - 50W - Plug-in transformer
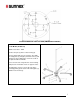
A. Remove the screws in the wall plate (1&2).
B. Remove the wall plate from casing (2)
C. Drill 4 holes (8mm) in alignment with the holes in wall
plate. Make sure plate is leveled. NOTE! Wall plate must
be mounted to wall stud or structural member.
D. Insert the anchors into the holes and attach the wall
plate with the screws provided.
E. Attach wall casing to the wall plate with provided screws.
F. Make sure the wall casing is securely fastened to the
plate and adjust and tighten the arm as needed.