Important Safety Information We thank you for choosing our product. To ensure your safety and health, please use this equipment correctly. Please read the information below carefully before using this equipment. 1. It is important to read this entire manual before assembling and using the equipment. Safe and effective use can only be achieved if the equipment is assembled, maintained and used properly. 2.
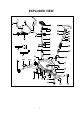
EXPLODED VIEW 2
PARTS LIST No. Qty. No.
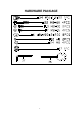
HARDWARE PACKAGE 4
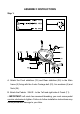
ASSEMBLY INSTRUCTIONS Step 1: A. Attach the Front stabilizer (23) and Rear stabilizer (26) to the Main frame (9) fixing with the 4 sets Carriage bolt (22), Arc-washers (6) and Nuts (24). B. Attach the Pedals(25L/R)to the *left and right side of Crank (11). * IMPORTANT: Left crank has reversed threading; you must screw pedal counter-clockwise to tighten. Failure to follow installation instructions may cause permanent damage to your bike.
Step 2: Fix the Saddle (28) to the Saddle tube (31) with the Nylon nuts (30) and Washers (29).
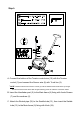
Step 3: A. Connect the bottom of the Tension control wire (10) with the Tension control (3) and connect the Sensor wire (8) with Trunk line (2). *NOTE : Please make sure the Tension control (3) is at the lowest tension level before you begin. This will ensure the wires are at their longest reaching points to make the connection easier. B. Insert the Handlebar post (5) to the Main frame (9) fixing with 4 sets Screws (7) and Arc-washers (6). C.
Step 4: •• A. Connect the Computer wire (1a) with the Trunk line (2). Connect the Computer (1) to the top of Handlebar post (5). B. Fix the Handlebar (20) to the Handlebar post (5) with the Screws (13) and Spring washer (12) and attach the Cover (17). Assembly is complete.