
User Manual


5
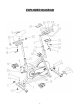
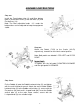
Step four:
Attach the Handlebar (21) to the Handlebar post (6), secured
with Bolts (24), Flat washers (26) and Spring washers (25).
Then, Set the lower Handlebar cover (23) on the square tube
of the Handlebar post (6) in alignment with the four grooves on
the mouth of the lower Handlebar cover (23). When the lower
Handlebar cover (23) slides to the top of the square tube of the
Handlebar post (6); rotate the cover 45 degrees to align with
the Handlebar (21). Use Screws (27) (28) to fix the upper
Handlebar cover (22) to the lower Handlebar cover (23), so
that the Handlebar (21) and Handlebar post (6) are in between
the Handlebar cover pieces (22, 23). Finally, turn and loosen
the L-shaped knob (9), pull the pin, and then insert the
Handlebar (21) assembly into the Main frame (1) section
simultaneously. Make sure the pin settles into the desired hole
and then secure the Knob.
Important:
This machine has equipped with L-shaped knob (9) for saddle & handlebar vertical adjustment.
Loosen the knob a little bit (no need to screw it out), and then pull the knob to adjust the
height.
1. If the L shape knob touches the tube when securing clockwise, please pull down the L shape
knob and turn it counterclockwise, then release it and secure it clockwise. Repeat it several
times until you secure it firmly.
2. If the L shape knob touches the tube when releasing counterclockwise, please pull down the
L shape knob and turn it clockwise, then release it and secure it counterclockwise. Repeat
it several times until you can move the handles to desired position.