rc Bike Sunny Magnetic Exercise SF-B910 IMPORTANT: PLEASE READ THIS MANUAL CAREFULLY BEFORE USING THE BIKE For Customer Service, please contact: support@sunnyhealthfitness.
Important Safety Information Please keep this manuall for future reference.. 1. It is important to read this entire manual before assembling and using the equipment. Safe and effective use can only be achieved if the equipment is assembled, maintained and used properly. It is your responsibility to ensure that all users of the equipment are informed of all warnings and precautions. 2.
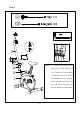
Exploded View b a -2-
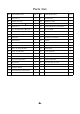
Parts List NO DESCRIPTION QTY NO DESCRIPTION QTY A BOLT M8*73 4 13 TRUNK LINE 1 B DOMED NUT M8 4 14a TENSION CABLE 1 C ARC WASHER ID8.5* 25*R30 4 14b TENSION KNOB 1 D BOLT M8*15 4 15 HANDLEBAR POST ASSEMBLY 1 E ARC WASHER ID8.
Assembly -4-
Step 1: STEP 1:Attach the Front & Back Stabilizer ( 2 & 4) to Main Frame (1) with Bolt (A) , Arc Washer (C) and Domed Nut (B) then tighten them.
Step 2: STEP 2:Attach the Seat (9) to Seat Post (8) with Nylon Lock Nut (28) and Washer (29). Slide the Seat Post Housing(7) on to the Seat Post (8), attach the Seat Post (8) to Main Frame (1) with Seat Post Knob (F) then tighten.
Step 3: a 10 a STEP 3 : Connect the Sensor Wire Connector (11) and Trunk Line (13). Connect the Tension Hook (10) and Tension Cable (14a).Put the Handlebar Post (15) in Main Frame (1), with Front Post Cover (12), and attach with Bolt (D) and Arc Washer (E) and tighten.
Step 4: STEP 4:Connect the Trunk Line (13) to Computer Wire (27), put the Computer (18) on Handlebar Post (15). Attach the Computer (18) to Handlebar Post (15) with Screws (G) and then tighten. Please note note: Screws (G) come preassembled on the computer ; they are not in hardware package.
Step 5: STEP 5:Attach the Handlebar (21) to Handlebar Post (15) with Bolt (I), Arc Washer (E) and Knob (H) then tighten. Insert the Hand Pulse Wire’s (19) circular pin to Computer’s back hole.
Step 6: IMPORTANT IMPORTANT: FAILURE TO FOLLOW PROCEDURES MAY RESULT IN PERMANENT DAMAGE. READ INSTRUCTIONS CAREFULLY BEFORE CONNECTING YOUR PEDALS. STEP 6:Connect the Pedals (L&R) (25) to Pedal Arm (26). To tighten the LEFT pedal, you must screw counter-clockwise. The RIGHT pedal tightens by turning clockwise. Please tighten by hand first, then finish by securing with wrench. RIGHT SIDE LEFT SIDE Note: Riding this bike backwards may loosen the pedals which can damage the threads.
Settings: The lowest magnetic force setting is on level 1 The highest magnetic force setting is on level 8 How to adjust the seat’s height: a. Turn the knob 3-4 rotations to the left to loosen the knob. b. With one hand pull the knob out; use your other hand to move the seat post to the desired place. c. Place the knob in the desired hole and turn it clockwise to tighten.
EXERCISE TIPS Warm up and cool down Stretching routine A successful exercise program consists of a warm-up, aerobic exercise, and a cool-down. Do the entire program at least two to three times a week, resting for a day between workouts. After several months, you can increase your workouts to four or five times per week. Warming up is an important part of your workout, and should begin every session.
5. Calf-Achilles Stretch Lean against a wall with your right leg in front of the left and your arms forward. Keep your left leg straight and your right foot on the floor, then bend your right leg and lean forward by moving your hips toward the wall. Hold, then repeat on the other side for 15 counts. 6. Side Stretch Open your arms to the side and continue lifting them until they are over your head. Reach your right arm as far upward toward the ceiling as you can for one count.