Invert Extend N Go SF-BH6719 USER MANUAL IMPORTANT! Please retain owner’s manual for maintenance and adjustment instructions. Your satisfaction is very important to us, PLEASE DO NOT RETURN UNTIL YOU HAVE CONTACTED US: support@sunnyhealthfitness.com or 1- 877 - 90SUNNY (877-907-8669).
IMPORTANT SAFETY INFORMATION We thank you for choosing our product. To ensure your safety and health, please use this equipment correctly. It is important to read this entire manual before assembling and using the equipment. Safe and effective use can only be achieved if the equipment is assembled, maintained and used properly. It is your responsibility to ensure that all users of the equipment are informed of all warnings and precautions. 1.
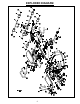
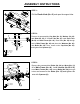
EXPLODED DIAGRAM 2
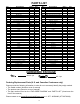
PARTS LIST No. 1 2 3 4 5 6 7 8 9 10 11 12 Description Spec. Description Spec.
ASSEMBLY INSTRUCTIONS STEP 1: Pull the Plastic Knob (No. 41) and open the support tube. STEP 2: 38 36 40 39 Remove the preassembled Cap Nuts (No. 39), Washers (No. 40) and Bolts (No. 38) off of Front Tube (No. 36). Install Front Tube (No. 36) onto Main Frame (No. 44). Insert Bolts (No. 38) through hole in Main Frame (No. 44) and place the Washers (No. 40) onto Bolts (No. 38). Then, screw on the Cap Nuts (No. 39) and tighten with Spanner (A).
STEP 4: Remove the preassembled Bolts (No. 11) and Nuts (No. 12) off of Support Tube (No. 10). Install Support Tube (No. 10) onto Main Frame (No. 44). Insert Bolts (No. 11) through holes and screw on the Nuts (No.12) and tighten the nuts with Spanner (A). 11 10 12 44 #11 M8 2pcs #12 M8 2pcs #A STEP 5: Assemble the 2 Connecting Tubes (No. 9) and 4 Sponges (No. 2). 9 9 2 2 2 2 STEP 6: 1 2 4 6 2 Remove the Pin (No. 4) from the hardware package and assemble Hook Bar (No. 1) into the Hook Tube (No.
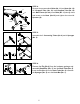
STEP 7: Assemble the 2 Handles (No. 46) into the Handle Connect Tubes (No. 45) and assemble 2 Sponges (No. 71) onto Handles (No. 46).
OPERATION INSTRUCTIONS Hold the knob and pull back and forth to extend the bench. Press the handle and hold to retract the bench.
ADJUSTMENT GUIDE ADJUSTING THE BALANCE Before using the product, check the balance of the product to ensure that it is safe for use. Put the product on a flat, even surface. If you find that the product is slightly uneven, you may adjust the product to compensate for uneven ground. To do so, rotate the end caps on the stabilizers until they're even with the surface. Please refer to the drawing below. Please adjust the end caps if there is a slight imbalance problem caused by uneven ground.
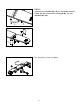
FOUR LEVELS FOR HOOK TUBE Pull the pin, there are four levels can be adjusted. ADJUSTING THE SUPPORT TUBE Turn knob to loosen. Pull knob to release and set the support tube at your desired level. Insert the knob again and turn to tighten. 9 Version 1.