Sunny Folding Recumbent Bike SF-RB1202 Assembly & User Manual Please read this manual carefully before attempting to assemble or use your new product, and retain for future use. For Customer Service, please contact: support@sunnyhealthfitness.
Before you Start Tools If required, most of our products are supplied with basic tools, which will enable you to successfully assemble your product. However, you may find it benefical to have a soft-headed hammer and perhaps an adjustable spanner handy as this may help. Prepare the Work Area It is important that you assemble your product in a clean, clear, uncluttered area.
Safety Before you undertake any program of exercise that will increase cardiovascular activity please be sure to consult with your doctor. Frequent strenuous exercise should be approved by your doctor and proper use of your product is essential. Please read this manual carefully before commencing assembly of your product or starting to exercise. *Please keep all children away from exercise product when in use. Do not allow children to climb or play on them when they are not in use.
Exercising Information Beginning How you begin to exercise will vary from person to person. If you have not exercised for a long period of time, have been inactive for a while, or are severely overweight you must start slowly, increasing your exercise time gradually, by perhaps only a few minutes for each session per week.
Exercising Information Warm Up A successful exercise program consists of three parts, Warm Up, Aerobic Exercise and Cool Down. Never start a training session without warming up. Never finish one without cooling down correctly. Perform between five and ten minutes of stretching before starting your workout to prevent muscle strains, pulls and cramps. Aerobic Exercise Session Those new to exercise should exercise no more than every other day to start with.
Exercising Information Cool Down To decrease fatigue and muscle soreness, you should also cool down by walking at a slow relaxed pace for a minute or so, to allow your heart rate to return to normal. Warm Up and Cool Down Exercise Hold each stretch for a minimum of ten seconds and then relax. Repeat each stretch two or three times. Do this before your Aerobic Exercise session and also after you have finished.
Exercising Information Side Stretch Open both arm to the side and gently lift them above your head. Reach your right arm as high as you can for one count, gently stretching the muscles of the stomach and lower back. Repeat the action with your left arm. Repeat 3 - 4 times. Inner Thigh Stretch Sit on the floor and pull your legs toward your groin, the soles of your feet together. Hold your back straight and lean forward over your feet. Tighten the thigh muscles and hold for 5 seconds.
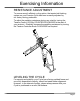
Exercising Information RESISTANCE ADJUSTMENT To ensure smooth efficient cycling action, the tension belt braking system on your Exercise Cycle has been correctly adjusted by our factory during production. To adjust the pedaling resistance during use, start by turning the Tension Control (32) fully COUNTER-CLOCKWISE at the start of your workout. Gradually increase the pedalling resistance by turning the Tension Controller Knob CLOCKWISE as required.
Assembly & Adjustments EXERCISE MONITOR FUNCTIONS The 6 function Exercise Monitor is set to start automatically when you begin to cycle. However, it is possible to switch on the monitor by pressing the Mode Button at the bottom of the monitor. To save battery consumption, the monitor will also switch off after it has been idle for approximately four minutes. Please refer to the leaflet supplied with the Exercise Monitor for all operational functions.
Assembly ACCESSORY FITMENT LIST These are all the accessories you will need to complete the assembly of your product. The following accessories are supplied in a pack and should be checked before attempting assembly.
Assembly & Adjustments 1. Unfold the Main Frame (1), Lock into position using 1 x Locking Pin (15). Connect the Front Stabilizer (2) to the Main Frame (1) with 2 x M8*65 mm Carriage Bolts (11), 2 x M8 Curved Washers (12), 2 x M8 Spring Washers (13) and 2 x M8 Dome Nuts (14). Repeat for the Rear Stabilizer (3) and tighten all Nuts and Bolts securely. 11 12 13 15 14 1 14 13 12 3 1 13 12 2 11 2. Assemble the Pedals *(Left and Right)(10) to the Pedal Crank (28 and 27) *(See note).
3. Connect the Supporting T ube (20) to the Main Frame (1) with 1 x M8* 4 0 mm Allen Bolt (22), 1 x M8 Flat Washer (23), and 1 x M8 Nylon Nut (31). 31 Connect the other side of Supporting Tube (20) to 23 the Main Frame (1) using the Ball Head Bolt (19). 22 20 19 1 5 7 17 4. Connect the Backrest Stem Support (6) to the 8 30 26 6 23 14 23 13 24 29 1 21 Saddle Support (29) with 2 x M8*35 mm Carriage Bolts (26), and 2 x M8 Flat Washers (23), and 2 x M8 Spring Washers (13), and 2 x M8 Dome Nuts (14).
5. Connect the Handlebar (4) to the Backrest Stem Support (6) using 2 x M8 Curved Washers (12), 2 x M8 Spring Washers (13), and 2 x M8*35 mm Allen Bolts (25). Next attach the Exercise Monitor (9) to the Main Frame (1) with the Flat Bolts (18).* Connect the Sensor Wire (16) and Exercise Monitor (9) together. 6 4 12 13 9 25 16 1 18 * NOTE Flat Bolts (18) come preassembled on the monitor. Simply remove them from the monitor. Then use them to attach monitor to the Main Frame (1). 6.
Exploded Diagram 5 7 8 17 26 30 23 24 6 23 29 14 12 13 14 21 4 19 31 23 32 9 22 20 18 16 11 33 12 13 3 14 10L 28 15 1 14 13 12 27 34 13 12 10R 2 11 Page 13
PARTS LIST PART NO.
23 24 25 26 27 28 29 30 31 32 33 34 Flat Washer(8*16*1.2) M8*15mm Allen Bolt M8*35mm Allen Bolt M8*35mm Carriage Bolt Left Crank Right Crank Saddle Support Flat Washer(6*16*1.