POWERSYNC SELF-POWERED RECUMBENT BIKE SF-RB4880 USER MANUAL IMPORTANT! Please retain owner’s manual for maintenance and adjustment instructions. Your satisfaction is very important to us, PLEASE DO NOT RETURN UNTIL YOU HAVE CONTACTED US: support@sunnyhealthfitness.com or 1-877-90SUNNY (877-907-8669).
IMPORTANT SAFETY INFORMATION We thank you for choosing our product. To ensure your safety and health, please use this equipment correctly. It is important to read this entire manual before assembling and using the equipment. Safe and effective use can only be achieved if the equipment is assembled, maintained and used properly. It is your responsibility to ensure that all users of the equipment are informed of all warnings and precautions. 1.
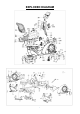
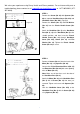
EXPLODED DIAGRAM 3
HARDWARE PACKAGE #26 M8x90 2PCS #20 D8xΦ20 2PCS #48 M6X40 4PCS #49 D6X1.2XΦ16 4PCS #24 ST4.2X18 3PCS #34 D8XΦ13X1.5 1PC #33 1PC #97 S=6 1PC #96 S=5 1PC #32 1PC #98 S=10,13,14,15,17 1PC Ordering Replacement Parts (U.S.
PARTS LIST NO. Description Spec. Qty. NO. Description Spec. Qty. 1 Main Frame 1 35 Foam Grip 2 2 Front Stabilizer 1 36 Pulse Extension Wire 1 2 3 Rear Stabilizer 1 37 Pulse Extension Wire 2 2 4 Handlebar Post 1 38 Meter 1 5 Handlebar 1 39 Axle 1 6 Nylon Nut M8 6 40 Screw 7 Flat Washer D8XΦ16X1.
NO. 69 Description Spec. Axle Spring Washer Qty. NO. Description Spec. Qty. 1 85 Handle Bracket 1 2 86 Big Alloy Sleeve 1 1 87 Upper Holder Block 1 70 Bearing 71 Nylon Nut 72 Belt Pulley 1 88 Idler Wheel 1 73 Center Axle 1 89 Axle Spring Washer 1 74 Belt 1 90 Eccentric Wheel 1 75 Small Belt Pulley 1 91 Nylon Nut 76 Sensor 1 92 Wheel 4 77 Cushion 2 93 Wheel Sleeve 4 1 pr.
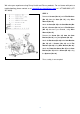
ASSEMBLY INSTRUCTIONS We value your experience using Sunny Health and Fitness products. For assistance with parts or troubleshooting, please contact us at support@sunnyhealthfitness.com or 1-877-90SUNNY (877907-8669). STEP 1: Attach the Lifting Handle (No. 27) to the Rear Stabilizer (No. 3) with 2 Bolts (No. 26) and 2 Arc Washers (No. 20) using Allen Wrench (No. 97). Remove 2 Shipping Tubes (A), 4 Bolts (No. 13), 4 Spring Washers (No. 14) and 4 Arc Washers (No. 15) from the Main Frame (No.
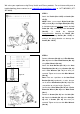
We value your experience using Sunny Health and Fitness products. For assistance with parts or troubleshooting, please contact us at support@sunnyhealthfitness.com or 1-877-90SUNNY (877907-8669). STEP 3: Remove the Screw (No. 24) with Spanner (No. 98) to separate Handlebar Cover (No. 25a) and Handlebar Cover (No. 25b). (Figure A) Figure A Remove the Sleeve (No. 33) and Flat Washer (No. 34) from the Plastic Handle Screw (No. 32). Attach the Handlebar (No. 5) to the Handlebar Post (No.
We value your experience using Sunny Health and Fitness products. For assistance with parts or troubleshooting, please contact us at support@sunnyhealthfitness.com or 1-877-90SUNNY (877907-8669). STEP 5: Attach the Pedals (No. 18L/R) to Cranks (No. 17L/R). NOTE: Make sure to attach Right Pedal (No. 18R), marked (R), to the Right Crank (No. 17R). It should be tightened clockwise. Attach the Left Pedal (No. 18L), marked (L), to the Left Crank (No.17L). It should be tightened counterclockwise.
We value your experience using Sunny Health and Fitness products. For assistance with parts or troubleshooting, please contact us at support@sunnyhealthfitness.com or 1-877-90SUNNY (877907-8669). STEP 7: Remove 4 Screws (No. 19) and 4 Flat Washers (No. 43) from the Seat (No. 54) using Allen Wrench (No. 97). Attach the Seat (No. 54) to the Seat Bracket (No. 50) with 4 Screws (No. 19) and 4 Flat Washers (No. 43) that were just removed, using Allen Wrench (No. 97). Remove the Screw (No.
ADJUSTMENTS & USAGE GUIDE ADJUSTING THE SEAT POSITION To move the Seat (No. 54) forward or backward, while seated on the bike, put your feet on the floor. Pull the Handle (No. 41) towards you. Move the Seat (No. 54). Push the Handle (No. 41) forward to secure. ADJUSTING THE HANDLEBAR To move the Handlebar (No. 5) forward or backward, loosen the Plastic Handle Screw (No. 32). Adjust the Handlebar (No. 5) to a suitable position, and tighten the Plastic Handle Screw (No. 32) to secure.
MOVING THE BIKE Lift the bike by the Lifting Handle (No. 27) until the Wheels (No. 8) on the Front Stabilizer (No. 2) touch the floor. Now you can move the bike. OPERATING INSTRUCTIONS The Powersync Self-Powered Recumbent Bike can generate its own power. When you pedal the bike, it generates power to power the meter and charge a device. The first time you use the bike or if you have not used the bike in a while, you have to pedal for about 5 minutes before there is enough power for the meter to display.
EXERCISE METER DISPLAY FUNCTIONS ITEM TIME DESCRIPTION Count up - No preset target, time will count up from 00:00 to 99:59. Count down - If training with preset time, time will count down from preset value to 00:00. Each preset increment or decrement is 1 minute between 00:00 to 99:00. SPEED Displays current training speed. Display range 0.0~99.9 KM/H or ML/H. RPM Displays the Rotation Per Minute. Display range 0~999 revolutions. DISTANCE Accumulates total distance from 0.00 to 99.99 KM or ML.
KEY FUNCTION ITEM DESCRIPTION Increase resistance level by turning the button clockwise. Select setting. Decrease resistance level by turning the button counter clockwise. + - Select setting. Mode In stop mode, press to confirm all setting or selection and enter program. Reset Press and hold for 2 seconds, meter will reboot and start from user setting. In stop mode, press to go back to main menu. Start/ Stop Start or stop workout. Recovery Test heart rate recovery status.
Drawing 7 Drawing 8 Drawing 9 Beginner Mode 1. 2. 3. 4. 5. Press START/STOP in any mode, then press RESET go to main menu. When MANUAL is flashing, use + or - to select workout program, choose Beginner Mode and press MODE to confirm (Drawing 13). Use + or - to select Beginner program 1~4 and press MODE to confirm (Drawing 14). Use + or - to set TIME. Press START/STOP key to start workout. Use + or - to adjust resistance level during workout. Press START/STOP key to stop workout.
Drawing 15 Drawing 17 Drawing 18 Cardio Mode 1. Press START/STOP in any mode, then press RESET go to main menu. When MANUAL is flashing, use + or - to select workout program, choose cardio and press MODE to confirm (Drawing 19). 2. Use + or - to set Age (Drawing 20, default: 25, range: 1-99), then press MODE to go to different CARDIO program selection. 3. Use + or - to select CARDIO 55%, 75%, 90% or TAG (Drawing 21, default: 100), and press MODE to confirm.
Drawing 23 Drawing 24 Drawing 25 RECOVERY After exercising for a period, keep holding pulse sensors and press RECOVERY key. All function display will stop except “TIME” starts counting down from 00:60 to 00:00 (Drawing 25). Screen will display your heart rate recovery status with the F1, F2…. to F6. F1 is the best, F6 is the worst (Drawing 26). User may keep exercising to improve the heart rate recovery status. Press the RECOVERY key again to return the main display. Drawing 25 Drawing 26 BODY FAT 1.
Drawing 31 Drawing 32 5. During personal profile setting, you can press RESET to correct setting. Press BODY FAT key again to go back to previous workout status. ※ Error code display during measurement: E-1--- user not hold pulse sensors correctly (Drawing 33) E-4--- Body Fat% exceed setting range 5.0%~ 50% (Drawing 34) Drawing 33 Drawing 34 KILOMETERS OR MILES 1. In stop mode, using three fingers, press MODE, START/STOP, RESET sequentially and hold at the same time for a few seconds. 2.
TROUBLESHOOTING NO. POTENTIAL REASONS SOLUTIONS 1 LCD no display. 1. Check the meter together with the stage’s 9 or 12 PIN connect cable, to see if the meter has bad contact or get loose with the stage’s 9 or 12 PIN connect cable. 2. Check if the DC JACK 3PIN connect cable are loose or not. 2 No alteration of resistance 1. When the LOAD/LEVEL is up or down, see if the motor is running or not. 2.