Magnetic Recumbent Bike Model No. SF-RB925 For Customer Service, please contact: support@sunnyhealthfitness.
IMPORTANT SAFETY INFORMATION 1. Before you start your exercise, read the manual carefully and also keep this manual for future reference. 2. Before beginning any exercise program you should consult your doctor first to determine if you have any medical or physical conditions that could put your health and safety at risk. Your doctor’s advice is essential if you are taking medication that affects your heart rate, blood pressure or cholesterol level. 3. Be aware of your body’s signals.
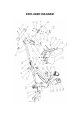
EXPLODED DIAGRAM 3
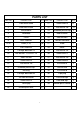
PARTS LIST PART NO. DESCRIPTION QTY PART NO. DESCRIPTION QTY 1 Front main frame 1 21 Screw M8x16 12 2 Rear main frame 1 22 Flat washer D8 14 3 Seat bracket 1 23 Quadrate plastic cap 2 4 Handlebar 1 24 Back cushion 1 5 Crank 1 25 Seat cushion 1 6 Rear stabilizer 1 26 Tension controller 1 7L/R Pedal (L/ R) 1/pr 27 Knob 1 8 Front stabilizer 1 28 Meter 1 9 Carriage bolt M8xL73 4 29 Flat washer D4 2 10 Arc washer Φ8.
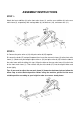
ASSEMBLY INSTRUCTIONS STEP 1: Attach the front stabilizer (8) to the front main frame (1), and the rear stabilizer (6) to the rear main frame (2), respectively with carriage bolts (9), flat washers (10), and acorn nuts (11). STEP 2: A: Connect the pulse wires a (33) with pulse wires b (35) together. B: Loosen the knob (27) and pull it upward; then insert the rear main frame (2) to the front main frame (1).
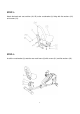
STEP 3: Attach the back and seat cushion (24, 25) to the seat bracket (3) fixing with flat washers (22) and screws (21). STEP 4: Install the seat bracket (3) onto the rear main frame (2) with screws (21) and flat washers (22).
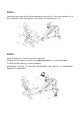
STEP 5: Connect the pulse wires b (35) with the handle pulse wire (20) first. Then fix the handlebar (4) to the seat bracket (3) with carriage bolts (16), washers (22) and acorn nuts (11). STEP 6: Attach the pedals (7L/ 7R) to the crank (5) respectively. To tighten the LEFT pedal; you must screw counter-clockwise; it is reversed threaded. The RIGHT pedal tightens by screwing clockwise. IMPORTANT: FAILURE TO FOLLOW PROCEDURES MAY RESULT IN PERMANENT DAMAGE TO YOUR BIKE.
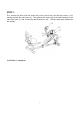
STEP 7: First, connect the wires from the meter (28) to the sensor wire (34) and pulse wires a (33) coming out from the main frame (1). Then connect the meter (28) to the meter bracket on the front main frame (1) with screws (30) and flat washers (29). (Screws come preassembled on the monitor) Installation is complete.
WARM-UP AND COOL-DOWN A successful exercise program consists of a warm-up, aerobic exercise, and a cool-down. Do the entire program at least two and preferably three times a week, resting for a day between workouts. After several months, you can increase your workouts to four or five times per week. WARM-UP PHASE The purpose of warming up is to prepare your body for exercise and to minimize injuries. Warm up for two to five minutes before strength-training or aerobic exercising.