
Instructions / Assembly

Item No. EOS Easy Open Fire Pit Screen
* Do not discard any of packaging until you have checked that you have all parts.
* Keep children away during assembly. This item contains small parts which can be swallowed by children.
* Retain the assembly instructions for future reference.
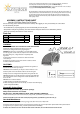
Parts list:
NO. Parts Qty. NO. Hardware Qty.
A1 Inner mesh Screen 1 T
Bolts (1/4" x 5/8")
4
A2
Outer mesh Screen
1
U
Washer
4
H
Handle
2
V
Nut
4
Y
Wrench
1
WARNING:
1.FOR OUTDOOR USE ONLY! NEVER LEAVE FIRE UNATTENDED!
2.Supervise children and pets when the fire pit is in use.
3.The fire pit is designed for cooking or grilling food.
ASSEMBLY INSTRUCTIONS SHEET
Prior to assembly, please read these instructions carefully. We suggest you carry out assembly on a soft surface
to avoid scratching the paint.
Thank you for choosing Sunnydaze Decor. If you have any questions, comments or
concerns please feel free to contact us by phone at: 888-881-4668, by
email:customerservice@serenityhealth.com, or you could also email us via our contact
us page at: www.SerenityHealth.com/contact_us.php.
We stand behind our brand and the quality of the items we sell. We will send new parts, or
replace products at our discretion within the one year warranty period. Before we can help,
you will need to provide proof of purchase with the date of purchase and photos of the
defective merchandise. We will use the photos to determine the cause of defect and for
future quality control.
pg ggg
5. Keep flames small and no more than 3" above the surface
of the stone
p
it.
6. Please
p
ut a raincover cover on this screen or take it to indoo
r
In order to extend the service lif
e
CAUTIONS:
2.Do not touch the outside of your fire pit or screen while it is in use.
3.Use the poker to move the handle of the fire screen during use.
4.Always have a fire extinguisher handy before, during and after use.
6.Do not use in inclement weather.
7. Allow handle(s) to cool before touching them.
8. When removing the screen from the fire pit, use caution to avoid swinging
parts. Lift by both handles.
Assembly Instructions:
Tools required: Hex wrench (Y) provided in package.
Phillips head screwdriver not included.
DO NOT FULLY TIGHTEN THE BOLTS UNTIL STEP 3 BELOW IS COMPLETE.
Care And Maintenance:
1.To maintain the finish, clean the surface by using a soft cloth. Do not use a metal brush.
5.Do not extinguish your fire pit with water. The water cause distortion,
rust or flaking paint. Use fire extinguisher or allow attended fire to die
out on it’s own.
1.Attach the handle (H) to Outer mesh screen(A1) using 2 bolts (T),2 Washers (U) and two nuts (V).
2.Attach the handle (H) to Inner mesh screen(A2) using 2 bolts (T),2 Washers (U) and two nuts (V).
4.DO NOT use this unit on a wood deck or on combustible surface
such as dry grass, leaves,mulch,etc,and place it no closer than 6 feet
from walls during use, or larger distance if required by local
regulations.
1.Burn only wood or charcoal in the fire pit. DO NOT use gasoline or
kerosene to start the fire in your fire pit.
1
.
To
maintain
the
finish
,
clean
the
surface
by
using
a
soft
cloth
.
Do
not
use
a
metal
brush
.
3. Please use a raincover to cover the screen after screen chill-down, do not make the screen touch the rain.
2.If metal is scratched, the mesh screen may need touch up painting. Ask your local paint store representative which paint is best for
your type of fire pit. To prevent rusting, coat the exposed surface immediately.