STANDARD FIXED SKYLIGHT INSTALLATION GUIDE 6201 27TH STREET SACRAMENTO, CA 95822 U.S.A 800.289.4700 TOLL FREE 916.395.4700 PHONE 916.395.9204 STANDARD FIXED SKYLIGHT INSTALLATION GUIDE © SUNOPTICS 2011 Rev.
STANDARD FIXED SKYLIGHT Parts List 1. #12 x 1-1/2” Hex Washer Head Screw (1 per installation hole) 2. Sunoptics Fixed Skylight Thank You for Purchasing our High Performance Prismatic Daylighting System 1. Caution: Handle Unit with Care. Insure the inside of the unit is clear of debris throughout the installation process. 2. Verify all materials are on site, and available for installation. 3.
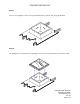
STANDARD FIXED SKYLIGHT Step 1 Insure that skylight curb is of required dimension, square and properly flashed. Step 2 Set skylight over prepared curb making sure there is equal clearance on all four sides. STANDARD FIXED SKYLIGHT INSTALLATION GUIDE © SUNOPTICS 2011 Rev.
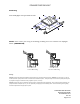
STANDARD FIXED SKYLIGHT Final Step Attach Skylight with provided Screws. NOTE: drive screws just snug to the flange, making sure not to distort the skylight frame. (SEE BELOW) Correct Mounting Incorrect Mounting Warning: Sunoptics recommends professional installation of the skylights by a competent licensed contractor. Sunoptics is not an insurer of, or for any Contractor/Installer of its products and has no control over the installation process.