WINDOW/WALL TYPE WINDOW AIR CONDITIONER WA-60FMS1: 6,000 BTU WA-80FMS1: 8,000 BTU WA-10FMS1: 10,000 BTU WA-12FMS1: 12,000 BTU MULTI-STEP SPEED ELECTRONIC CONTROL TABLE OF CONTENTS Important Safety Instructions ..........................1-3 Installation Instructions .................................... 4-8 Normal Sounds .................................................9 Air Conditioner Features ..............................10-11 Care and Cleaning ......................................
IMPORTANT SAFETY INSTRUCTIONS READ THIS MANUAL Inside you will find many helpful hints on how to use and maintain your air conditioner properly. Just a little preventive care on your part can save you a great deal of time and money over the life of your air conditioner. You'll find many answers to common problems in the chart of troubleshooting tips. If you review our chart of Troubleshooting Tips first, you may not need to call for service at all.
IMPORTANT SAFETY INSTRUCTIONS CAUTION Do not situate a pet or house plant where it will be exposed to direct air flow. This could injure the pet or plant. When removing and cleaning the filter, be cautious of sharp edges and corners. It may cause an injury. Do not clean the air conditioner with water or spray bottle. Do not use strong detergent such as wax or thinner to clean the unit. Appearance may be deteriorated due to change of product color or scratching of its surface.
IMPORTANT SAFETY INSTRUCTIONS WARNING NOTE: The power supply cord with this air conditioner contains a current detection device designed to reduce the risk of fire. Please refer to the section Operation of Current Device for details.In the event that the power supply cord is damaged,it cannot be repaired-it must be replaced with a cord from t he manufacturer. WARNING Avoid fire hazard or electric shock. Do not use an extension cord or an adaptor plug. Do not remove any prong from the power cord.
INSTALLATION INSTRUCTIONS CAUTION BEFORE YOU BEGIN Do not, under any circumstances, cut or remove the third (ground) prong from the power cord. Read these instructions completely and carefully. IMPORTANT- Save these instructions for local inspector s use. IMPORTANT- Observe all governing codes and ordianaces. Note to Installer- Be sure to leave these instructions with the Consumer. Note to Consumer- Keep these instructions for futrue reference.
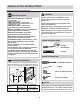
INSTALLATION INSTRUCTIONS 1 C: Align screw openings on the top rail to those on the top of the unit. Fig.B PREPARE THE WINDOW Side and rear of unit needs to be clear of obstacles to allow airflow through condenser. The rear of the unit must be outdoors, not inside a building or garage. Fig.B Mounting Hardware 3/4 (or 1/2 ) Screws (7) Foam Weather Lock Frame Sash Lock window seal stripping (1) (2) (1) (10 *3/4 *1/12 ) (5) D: Secure top rail to the unit with the 3/8" Screws. Fig.C. Fig.
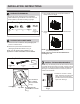
INSTALLATION INSTRUCTIONS B. Slide the free end "I" section of the panel directly into the cabinet as shown in Fig. 2. Slide the panel down. Be sure to leave enough space to slip the top and bottom of the frame into the rails on the cabinet. 4 SECURE THE ACCORDION PANELS A. With a firm grip on the air conditioner, carefully place the unit into the window opening. The bottom of the air conditioner frame should sit against the window sill (Fig.5). Carefully bring the window down behind the top rail.
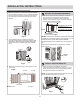
INSTALLATION INSTRUCTIONS B. Drive 3/4" (19mm) or 1/2" (12.7mm) locking screws through frame holes into window sash (Fig.8). Fig.8 C. To secure lower sash in place, attach right angle sash lock with 3/4" (19mm) or 1/2" (12.7mm) screw as shown in Fig. 9. 1 1 2 2 3 4 5 3 6 7 4 8 9 10 5 11 12 6 13 14 15 16 17 Measure the inner width of the side curtain Fig.11 Fig.9 D. Cut foam window seal and insert it into the space between the upper and lower sashes. Fig. 10. FOAM SEAL or Fig.
INSTALLATION INSTRUCTIONS 7 INSTALL WEATHER STRIPPING If AC is Blocked by Storm Window Add wood as shown in Fig.15, or remove storm window before air conditioner is installed. Installing the weather strip will minimize air leaks between the air conditioner and window opening. Trim the weather strip to the proper length, peel off the protective backing and insert into any gaps and openings. Fig 14. If Storm Window Frame must remain, be sure the drain holes or slots are not caulked or painted shut.
NORMAL SOUNDS High Pitched Chatter High efficiency compressors may have a high pitched chatter during the cooling cycle. Vibration Unit may vibrate and make noise because of poor wall or window construction or incorrect installation. Sound of Rushing Air At the front of the unit, you may hear the sound of rushing air being moved by the fan Pinging or Switching Droplets of water hitting condenser during normal operation may cause pinging or switching sounds.
AIR CONDITIONER FEATURES SLEEP FEATURE: TO SELECT THE OPERATING MODE: Press Sleep button to initiate the sleep mode. The unit will operate at the set temperature for 30 minutes and proceed to increase temperature by 2°F. After another 30 minutes, unit will again increase temperature by 2°F. This new temperature will be maintained for 6 hours then return to the originally set temperature. This ends the Sleep mode and unit will continue to operate as originally programmed.
AIR CONDITIONER FEATURES DISPLAYS: ADDITIONAL THINGS YOU SHOULD KNOW Temp Temp Timer Timer Now that you have mastered the operating procedure, here are more features in your control that you should become familiar with. The Cool circuit has an automatic 3 minute time delay when unit is turned off and on quickly.This protects the compressor from overheating and possible circuit breaker tripping. The fan will continue to run during this time.
CARE AND CLEANING Cabinet Cleaning Winter Storage Be sure to unplug the unit to prevent shock or firehazard. The cabinet and front may be dusted with an oil-free cloth or wipe with a cloth dampened in a warm water and mild detergent solution. Wipe clean and dry thoroughly. Never use harsh cleaners, wax or polish on the cabinet front. Be sure to wring excess water from the cloth before wiping the controls. Water in or around the controls may cause damage to the air conditioner.
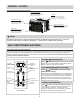
Fea tures of remote control 1. ON/OFF Button: Push this button to start operation, push again to stop operation. NOTE: unit automatically initiates Energy Saver function when operating under Cool, Dry and AUTO modes. AU TO C LOC K SET TEMP . E ON F O FF 2. MODE Select Button: Press to select desired operation mode: AUTO COOL - DRY - FAN. FAN SP EED 1 2 MODE FAN ENER GY SAVER 8 TIM ER 3 9 CAN C EL 4 5 6 7 F OLL OW ME R ES ET LOCK SL EEP 10 CLOCK 11 12 LED 13 3.
* !0 7 , ! ++ SETTING THE CLOCK A UTO C LOC K Before you start operating the air conditioner, set the clock on the remote controller. The clock panel on the remote controller will display time regardless if air conditioner is in use or not. SE T TE MP . F Initial Setting of the Clock After batteries are inserted in the remotecontroller, the clock panel will display "12:00".Press and hold the CLOCK button for 3 seconds, display will begin to flash. 1. Press UP/DOWN buttons to set time.
TIMER OPERATION 1. Press TIMER button and remote will display 0.0 and either TIMER ON or TIMER OFF indicator will flash. 2. Press the UP/DOWN button to set desired time. Press or hold the button to set time in 0.5 hour increments, up to 10 hours; then in 1 hour increments up to 24 hours. The set time will register 3 seconds after setting. Once set, the TIMER ON or TIMER OFF indicator on the display panel will be illuminated. SE T T EMP. F ON OF F Canceling 3.
$ /" . ) ' 0 3 0 . , 0 % 8 , % , , % 0 .
1 M , % % + . 7 , . , % , 3 . + % , ' , ' +4 , . ' 6 A . + S % , A 5 , + % . 2 % 0 A , . . + 0 % , % % S %3 % % + , : % A , .