Quickie T45 User Instruction Manual & Warranty SUPPLIER: THIS MANUAL MUST BE GIVEN TO THE RIDER OF THIS WHEELCHAIR. RIDER: BEFORE USING THIS WHEELCHAIR READ THIS ENTIRE MANUAL AND SAVE FOR FUTURE REFERENCE.
I. INTRODUCTION SUNRISE LISTENS Thank you for choosing a Quickie wheelchair. We want to hear your questions or comments about this manual, the safety and reliability of your chair, and the service you receive from your supplier. Please feel free to write or call us at the address and telephone number below: Sunrise Healthcare Group Mobility Products Division Customer Service Department 7477 East Dry Creek Parkway Longmont, CO 80503 (303) 218-4500 Let us know your address.
I I . TA B L E OF CONTENTS 1. INTRODUCTION .............................................................................. a. Sunrise Listens ...................................................................................... 11. TABLE OF CONTENTS .................................................................. III. YOUR CHAIR AND ITS PARTS ................................................ IV. NOTICE - READ BEFORE USE .................................................. a.
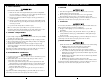
I I I . YO U R CHAIR AND ITS PA RT S I I I . YO U R CHAIR Weight 75 lbs. 8 1 Rear Wheels Type: Std - mag Sizes: Std - 16”, Opt - 20” Tires: Std - pneumatic Opt - 20” pneumatic with airless insert, full-profile polyurethane Tilt Mechanism Std - std (90 pound assist) Opt - heavy-duty (135 pound assist) 3 Solid Back/Seat 24” back height 4 5 11 6 12 14 13 15 7 16 17 Wheel Locks Std - wheel locks Backrest Std: fixed/adjustable Opt: reclining, stroller handles 10 Quickie T45 1.
I V. N O T I C E — R E A D BEFORE USE A. CHOOSE THE RIGHT CHAIR & SAFETY OPTIONS Sunrise provides a choice of many wheelchair styles to meet the needs of the wheelchair rider. However, final selection of the type of wheelchair, options and adjustments rests solely with you and your health care advisor. Choosing the best chair and set-up for your safety depends on such things as: 1. Your disability, strength, balance and coordination. 2.
V. G E N E R A L WA R N I N G S E. SAFETY CHECKLIST WA R N I N G S H. TERRAIN Before Each Use Of Your Chair: 1. Make sure the chair rolls easily and that all parts work smoothly. Check for noise, vibration, or a change in ease of use. (They may indicate low tire pressure, loose fasteners, or damage to your chair). 2. Repair any problem.Your authorized supplier can help you find and correct the problem. 3. Check to see that both quick-release rear axles are locked.
V. G E N E R A L WA R N I N G S K. WHEN YOU NEED HELP V I . WA R N I N G S : FA L L S & TIP-OVERS A. CENTER OF BALANCE For The Rider: Make sure that each person who helps you reads and follows all warnings and instructions that apply. For Attendants: 1. Work with the rider’s doctor, nurse or therapist to learn safe methods best suited to your abilities and those of the rider. 2. Tell the rider what you plan to do, and explain what you expect the rider to do.
V I . WA R N I N G S : FA L L S & TIP-OVERS C. WHEELIES & TIP-OVERS E. REACHING OR LEANING Doing a “wheelie” means: balancing on the rear wheels of your chair, while the front casters are in the air. It is dangerous to do a "wheelie" as a fall or tip-over may occur. However, if you do it safely, a “wheelie” can help you overcome curbs and obstacles. 1. Consult your doctor, nurse or therapist to find out if you are a good candidate to learn to do a “wheelie.” 2.
V I . WA R N I N G S : FA L L S & TIP-OVERS G. RAMPS, SLOPES & SIDE HILLS Riding on a slope, which includes a ramp or side hill, will change the center of balance of your chair.Your chair is less stable when it is at an angle. Anti-tip tubes may not prevent a fall or tip-over. 1. Do not use your chair on a slope steeper than 10%. (A 10% slope means: one foot in elevation for every ten feet of slope length.) 2. Always go as straight up and as straight down as you can.
V I . WA R N I N G S : FA L L S & TIP-OVERS V I I . WA R N I N G S FOR SAFE USE J. STAIRS 1. NEVER use this chair on stairs UNLESS you have someone to help you. Doing so is likely to cause a fall or tip-over. 2. Persons who help you should read and follow the warnings “For Attendants” (p. 12), and the “For Safe Use” (Section VII). If you fail to heed these warnings damage to your chair, a fall, tip-over or loss of control may occur and cause severe injury to the rider or others. K.
V I I . WA R N I N G S FOR SAFE USE C. CLIMBING A CURB OR SINGLE STEP Follow these steps to help the rider climb a curb or single step going FORWARD: 1. Stay behind the chair. 2. Face the curb and tilt the chair up on the rear wheels so that the front casters clear the curb or step. 3. Move forward, placing the front casters on the upper level as soon as you are sure they are past the edge. 4. Continue forward until the rear wheels contact the face of the curb or step.
V I I I . WA R N I N G S : C O M P O N E N T S & OPTIONS A. ANTI-TIP TUBES (Optional) & OPTIONS D. FASTENERS Anti-tip tubes can help keep your chair from tipping over backward in most normal conditions. 1. Sunrise Recommends Use Of Anti-Tip Tubes: a. UNLESS you are a skilled rider of this chair and are sure you are not at risk to tip over. b. Each time you modify or adjust your chair.The change may make it easier to tip backward.
V I I I . WA R N I N G S : C O M P O N E N T S & OPTIONS G. POSITIONING BELTS (Optional) Use positioning belts ONLY to help support the rider’s posture. Improper use of these belts may cause severe injury to or death of the rider. 1. Make sure the rider does not slide down in the wheelchair seat. If this occurs, the rider may suffer chest compression or suffocate due to pressure from the belts. 2. The belts must be snug, but must not be so tight that they interfere with breathing.
V I I I . WA R N I N G S : C O M P O N E N T S & IX. SET OPTIONS UP & ADJUSTMENT Note: Setting the wheelchair on a table or on a flat surface, such as a table or on a flat surface, such as a workbench, helps make these procedures easier. M. MODIFIED SEAT SYSTEMS Use of a seat system not approved by Sunrise may alter the center of balance of this chair.This may cause the chair to tip over. 1. Do not change the seat system of your chair UNLESS you consult your authorized supplier first. 2.
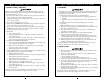
IX. SET UP & IX. SET ADJUSTMENT C. ARTICULATING LEGREST (Optional) UP & ADJUSTMENT F. DUAL-POST, HEIGHTADJUSTABLE ARMRESTS a 1. Installation 1. Installation or Removal To install or remove Articulating Legrest (ALR) see instructions for Swing-Away Footrests installation. 2. Adjustment a. The assembly is held securely in place when the lever (a) is facing forward. b. Pull back on securing lever. c. Insert or remove armrest. d. Return securing lever to locked position. 2. Height-Adjustment a.
IX. SET UP & ADJUSTMENT H. ANTI-TIP TUBES Anti-tip tubes are recommended for all wheelchairs. IX. SET c e d a. Press the rear anti-tip release lever (c) on the anti-tip tube so that both release pins are drawn inside. b. Insert into the anti-tip tube receiver (d). c. Turn the anti-tip tube down until release pin is through the receiver mounting hole. d. Insert second anti-tip tube the same way. 2.
IX. SET UP & IX. SET ADJUSTMENT K. FIXED/ADJUSTABLE BACKREST UP & ADJUSTMENT M. WHEEL LOCKS The backrest comes with an angle-adjustment range from 16o to 40o. 1. Angle-Adjustment a. Loosen and remove bolt (a) b. Set backrest at desired angle using preset holes in armrest angle plate. c. Replace and tighten bolt. d. Repeat on other side. b a Quickie T45 wheelchairs are standard with wheel locks. Wheel locks are installed by Sunrise unless you have requested otherwise.
X. TROUBLESHOOTING You will need to adjust your chair from time to time for best performance (especially if you alter the original settings). This chart gives you a first solution, then a second and a third if needed. You may need to look farther to find the best solution for a specific problem.
XI. MAINTENANCE C. MAINTENANCE TIPS 1. Axles & Axle Receivers: Check axles and axle sleeves every six months to make sure they are tight. Loose sleeves will damage the axle plate and will affect performance. 2. Tire Air Pressure: Check air pressure in pneumatic tires at least ONCE A WEEK. The wheel locks will not grip properly if you fail to maintain the air pressure shown on tire sidewall. D. CLEANING 1. Paint Finish a. Clean the paint finish with mild soap at least once a month. b.
NOTES 930356 Rev. B 38 39 930356 Rev.
Sunrise Medical Home Healthcare Group Mobility Products Division 7477 East Dry Creek Parkway • Longmont, Colorado • 80503 USA (303) 218-4500 or (800) 456-8165 In Canada (800) 263-3390 © 1998, Sunrise Medical 5.98 930356 Rev.