
Owner Manual


Sunshine GardenHouseSunshine GardenHouse
Sunshine GardenHouseSunshine GardenHouse
Sunshine GardenHouse
™™
™™
™
PO Box 2068, Longview, WA 98632
Sunshine GardenHouseSunshine GardenHouse
Sunshine GardenHouseSunshine GardenHouse
Sunshine GardenHouse
™™
™™
™
PO Box 2068, Longview, WA 98632
4
11
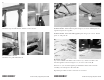
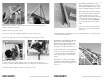
Front Wall - Box #6
Place the front wall panels on the front wall base with the panel connectors
facing inside. Drive 1-1/4” screws into the untaped connector holes at the base.
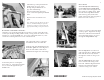
Side Wall Top Plates - Box #4 & 5
With a helper, attach the side wall top
plates between the front wall and
back wall using 1-1/4” screws.
Stagger the 8’ top plate above, where
the 4’ is located at base. See joint
location diagram.
Drive screws into the untaped holes
only.
Sagging is normal and expected when
installing the side wall top plate.
Installing the sidewalls will remove
the sag.
From the inside of the GardenHouse,
secure the unvented panels using 2-1/
2” screws through the three pre-
drilled holes in the ridge.
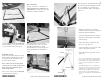
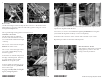
Automatic Vent Operators - Box #4
Suggestion: Installing the black cylinder into the operator arms is easier if you
refrigerate the cylinder for an hour (don’t freeze) before attaching. You can
easily push the piston into the black cylinder when the paraffin has contracted in
the colder temperature.
Position a vent operator near the
center of a roof vent along side a truss
with one bracket on the vent frame
bottom and one on the adjacent roof
panel blocking. Attach the two
brackets using four 1-1/4” screws.
4’
8’
Joint Location
Diagram