
Owner Manual


Sunshine GardenHouseSunshine GardenHouse
Sunshine GardenHouseSunshine GardenHouse
Sunshine GardenHouse
™™
™™
™
PO Box 2068, Longview, WA 98632
Sunshine GardenHouseSunshine GardenHouse
Sunshine GardenHouseSunshine GardenHouse
Sunshine GardenHouse
™™
™™
™
PO Box 2068, Longview, WA 98632
5
10
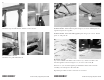
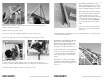
Top Back & Front Panels - Box #5
With a helper, attach the top back and front panels with the ridge connector
facing in, using 1-1/4” screws.
Align the panels along the roof line.
Drive 2-1/2” screws through pre-drilled holes at the roof line joint.
Note: Prop open front door before installing top panel; it makes it easier.
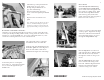
To position the back wall stud at the center of the wall and centered on its
connectors, use the “spacer” (Box #5) at the top and bottom of a back wall panel.
Attach the stud through the connectors using 3/4” screws.
Back Wall Stud - Box #3
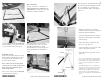
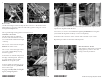
Roof Panels - Vented Side (cont.)
Attach vent flashing to the top edge of
the vented roof panels using roofing
nails provided through the four holes.
With a helper, lift a vented roof panel
above the ridge and let it slide down
until the metal angles rest on the
ridge. Slide the panel against the front
roof panel and secure it using 2-1/2”
screws through the five pre-drilled
holes along the sides and one in the
center.
Position the other vented roof panel
against the first one and attach it the
same way.
Attach the back 2’ roof panel the same as you did the front 2’ roof panel. It will
overhang the back wall 3/4”.
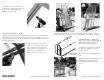
Roof Panels - Unvented Side - Box #2
With a helper, lift the front 4’ roof
panel above the ridge and let it slide
down until the ridge flashing rest on
the ridge of the other side of the roof.
Position the panel to overhang the front
wall 3/4”. Secure the panel with 2-1/
2” screws through the six pre-drilled
holes along the sides and one in the
center.
Repeat this procedure for the center
roof panel and the back roof panel.
The back panel will overhang the back
wall 3/4”.