
Owner Manual


Sunshine GardenHouseSunshine GardenHouse
Sunshine GardenHouseSunshine GardenHouse
Sunshine GardenHouse
™™
™™
™
PO Box 2068, Longview, WA 98632
Sunshine GardenHouseSunshine GardenHouse
Sunshine GardenHouseSunshine GardenHouse
Sunshine GardenHouse
™™
™™
™
PO Box 2068, Longview, WA 98632
6
9
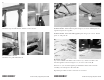
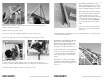
Roof - Box #4
(If not already done at the factory,
rest the ridge front and ridge back
pieces on the side wall top plate with
the connectors pointing down. With
the ends of the ridge flush with the
ends of the top plate, mark with a
pencil on the inside of the top plate at
the front of each connector.)
Position a roof truss at the center mark
on the top plate. Align the front edge
of the truss with the mark and attach
it from the inside using 3/4” screws
through the untaped holes only.
Rest the ridge front on to the front
wall and center truss. With the ridge
flush with the front wall, attach it
through the connectors using 1-1/4”
screws.
Slide the ridge back into the center
truss connector and resting on the
back wall. With the ridge flush with
the back wall, attach through the
connectors using 1-1/4” screws.
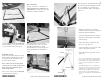
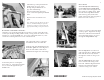
Attach the top of the panel from the
inside using one 2-1/2” screw
through the pre-drilled hole. See
page 14 for addendum tip.
Then attach the sides using four
2-1/2” screws through the pre-drilled
holes.
Repeat for the second back vent
panel.
Note: If the top plates and ridge do not appear
level now, check the building for squareness
and adjust as needed. Roof panels will not fit
properly if the building is not square and level.
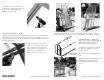
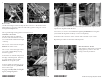
Roof Panels - Vented Side - Box #2 & 7
Suggestion: It is generally preferable to locate the roof vents on the side of the
roof away from the prevailing summer wind, so rising warm air is drawn out as
wind moves over the GardenHouse. As hot air is exhausted at the roof, cooler
air is drawn in through the lower vents on the back wall.
The vented side of the roof must be
attached before the unvented side.
From the side of the GardenHouse, lift
the front 2’ panel above the ridge near
the front wall and let is slide down
until the metal angles rest on the ridge.
Position the panel to overhang the
front wall 3/4”. Secure the panel with
2-1/2” screws through the five pre-
drilled holes.