
Owner Manual


Sunshine GardenHouseSunshine GardenHouse
Sunshine GardenHouseSunshine GardenHouse
Sunshine GardenHouse
™™
™™
™
PO Box 2068, Longview, WA 98632
Sunshine GardenHouseSunshine GardenHouse
Sunshine GardenHouseSunshine GardenHouse
Sunshine GardenHouse
™™
™™
™
PO Box 2068, Longview, WA 98632
87
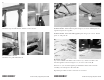
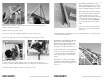
Seat the remaining four trusses fully into the connectors. Attach them to the
ridge using 1-1/4” screws, and to the side wall top plates using 3/4” screws
through the untaped holes.
The sag in the ridge and top plates is natural for now.
Roof - (cont.)
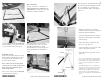
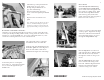
All side wall panels are identical.
Position a side wall with the connec-
tors on the inside and the metal angle
on the top.
Drive 2-1/2” screws into the two pre-
drilled holes at the corner.
Drive 1-1/4” screws through connec-
tors on the outside, lifting any sag
from the top plate.
Position the second side wall panel at
the edge of the first panel. Drive 2-1/
2” screws halfway into two pre-
drilled holes along this joint.
Position a third panel, driving 2-1/2”
screws halfway into two pre-drilled
holes at the corner.
See page 14 addendum for helpful
tip for joining all panels.
Side Walls - Box #1 & 5
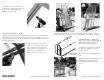
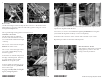
Swing the “halfway connected” second and third panels inward and press them
together into alignment with the base.
Use four 2-1/2” screws to attach them through the pre-drilled holes along this
joint. Finish driving all the “halfway” screws in completely.
Fasten the center connectors on the outside of the wall with 1-1/4” screws.
Repeat this procedure for the other sidewall panels.
Back Vent Panels - Box #3
Ask a helper to slide a back vent panel
snugly up into position so the vent
swings our freely at the base.