
Instructions / Assembly


9
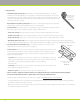
4. Palram Recommended Washer / Fastener Combination: Palram Recommended
Washer / Fastener combination was chosen after comprehensive performance testing. The
“umbrella” shaped gaskets seal the fastener holes & heads well without exerting excessive
pressure on the SunSky panel itself. Limited thermal expansion is possible and compatibility with
polycarbonate assured. Regular Washer/Gaskets Fasteners (e.g. Tek Screws) for metal panels are
NOT RECOMMENDED for use with SunSky as these types of washers apply excessive pressure,
are inadequate for SunSky sealing, and cause undue internal stresses in the panel. The stresses
result in crazing, fractures, and eventual failure. Installations using such fasteners are strongly
discouraged and are subject to nullification of warranty.
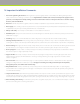
5. Installation & Fastening Tips:
a. Allow for expansion & contraction at fasteners: For panels longer than 12', pre-drill panels at all fastening points with a 3/8" hole
to allow for increased expansion and contraction due to longer length. For panels 12' in length or less, pre-drill a hole 1/16" larger
than the diameter of the fastener shank. Palram recommends that SunSky panels are not installed below 40°F or above 80°F. See
Page 17, Table 3, for detailed SunSky Thermal Expansion Data.
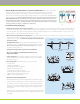
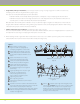
b. Drive fasteners perpendicular to SunSky face. Use an adjustable-torque power screwdriver to ensure against over tightening.
Avoid distortion of washer/gasket and panel. (See fastener positioning
details - Figure 14a and 14b). Never use an impact wrench/driver for
fastening SunSky.
c. Installation Direction: We recommend starting installation from
the bottom up, on one side, and work to the left or right accordingly.
Never start working from both ends to the middle. Always lap the
top panel over the lower one.
d. Keep panel straight, flush and taut during installation.
e. Do not over tighten (see important note above and
Figures14a & 14b)
f. Side-Lap Support: At a side-lap of metal on SunSky or two SunSky
panels (multi-panel installation) a lengthwise wood or steel support
bar may be required.
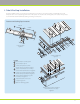
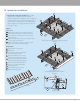
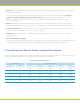
g. Fastening Details (Schematic Figures 15, 16, 17, and 18):
1. SunSky panel
2. Adjoining metal panel
3. Valley fastener, with 3/4" Washer
4. Metal crest / valley fastener
5. Side-lap fastener with 3/4" washer
6. Side-lap stitching fastener and 3/4" washer
7. Butyl-rubber or expanding sealing strip
8. Optional side-lap support bar
h. Fasteners Positioning Comments:
• Generally, valley fasteners should be installed at the top & bottom edges,
and at end-laps of SunSky panels, as shown on Page 8, Section J, Figure13.
• In multi-panel runs, the number of fasteners can be reduced at mid-
purlins, unless conditions demand otherwise. The remaining fasteners
should be evenly positioned adjoining the main corrugations of the
specific panel.
• Stitching screws should be distributed 12"-16" apart (For polycarbonate
to polycarbonate side laps, please use the 1" Rubber grommet shown
on page 8)
90º
1
3
3
4
2
7
2
1
8
4
3
4
7
Right & wrong fastener insertion
Figure 14a
Correct Oblique Over Tightening
Figure 15
Figure 17
2
6
4
3
1
7
1
6
3
4
2
7
Figure 16
Figure 18
Figure 14b
90°
Approved
19mm
(3/4 in.)
15 .8mm
(5/8 in.)
14 .3mm
(9/16 in.)
DO NOT USE