Stainless Steel Side Burner Use & Care Manual For Liquid Propane and Natural Gas Models Side Burner Models 2CSB Double Slide-In Side Burner LP/NG 1SSB Single Drop-In Side Burner LP/NG For Outdoor Use Only To installer or person assembling side burner: Leave this manual with side burner for future reference. To consumer: Keep this manual for future reference. www.sunstonegasgrills.
Welcome & Congratulations Congratulations on your purchase of a new side burner! We are very proud of our products and we are completely committed to providing you with the best service possible. Your satisfaction is our #1 priority. Please read this manual carefully to understand all the instructions about how to install, operate and maintain for optimum performance and longevity. We know you’ll enjoy your new side burner and thank you for choosing our product. We hope you consider us for future purchases.
Table of Contents Safety Instructions ...................... 4 Burner Models ............................. 5 Gas Requirement......................... 6 Locating the Grill ......................... 10 Pre Operation Leak Testing ........ 12 Parts List .................................... 14 Light the Grill................................ 16 Operation and Features .............. 19 Care & Maintenance ................... 20 Troubleshooting Your Burner ..... 22 Limited Warranty ........................
Safety Instructions WARNING: Improper installation, adjustment, alteration, service or maintenance can cause injury or property damage. Read the installation, operating and maintenance instructions thoroughly before installing or servicing this equipment. General Safety Instructions 1. 2. 3. 4. 5. 6. 7. 8. 9. 10. 11. 12. 13. 14. 15. 16. For Household Outdoor Use Only – DO NOT use indoors or in any type of enclosed area such as a garage, shed or breezeway. Keep clear of trees and shrubs.
placed away from walkways to avoid tripping hazard. Keep gas supply lines as short as possible. Never move the side burner when hot. DO NOT use while under the influence of drugs or alcohol. DO NOT store a spare gas cylinder under or near your side burner. In the event that a burner goes out, turn burner knobs to the full OFF position. Do not attempt to use the side burner until the gas has had time to dissipate. 22. Do not use side burner until leak check has been made. 23.
Gas Requirement NOTE: Always have a qualified service technician perform difficult conversions or modifications. WARNING: Never attach an unregulated gas line to the appliance. Connection to an unregulated gas line can cause excessive heat or fire. IMPORTANT: Before connecting side burner to gas source, make sure burner control knobs are in “OFF” position.
Cylinder Specifications - - - - - Any L.P. gas supply cylinder used with this appliance must be approximately 12 inches diameter and 18 inches high. The maximum fuel capacity is 80% and is approximately 20 pounds of propane. The L.P. cylinder must have a shut-off valve (see picture) terminating in a Type 1 L.P. A Type 1 compatible cylinder with a Type 1 cylinder valve has a back-check valve which does not permit gas flow, until a positive seal has been obtained.
Insert the regulator inlet into the tank valve and turn the coupling nut clockwise until the coupler tightens up (see picture). Do not over tighten the coupler. Turn the main tank valve on and turn the burner control valves on the unit to the “HIGH” position for about 20 seconds to allow the air in the system to purge before attempting to light the burners. WARNING: Always take a leak test before lighting the grill to prevent a possible fire or explosion.
test new and exchanged LP tanks BEFORE connecting to burner. - Natural Gas Hook-up Always check the rating plate to make sure the gas supply you are hooking up to is the gas type the side burner is manufactured for. This natural gas burner is designed to operate on natural gas ONLY, at a pressure regulated at 4” (101.6mm) water column (W.C.) when equipped with the correct natural gas orifices on the valves and a natural gas regulator on the supply line regulated at the residential meter.
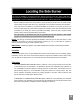
Locating the Side Burner Check your local building codes for the proper method of installation. In the absence of local codes, this unit should be installed in accordance with the National Fuel Gas Code No. Z223.1-1998 USA or CAN/CGA-B149.1/.2 Natural Gas/Propane Code (Canada) latest edition or the National Electrical Code ANSI/NFPA No. 70 or the Canadian Electrical Code CSA C22.1, 1990 or latest version.
The two top illustrations demonstrate how the slide-in type unit is designed to fit into openfront enclosures, and supported at the Countertop. Do not install this unit under unprotected flammable surfaces. Do not install or use this appliance inside a building, garage, or any other covered area. It must not be used in or on recreational vehicles or boats. INSTALLER NOTE: This unit should be installed so that it can be removed at a later date if factory service is required.
For Built-in Installations A side burner is designed for easy installation into masonry enclosures. For non-combustible applications, the side burner drops into the opening (as shown in cut-out detail drawing - Fig. A) above or below depending on space, and hangs from its counter top trim. A deck is not required to support it from the bottom. It is recommended that the enclosure have ventilation holes to prevent gas build-up in the event of a leak.
Pre Operation Leak Testing DANGER 1. 2. 3. Do not insert any tool into the valve outlet or safety relief valve. You may damage the valve and cause a leak. Leaking propane may result in explosion, fire, severe personal injury, or death. If a leak is detected at any time or you cannot stop a gas leak, immediately close pipeline valve and call LP gas supplier or you fire department! Check all gas supply fittings before each use and each time the gas supply cylinder is connected to the regulator.
gas tanks now come equipped with a leak detector mechanism internal to the tank; when gas is allowed to escape rapidly, it shuts off the gas supply. A leak may significantly reduce the gas flow making the side burner difficult to light or causing low flames.
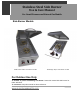
Single Side Burner Parts List 15
Sun2CSB LP/NG & 1SSB LP/NG No. Name Qty Part No. No. PARTS LIST Name Qty Part No.
GENERAL RULES Do not leave the side burner unattended while cooking! - Make sure the burner has been leak tested and is properly located. Light the burners using the instructions provided in this manual. Adjust heat settings to your desired cooking temperature. Allow burners to cool down, wipe off any splatters or grease. Do not put a cover on the side burner while it is still hot as it could start a fire. NOTE: If for some reason, igniters fail to light, burners can be lit with a gas lighter.
Lighting Instructions OPEN LID ENSURING BURNER CONTROLS ARE IN THE “OFF” POSITION, TURN ON THE GAS SUPPLY VALVE. Main Burner Lighting 1. Push and turn the Right or Left knob to HIGH position 3-5 seconds to light burner. 2. Press and Hold the center Igniter button, and wait to hear the igniter clicking, see top of burner and locate ceramic electrode to see the sparking 3. To light either burner, push and turn control knob counter clockwise to HIGH position and adjust to desired cooking temperature. 1.
Operations and Features When initially bringing turning the burners on, burn the burners to get rid of any odors or debris by operating at “HIGH” setting Preparing Food for the side burner WARNING: Always observe safe food-handling and safe food-preparation practices when using this burner, to prevent food-borne illnesses. - - Always cook foods adequately. Undercooked foods can retain bacteria, especially if thawed or exposed to warm conditions prior to cooking.
Care & Maintenance CAUTION: All cleaning and maintenance should be done only when side burner is cool & with the fuel supply turned off at the cylinder. If your side burner is set up for use with Natural Gas, turn off gas supply at the system manual shut off valve. DRIP PAN The drip pan located below the Burner should be cleaned periodically to prevent heavy buildup of debris. NOTE: Allow the drip tray to cool before attempting to clean.
ANNUAL CLEANING OF BURNER HOUSING Burn-off the barbeque after every cookout will keep it ready for instant use, however, once a year you should give the entire side burner a thorough cleaning to keep it in top operating condition. 1. Shut off gas supply at source and disconnects fuel line. Protect fuel line fitting. 2. Remove and clean the cooking grids and burners. 3. Cover the gas valve orifices with a piece of aluminum foil. 4.
Troubleshooting Your Side Burner GENERAL TROUBLE SHOOTING You should inspect the burners at least once a year or immediately if any of the following conditions occur: • The smell of gas. • Flames appearing mostly yellow. (Some yellow at the tips is OK) • The burners will not get hot enough. • Burners make a snapping noise. • The burners heats unevenly. SPIDER AND INSECT WARNING INSECT WARNING:Spiders and insects can nest in the burners of this and other burners, which could disrupt gas flow.
- If you hear a snapping sound, can you see a spark at the electrodes? Note: You will need to remove your cooking grates and flame tamers to see the electrodes. • Check your igniter battery and replace if needed. • Check for loose wire connections to the igniter or electrodes. • Check to see if debris is blocking the electrodes. • If the igniter is not working, can you light the burner with a lighter? • Flare-ups Ensure burner is not placed directly in the path of wind.
23
Limited Warranty (This warranty covers all models of Side Burners) LIMITED ONE-YEAR WARRANTY All other burner components including igniters, knobs, valves, tubing, ceramic electrode assembly and covers are warranted to be free from defects in material and workmanship for a period of one year from the original date of purchase. LIMITATIONS & EXCLUSIONS 1) SUN warranty applies only to the original purchaser and may not be transferred.
24