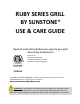
RUBY SERIES GRILL BY SUNSTONE® USE & CARE GUIDE Read all instructions before you operate your grill. Save these instructions! Conforms to ANSI STD Z21.58b-2012 Certified to CSA STD 1.6b-2012 Outdoor Cooking Gas Appliance 3174816 To installer or person assembling grill: Leave this manual with grill for future reference. To consumer: Keep this manual for future reference. www.sunstonemetalproducts.com ATTENTION: THE RUBY GRILL MUST BE INSTALLED ACCORDING TO THE INSTALLATION GUIDE SHOWN ON PAGES 9 THRU 14.
Welcome & Congratulations Congratulations on your purchase of a new Ruby grill! We are very proud of our product and we are completely committed to providing you with the best service possible. Your satisfaction is our #1 priority. Please read this manual carefully to understand all the instructions about how to install, operate and maintain for optimum performance and longevity. We know you’ll enjoy your new grill and thank you for choosing our product. We hope you consider us for future purchases.
ATTENTION: Indicates a potentially hazardous situation which, if not avoided, may result in minor or moderate personal injury, or property damage. WARNING: Indicates an imminently hazardous situation which, if not avoided, will result in death or serious injury. VOLTAGE: Indicates a potentially hazardous situation which, if not avoided, may result in minor or moderate electrical shock.
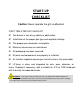
START-UP CHECKLIST Caution: Never operate the grill unattended. FIRST TIME STARTUP CHECKLIST The burner is free of any debris or obstruction. Installation of the proper gas type and regulator settings. The proper gas connection is complete. Minimum clearances are maintained. All packaging has been removed. All parts and components are properly in installed. An installer-supplied manual gas shut-off valve is fully accessible. LP hose is clean and inspected for cuts, wear, abrasion, or leaks.
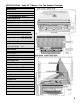
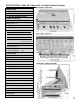
SPECIFICATIONS – Ruby 30” 3 Burner - Pro Sear Product Overview Model Series RUBY3B-NG 30” RUBY3B-LP 30” 3174816 ***All 304 Stainless Steel*** Product Overview Cooking Grid Size--- 27-1/2" X 19-1/2” Burger Count-------Warming Rack------- 28 burgers Main Cooking Space 536.25 Sq. Inch Total Cooking Space 151.25 Sq. Inch 687.5 Sq.
SPECIFICATIONS – Parts Diagram/Ruby3B 30” RUBY3B-LP / RUBY3B-NG Parts List RUBY3B-LP / RUBY3B-NG Parts List No. 1 2 3 4 5 6 7 8 9 10 11 12 13 14 No. 15 16 17 18 19 20 21 22 23 24 25 26 27 Description Thermostat Hood Handle Hood Hood Bolt Thermometer Light Assembly Warming Rack Pro Searing Grate Grate Grate Warming grid Heat Shield Gas Transfer Rot. Mount Manifold Clip Q 1 ty 1 . 1 2 2 1 1 1 1 2 2 1 1 1 Part No.
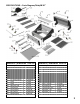
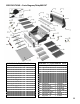
SPECIFICATIONS – Ruby 36” 4 Burner - Pro Sear Product Overview Model Series RUBY4B-NG 36” RUBY4B-LP 36” 3174816 ***All 304 Stainless Steel*** Product Overview Cooking Grid Size--- 33-1/2" X 19-1/2” Burger Count-------Warming Rack------- 32 burgers Main Cooking Space 653.25 Sq. Inch Total Cooking Space 184.25 Sq. Inch 837.5 Sq.
SPECIFICATIONS – Parts Diagram/Ruby4B 36” RUBY4B-LP / RUBY4B-NG Parts List No. Description Q Part No. 1 Thermostat 1 ty R-TMETER 2 Hood Handle 1 Hood-R4B-H . 3 Hood 1 Hood-R4B 4 Hood Bolt 2 R-HAB Thermometer 5 Light Assembly 2 R-LIGHT 6 Warming Rack 1 R-WR-4B 7 Pro Searing Grate 1 R-GSEAR 8 Grate 1 R-GR4B 9 Grate 1 R-GR4B 10 Warming grid 3 R-FL-4B 11 Heat Shield 3 R-HS-4B 12 Gas Transfer 1 R-GSC-4B 13 Rot.
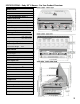
SPECIFICATIONS – Ruby 36” 4 Burner IR - Pro Sear Product Overview Model Series RUBY4BIR-NG 36” RUBY4BIR-LP 36” 3174816 ***All 304 Stainless Steel*** Product Overview Cooking Grid Size--- 33-1/2" X 19-1/2” Burger Count-------Warming Rack------- 32 burgers Main Cooking Space 653.25 Sq. Inch Total Cooking Space 184.25 Sq. Inch 837.5 Sq. Inch Grilling Surface BTU’s & Heat Grill Surface BTU’s--- 60,000 Btu’s Rot.
SPECIFICATIONS – Parts Diagram/Ruby4BIR 36” RUBY4BIR-LP / RUBY4BIR-NG Parts No. Description List Q Part No. 1 2 3 4 5 6 7 8 9 10 11 12 13 14 15 Thermostat Hood Handle Hood Hood Bolt Thermometer Light Assembly Warming Rack Pro Searing Grate Left Grate Right Grate Warming grid Heat Shield Gas Transfer Rot. Mount Manifold Clip Panel Bolt 1 ty 1 .
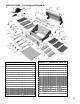
SPECIFICATIONS – Ruby 42” 5 Burner IR - Pro Sear Product Overview Model Series RUBY5BIR-NG 42” RUBY5BIR-LP 42” 3174816 ***All 304 Stainless Steel*** Product Overview Cooking Grid Size--- 39-1/2" X 19-1/2” Burger Count-------Warming Rack------- 36 burgers Main Cooking Space 770.25 Sq. Inch Total Cooking Space 217.25 Sq. Inch 987.5 Sq. Inch Grilling Surface BTU’s & Heat Grill Surface BTU’s--- 75,000 Btu’s Rot.
SPECIFICATIONS – Parts Diagram/Ruby5BIR 42” RUBY5BIR-LP / RUBY5BIR-NG Parts No. Description List Q Part No. 1 2 3 4 5 6 7 8 9 10 11 12 13 14 15 Thermostat Hood Handle Hood Hood Bolt Thermometer Light Assembly Warming Rack Pro Searing Grate Left Grate Right Grate Warming grid Heat Shield Gas Transfer Rot. Mount Manifold Clip Panel Bolt 1 ty 1 .
LOCATING GRILL – Grill Cut-Out Dimensions Grill Cut-Out Your grill is SELF-RIMMING, meaning the lip of grill rests on top of the counter edge around the cut-out with the front of grill which is Free-Hanging from counter top. Because of this, there is No Need for any Trim-Kit like with many other grills in the market. 1. Maintain 24” Clearance from any Combustible Materials in ANY direction of Grill. 2.
LOCATING GRILL – Installing into Open Area Windy Conditions Your grill is specially designed to draw fresh air in through the front, and in direct to the bottom burners. When grilling the hot gases are then released through the back of grill through a venting system. Using your grill in windy conditions may disrupt the front-to-back air flow. 1. For breezy days, be careful not to leave the front hood down for more than 15 minutes, when the burners are on. (Never leave grill unattended when in operation) 2.
LOCATING GRILL– Installing into Windy Open Area ATTENTION: Take special precaution when installing grill in open Breezy area, check the direction of Prevailing Wind, if back of grill is facing any oncoming wind or breeze, be sure to protect the back of grill, and erect a partition wall, or only use grill with hood open on breezy days. Windy Area Positioning your grill in your backyard is more often thought of how it is pleasing to the eye, but more important than this is how that it functions correctly.
LOCATING GRILL– Installing under overhead structure Overhead Structure Definition: Structure built above Appliance that is sometimes attached to the home’s exterior outside wall or roof and there is a Minimum of “Two” adjacent sides which are open with outside exposure.
LOCATING GRILL – Installing into Enclosed Area 13
LOCATING GRILL – Installing into Enclosed Area Enclosed Island Definition: Any Appliance that is installed into “Enclosed” structure with Two or more sides walled off, either into an outdoor home’s patio structure, against any home exterior wall or under any Eaves of the home. Clearances to Non-Combustible Construction*: A minimum of 4” to 6” clearance from the back of the grill to non-combustible construction is required for the purpose of allowing the lid to open fully.
GRILL INSTALLATION- Light Transformer Installation 1. Locate the transformer Remove the transformer from the plastic bag located in the interior of grill. Make sure the Transformer is complete, and double check the grill light plug cord is properly secured to transformer, and all wires are firmly fixed into plastic clip plug. 2. Mount Transformer Using metal screws and attach the transformer to the back inner wall of your islands cabinet wall, somewhere near the already installed GFCI electrical outlet.
GRILL INSTALLATION – Propane Tank Types Types of Propane Tanks: Propane tanks are mainly used alongside stoves, water heaters, grills, generators, and welding equipment. These bottles or metal cylinders contain propane, a type of alkaline gas that has been compressed and transformed into liquid form. Transporting, storing, and using propane safely can only be possible if it is held inside tanks or containers. Since propane has various applications, many types of tanks are being used as propane containers.
GRILL INSTALLATION – Propane Tank Types WARNING: If you have a Side Yard Propane Tank, you MUST have additional Medium Pressure Regulator located at the Grill. If you do not serious bodily harm may result or damage to the grill and island structure from HIGH Heat extremes.
GRILL INSTALLATION – LP Gas Line Connections 1. For this type of installation, it is most similar to the NG gas installation method, only the regulator is set for liquid propane. First you will install a gas pipe, coming into island from outside, be sure the Safety Shut-Off valve is easily accessible. 2. Next, locate the gas manifold on grill, for this type of installation, the 1/2" to 3/8" flare adapter, and LP Regulator Hose that comes with your LP Grill is not needed.
GRILL INSTALLATION – NG Gas Line Connections ATTENTION: Always turn grill knobs OFF, before installing gas lines, or making any connections and disconnections of supply hoses. WARNING: Always take a leak test before lighting the grill to prevent a possible fire or explosion.
GRILL INSTALLATION – Propane Tank Connections IMPORTANT: Before connecting grill to gas source, make sure BBQ Grill control knobs are in “OFF” position. Verify the type of gas supply to be used, either natural or LP, and make sure the marking on the appliance rating label agrees with that of the supply. All pipe sealants must be an approved type and resistant to the actions of LP gas. Never use pipe sealant on flare fittings.
GRILL INSTALLATION – Propane Tank Connections Hose and Regulator The Type 1 connection system has the following features: The system will not allow gas to flow until a positive connection has been made. NOTE: The cylinder control valve must be turned off before any connection is made or removed. The system has a thermal element that will shut off the flow of gas in the event of a fire. The system has a flow limiting device which, when activated, will limit the flow of gas to 10 cubic feet per hour.
GRILL INSTALLATION – Propane Tank Connections LP Gas Hook-up This liquid propane grill is designed to operate on Liquid Propane ONLY. The LP gas grill is designed to be used with a standard 20 lbs gas cylinder and must be constructed and marked in accordance with specifications of the US Department of Transportation for propane gas cylinders. Always keep cylinder securely fastened in an upright position. Never connect an unregulated propane gas cylinder to the grill.
USING YOUR GRILL – Cooking Zones Cooking Zones Your Ruby Grill is divided into Five Cooking Zones, depending on the number of burners you have will increase or decrease the size of each zone. Each cooking zone is designed to be controlled individually by the burner control knob. Specific zones are better suited to specific types cooking. Variable Cooking Grids Your Ruby Grill is designed for an exquisite cooking experience with the use of variable cooking grids and separate searing station.
USING YOUR GRILL – Smoker/Steamer Box Smoker/Steamer Box Adding the smoker box to your cooking experience creates a unique flavorful experience to your food. Use it for either a smoker box with wood chips, or by filling with Water it becomes a steamer box. While in use, remember to close the hood, with the knobs set to LOW, for maximum results. There are many different wood chips available on the market, the most common ones are mesquite and hickory.
USING YOUR GRILL- Pro Sear Burner HEAT RISES 200 DEGREES EVERY MINUTE TEMPERATURE INCREASES TO 800 DEGREES AT THE GRILLING SURFACE TURN ON OTHER BURNERS FOR HIGHER TEMPERATURE USE THE IR-BURNER FOR ADDITIONAL PASS-OVER SEARING MOVE SEARING GRATE TO RIGHT/LEFT OR CENTER OF GRILLING SURFACE Sear Cooking Tips Sear cooking is recommended for most grilling applications as searing locks in flavor and juices while allowing the outer surface to absorb smoke and food aroma that is produced, as grease and drippings
USING YOUR GRILL-Burner Adjustments Correct Flame Color and Height Flames should be blue and stable with no yellow tips, excessive noise or lifting. If any of these conditions exist, check if the air shutter or burner ports are blocked by dirt, debris, or spider webs. If needed, proceed with air shutter adjustment. The amount of air which enters a burner is governed by an adjustable bolt at the inlet called an air shutter.
USING YOUR GRILL- Rotisserie Setup Rotisserie assembly can be purchased individually either by individual item, or in a complete set, for your size of grill. The rotisserie assembly can also be used with or without an infra-red back burner. Name Qty. Part No. 3 Burner Rotisserie set 1 P-RK-3B 4 Burner Rotisserie set 1 P-RK-4B 5 Burner Rotisserie set 1 P-RK-5B 1. Insert Rotisserie Motor into Motor Bracket Assembly. 2. Slide Prong Forks with the prongs facing away from the handle into Spit Rod.
USING YOUR GRILL- Rotisserie Cooking WARNING: Never stand with your head directly over the Grill when preparing to light the Rotisserie burner, to prevent possible bodily injury. Never operate Rotisserie Burner with main (other) burner(s) “ON”. Warming Rack must be removed or in Tilt-Away Position when Rotisserie Burner is ON. Rotisserie Cooking Tips Rotisserie is mostly used to cook large piece of meat and poultry to assure slow, even cooking.
USING YOUR GRILL –Lighting the Rotisserie IR-Burner Lighting Instructions Open Lid/Hood Ensure Burner Control Knobs In the “OFF” position, Turn on the “SMALL” gas supply knob 1. Push the knob in and slowly rotate counter-clockwise to the high position. Allow Gas to Completely Fill the IR Burner 2. You will hear a loud click as the electronic lighter produces a spark. Listen for the sound of the gas igniting and look for a flame through the cooking grids.
SAFETY CHECKS –Leak Test WARNING: Always take a leak test before lighting the grill to prevent a possible fire or explosion. Never store a spare propane cylinder in the vicinity of this Grill, or in the vicinity of any other potential heat source. Never attempt to attach this grill to the self-contained LP gas system. Do not use grill until leak testing. Before Testing DO NOT smoke while leak testing. Extinguish all open flames. Never leak test with an open flame or risk of serious harm to self or others.
SAFETY CHECKS –Leak Test Liquid Propane Leak Testing Procedure Test connection from LP Tank to Regulator Natural Gas Leak Testing Procedure Test connection from grill to LP Hose regulator If unable to stop gas leak, turn gas off Test connection next to NG regulator Test connection from gas line to adapter Test Quick Disconnect SAFETY CHECKS –Attention & 31
SAFETY CHECKS –Attention & Warnings WARNING: When Lighting the Grill. DO NOT RELEASE KNOB, GAS WILL CONTINUE TO FLOW. WARNING: Keep any electrical supply cords and the fuel supply hose away from any heated surfaces. WARNING: Failure to open the lid while igniting the barbecue’s burners, or not waiting 5 minutes to allow the gas to clear if the barbecue does not light, may result in an explosive flame-up which can cause serious bodily injury or death. CAUTION: Inspect the hose before using the grill.
GRILL START-UP - Grill Safety CAUTION Do Not close grill hood for more than 7 minutes with burners set to HIGH temperature, or damage may occur to grill that is not covered under manufacture warranty. CAUTION When using your Grill, always cook with hood up when knobs are on HIGH HEAT setting. NEVER close the hood and walk away. Always turn burners to LOW HEAT when hood is in down position Grill Operation.
GRILL START-UP –Lighting the Grill Lighting Instructions Open Lid/Hood Ensure Burner Control Knobs In the “OFF” position, Turn on the gas supply valve 1. Push the burner knob in and slowly rotate counter-clockwise to the high position. 4. Upon successful lighting, repeat the process on the other burners you wish to light. 5. To shut off the burners, rotate the knob and turn to OFF. 6. It is normal to hear a popping sound when the burners are turned off. 2.
CARE & MAINTANCE –Cleaning the Grill ANNUAL CLEANING OF GRILL HOUSING Burn-off the grill after use will keep it ready for instant use, however, once a year you should give the entire grill a thorough cleaning to keep it in top operating condition. 1. Shut off gas supply at source and disconnects fuel line. Protect fuel line fitting. 2. Remove and clean the cooking grids, flavorizors and burners. 3. Remove warming rack and wash with mild detergent and warm water. 4.
CARE & MAINTANCE – Opening Panel When performing a Gas Conversion, Opening the Panel is the First Step to converting the grill from either Liquid Propane or Natural Gas. Always Turn-Off and Disconnect any Gas Lines or Connections from the grill, before performing any service or conversion on the grill.
CARE & MAINTANCE – Opening Panel 37
GAS CONVERSION – Getting Started DANGER! Disconnect the Gas Line from back of grill, and Turn the Gas Supply OFF to the grill before performing Gas Conversion. Serious Injury may result if Gas is Left ON. Parts Needed for each Gas Conversion Type NG to LP Conversion: LP Valve – Need 3 , 4 or 5 depending number of burners Safety Valve for NG (With IR Burner) R-RSvalve for LP R-Rvalve for LP LP Regulator LP-Reg ½” to 3/8” Flare Adapter Item No. P-MAdapter-LP LP IR-Flare Adapter Item No.
GAS CONVERSION – Accessing Valves The Following section is for converting your Ruby Grill from NG to LP or from LP to NG. While performing this conversion, make sure your Gas line is Disconnected from the Grill and Gas is turned Off.
GAS CONVERSION – Convert Safety Valve The Following section is for converting your Ruby Grill Safety Valve for Either LP to NG or NG to LP, for all grills with an Infra-Red Back Burner. Skip this section if your grill does not have this part.
GAS CONVERSION – IR Burner Flare Adapter The Following section is for converting your Ruby Grill Safety Valve for Either LP to NG or NG to LP, for all grills with an Infra-Red Back Burner. Skip this section if your grill does not have this part.
GAS CONVERSION – Convert NG to LP The Following section is for converting a Ruby Grill from Natural Gas to Liquid Propane ONLY, if you are converting from Liquid Propane to Natural Gas, skip this section and continue onto the next page.
GAS CONVERSION – Convert LP to NG The Following section is for converting a Ruby Grill from Liquid Propane to Natural Gas ONLY, if you are converting from Natural Gas to Liquid Propane, skip this section and refer to page 38.
GAS CONVERSION – Convert LP to NG 44
SUNSTONE RUBY SERIES GRILL WARRANTY “ALL WARRANTIES ARE VOID IF GRILL IS NOT INSTALLED ACCORDING TO SUNSTONE’S BASIC INSTALLATION GUIDELINES, SEE PAGES 9 THRU 13” WARRANTY ON PARTS_________________________________________________________________________ MAIN BURNERS ------------------------------------------ LIMITED LIFTIME, with THREE YEAR GUARANTEE COOKING GRATES ----------------------------------------LIMITED LIFETIME FLAVORIZER GRIDS ---------------------------------------LIMITED LIFETIME FIREBO