
Instructions / Assembly


Page 4
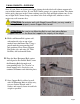
3.WALL CABINETS – OVERVIEW
Once all your Lines are drawn, next begin placing the individual wall cabinet support rails,
start with the bottom rail first. If your Wall Cabinet group is in a corner location, like shown
in this guide, then start in the Corner reaching out to the Left and Right cabinet runs. Or for
any straight Wall Cabinet Group, start either at the Left or Right side, whichever side is
against any wall structure first.
A. Hold each Bottom Rail against wall,
with underside edge on top of pre-
marked lower horizontal line. Using a
pencil mark the corresponding drill
hole positions. Place Lower Support
Rail to the side, and using 3/8” Inch
Drill Bit, drill each marked hole.
B. Place the Base Horizontal Rail against
wall aligned to Pre-Drilled Holes, insert
the Mounting Bolts through each
corresponding hole. Use “Leveler” to
check support rail is Leveled as you
continue to Hammer each bolt into place.
C. Once Support Rail is affixed to wall,
with All Mounting Bolts in all the way,
now use Socket Wrench with ½”
Socket, and securely fasten in each bolt
at tight as possible.
ATTENTION: For exterior walls with Wood Framed Studs, you may need to
use “Lag Bolts” to properly secure Support Rails to wall.
ATTENTION: Be sure to use Mounting Bolt in each hole along Bottom
Support Rail, as it is the Base that supports the majority of the weight.