
Instructions / Assembly


IOM-WR-WW 1616 14 of 36
STEP 4.1:
Floor Cleaning
The floor must be completely swept of all debris including all nails, dirt, wood, and other
construction debris. Make absolutely sure there are no objects on the floor which might
damage the wire.
Wet mop the floor at least twice to ensure there is no dirt or dust. This will allow proper
bonding of the mortar and proper stick of any adhesives or double-sided tape used later.
STEP 4.2:
Outline the Heated Area
Use a marker to outline the area where the heating cable will be installed. Refer to the
Appendix for a table of recommended clearances.
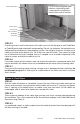
Cabinet vanities: Draw the border right up to the toe-kick. The wire can be installed up to
1" away from the vanity toe-kick.
Tubs and shower entries: Draw the border about 3" from the edge of the tub or shower.
Walls: Draw the border about 3" from the wall. If required to help the cable fit better, it may
be drawn 4" to 6" from the wall since people do not generally stand this close to a wall
anyway. It may also be drawn closer, but be careful that the cable will not be placed under
any trimwork.
Remember the heating cable length CANNOT be cut to fit. It must be kept its original
length and fully embedded in the mortar in the floor. Any modification or mis-use of the
heating cable will void the warranty and cause potential shock or fire hazard.
• Keep the cable at least 6" from toilet flanges
• Do not run the cable under cabinets or fixtures that have no clearance under them.
•
Avoid running the cable into a small closet or pantry. The heat cannot escape and things
can be laid on the floor, blocking the heat and potentially overheating and causing a
fire hazard.
STEP 4.3
Make Sure the Cable Fits
Check the cable size to ensure it will fit inside the Heated Area at the selected wire spacing.
See Table 2.
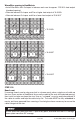
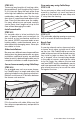
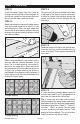
STEP 4.4
Decide the Layout
Decide which direction the cables will run on the floor for the easiest coverage. Refer to the
sample layouts in this manual for assistance. Depending on the shape of the area, it may
help to think of it in terms of several smaller areas.
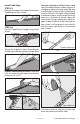
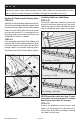
Phase 4 - Cable Installation with CableStrap
™