
Instructions / Assembly


8
SunTouch UnderFloor Installation Manual
PART 3: Install the Mat
See Part 6 for typical wiring dia-
grams.
Observe the following rules, plus all
other electrical/building codes and the
Cautions on Page 4 when installing the
mat(s):
Do not allow the foil radiator of
the mat to be mounted such that
it contacts metal objects such as
nails, staples, metal pipes, heat-
ing ducts, and joist straps.
Keep the mat at least 2” away
from recessed fixtures (lights,
etc.), ventilation openings, and
other openings.
Keep the mat at least 8” away
from the edges of outlet boxes
and junction boxes used to
mount surface lighting fixtures.
Keep the mat at least 6” away
from heat-sensitive items such as
toilet rings, flexible ducting, and
other items rated less than 194
°
F
(90
°
C). Consult manufacturers of
those items.
REMEMBER:
Pay careful attention to areas
where ductwork, wiring, or other
items do not allow the mat to
be installed. Keep in mind that
where mats are not installed, the
corresponding floor area above
will not get very warm.
Before installing the mat, inspect all
joists as well as the underside of the
subfloor for nails, screws, or other sharp
objects that protrude into the joist cav-
Test fit the mat between the joists before
stapling the mat to the joists.
1. Measure between the floor joists
where mat(s) will be installed. Measure
the width of the mat selected to fit
between these joists. The difference
between these measurements deter-
mine how much mat mesh remains
for stapling to each side of the joists.
Because the distance between floor
joists can vary, taking these measure-
ments will help ensure the mat will be
centered between the joists. It is also
prudent to test fit the mat by holding
the mat up into the joist cavity.
2. If the mat begins near the rim joist,
measure about 6” out from that rim
joist. This will allow enough room for
the mat power leads, and will prevent
unnecessary heating of the wall cavity
above the floor.
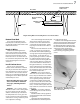
3. Measure 2” below the subfloor and
mark the joists on both sides of the
joist cavity.
4. To help hold up the power leads
while installing the mat, fasten one
NailTite over the power leads
5. Hold the mat up along one joist
and begin stapling the mat mesh along
the 2” mark from the subfloor. Staple
every 4” to 6” for about 2 ft. to get
started.
ity. These items can damage the mat,
and must be removed, cut off, or bent
flat against the underside of the sub-
floor or the side of the joist(s).
Do not staple, cut, or damage the
foiled heating portion of the mat in any
way. The fiber mesh of the mat is the
portion that will be used to staple the
mat to the joists.
Do not leave the mat rolled up or
bunched up in any way in the joist
bay. Doing so will cause dangerous
overheating and possible damage.
Mats must be installed so that they
are completely flat across the joist
cavity.
1.
2.
3.
4.
5.