
Install Instructions


11 of 36 © 2016 Watts Water Technologies
STEP 3.1:
Determine the area for HeatMatrix
HeatMatrix is installed in both unheated and heated areas to provide crack-isolation and
waterproofing. Order a quantity that will cover the full square footage of the area to be tiled.
STEP 3.2:
Substrate preparation
The substrate must be flat, clean, dry, structurally sound, adequately load bearing and free
from material which may prevent bonding with the cement mortar.
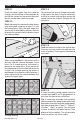
STEP 3.3:
Cut lengths of HeatMatrix to fit the installation area
Measure and cut HeatMatrix to the required length for each row. Mark the boundary edge
on the subfloor to use as a guide for mortar application.
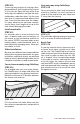
STEP 3.4:
Secure HeatMatrix to the substrate with mortar
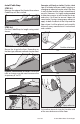
The type of mortar used to secure the membrane to the subfloor depends on the type
of substrate. For most substrates, a premium modified thinset mortar is recommended.
Apply the mortar for the first row using a 1/4" x 1/4" notched trowel. Place the cut length
of HeatMatrix over the mortar. Position membrane, then readjust alignment if necessary
by lifting one end, and pulling lightly. Do not leave gaps between sections of HeatMatrix
and ensure the pattern is aligned. Work HeatMatrix in using a float or flat trowel. The entire
surface of the fleece on the underside of the membrane should be securely bonded to the
mortar. Observe the mortar open time while working. Trim out any rough drain openings or
other obstructions if necessary. Repeat the application process for each row until the space
to be tiled is completely covered.
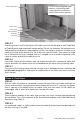
STEP 3.5:
Outline the heated area
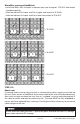
Mark the areas where the WarmWire cable will be installed. WarmWire should not be installed:
• Within 3" of the wall perimeter, door jamb, tub or shower base
• Within 6" of toilet flanges
• Under cabinets or fixtures that have no clearance under them
•
Within confined spaces like closets or pantries where the heat cannot disperse, particularly
when objects are left on the floor.
Wire may be omitted from areas with no foot traffic. Refer to Appendix 1 for a table of
recommended clearances.
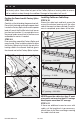
Phase 3 - Cable Installation with HeatMatrix
There are 2 installation methods for securing WarmWire:
•
HeatMatrix offers an easy way to install WarmWire while providing crack-isolation, vapor
management and waterproofing for installations with tile or stone. To install, WarmWire
is simply pressed into the HeatMatrix channels at a selected spacing. With HeatMatrix,
the space between rows can be easily adjusted to accommodate additional wire or
provide more or less heat in defined areas.
•
CableStrap is used for installations where crack-isolation and waterproofing are not
required, or in areas that need a lower profile. CableStrap be covered with a smooth
mortar finish for use under hardwood, laminate or resilient flooring. For CableStrap
installation instructions, refer to Phase 4.