
Install Instructions


IOM-WR-WW 1616 18 of 36
This application into a shower area must be verified by the local inspector or the authority
having jurisdiction (AHJ).
STEP 5.1
Cables only with (-W) on the nameplate label may be installed into a floor or bench seat
located in a shower area. It must never be installed into walls. In general, the cable should be
completely embedded into mortar as close to the surface coverings as possible. The cable
may be placed directly below the tile or stone coverings for the best performance by using
hot glue to secure the cable to the substrate.
If HeatMatrix or CableStraps are intended to be used instead, two methods may be used to
help avoid obstructing the flow of water to the drain when grout sealants begin to degrade:
(1) Place the HeatMatrix or CableStrap below the waterproofing system used, or (2) place a 3"
wide strip of HeatMatrix or CableStrap only around the perimeter of the shower floor and cover
above this with HeatMatrix Joint Strip or similar waterproofing and use hot glue everywhere
else to secure the cable.
See the Appendix for an example of this type installation.
Phase 5 - Shower Area Installation
Do not secure HeatMatrix or CableStrap with fasteners that may penetrate the waterproofing
membrane.
It is recommended that a dedicated cable be installed in the shower area separate from the
rest of the bath floor. In case there is ever a problem with the shower installation, this cable
could be disconnected without loss of heat to the rest of the floor.
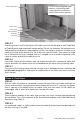
STEP 5.2
Make sure the power lead factory splice (the connection between the power leads and the heating
cable) is located outside the shower area and at least 1' away from shower openings and other
similar areas normally exposed to water. Make sure the control is located at least 4' away from
shower openings such that it cannot be exposed to water or touched by a person in the shower area.
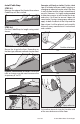
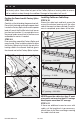
STEP 5.3
If the heating cable must enter the shower area over a curb, secure the cable at the edges
in an "s-shaped" curve to ensure the cable is not bent sharply or pinched when surface
coverings are installed. If the cable is installed below the waterproofing membrane, the curb
surface may be notched 1" wide and 1/8" deep to help the cable lay flat, and coated with
mortar before applying the waterproofing. Do not damage any waterproofing components,
and do not run the heating cable through a non-masonry curb, causing it to overheat.
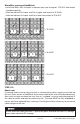
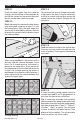
STEP 5.4
Fill in the floor area with cable. Around the drain leave at least 2" spacing from the edge of
the flange. Make sure cable is not placed where door hardware, handrails, or other items
may mount to the floor.