
Install Instructions


23 of 36 © 2016 Watts Water Technologies
Types of Construction
Tile or stone applications with HeatMatrix
To install tile or stone over HeatMatrix and WarmWire, refer to the manufacturers recom-
mendations on mortar type, notch size and curing time. For areas exposed to surface water,
the seam between rows of HeatMatrix should be sealed with HeatMatrix Joint Strip. This is
done by troweling a strip of mortar over the seam, then pressing Joint Strip into the mortar.
Ensure these sections are as flush with the adjacent surfaces as possible. Once set, the tile
can be installed over these areas as usual.
Laminate, resilient or hardwood over HeatMatrix
When applying mortar over HeatMatrix in this application, the finish must be smooth instead
of notched. Do not use nails or screws to attach any type of flooring to the finished mortar
surface. A 'floating' floor installation is typically recommended for wood or laminate flooring
due to expansion and contraction caused by changes in floor temperature. When selecting
floor coverings, the R-value should not exceed R-2.5. when using 3" or 3.5" wire spacing
and not exceed R-1.5 when using 2.5" spacing.
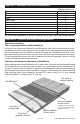
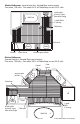
Appendix 2: Types of Construction and Applications
Polymer modified
thinset mortar
Polymer modified
thin set mortar*
WarmWire
®
heating cable
Concrete or
plywood substrate
Tile, stone or
laminate flooring
HeatMatrix™
*modified or non-modified thin-
set mortar as recommended by
the tile manufacturer
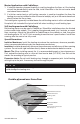
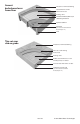
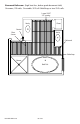
Appendix 1: Minimum Clearances for WarmWire
Minimum Clearance
Bathroom vanity or kitchen cabinet toe-kick 1"
Showers or tub boundaries 3"
Doorway framing 3"
Walls 3"
Toilet flange 6"
Other heating wire 2"
Heating cable power lead 1"
Appliances (washer, dryer, oven) 1"
Baseboard heaters or radiators 3"
Below a built-in,cabinet,furniture 1-1/2"
Drains 2"
Do not install WarmWire in closets, pantries or in other small enclosed spaces.