
Install Instructions


IOM-WR-WW 1616 32 of 36
See phase 5 for complete details and Cautions. This application into a shower area must
be verified by the local inspector or the authority having jurisdiction.
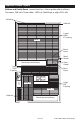
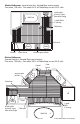
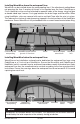
Installing WarmWire above the waterproof liner
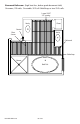
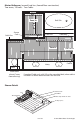
Installing WarmWire below the waterproof liner
WarmWire can be installed on a sloped mortar bed below the waterproof liner layer using
CableStrap or a 2-inch strip of HeatMatrix. Ensure the WarmWire and CableStrap or
HeatMatrix are fully covered in mortar, and trowel to provide a smooth finished surface. Apply
waterproof liner over the smoothed mortar surface according to the liner manufacturer's
instructions. Ensure the coverings above the waterproof liner do not exceed R-0.5 to avoid
capturing too much heat.
WarmWire can be installed above the waterproofing liner if the attachment method does
not puncture the liner. A overlay of thinset is first applied over the liner. CableStrap or
2-inch HeatMatrix strips are then attached to opposite sides of the shower using hot glue
or double sided tape. Leave a 2 inch gap between the drain flange and WarmWire. When
using HeatMatrix, strips are covered with mortar and Joint Tape after the wire is in place.
This reduces the chance of water becoming trapped in the low sections of the HeatMatrix
membrane. Ensure WarmWire is fully embedded within a cement based mortar before tiling.
Mortar bed sloped
towards drain
ThinsetWarmWire secured with hot
glue min. 2" from drain
Joint Strip Thinset
Thinset
HeatMatrix 2-
inch strip
Curb covered with
waterproofing
Waterproof
liner
Tile
Backer board
Mortar bed sloped
towards drain
WarmWire Cement
Mortar
CableStrap or
HeatMatrix strip
Curb covered with
waterproofing
Waterproof
liner
Thinset
Tile
Backer board