INSTALLATION MANUAL 888-432-8932 w w w. s u nto u c h . co m Please be aware that local codes may require this product and/or the control to be installed or connected by an electrician.
SunTouch WarmWire Installation Manual Welcome to SunTouch WarmWire WarmWire is a simple, economical way to warm any floor, and provide years of lasting comfort. This instruction manual provides complete details, suggestions, and safety precautions for installing this floor-warming system. Fasten the cables to the floor. Then, depending on the floor coverings to be used, put down a layer of thin-set, thick-set, or selfleveling mortar on top of the cables. Finally, install the floor coverings.
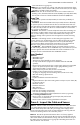
SunTouch WarmWire Installation Manual Phase 1: Design the System STEP 1.1 NO! 3 WarmWire should be installed in all interior floor areas that are to be warmed. It cannot be used for exterior applications, snow melting, or in ceilings. In some applications, it can be used to heat the room as well, but in general it is not designed for this purpose (heat-loss calculations must be made to determine if enough heat will be provided to match the heat loss of the room).
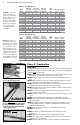
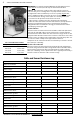
SunTouch WarmWire Installation Manual Table 1: 120 VAC Spools Model Number Example 1. There are 40 sq. ft. of bathroom area to be warmed with 120 VAC. The cable is to be spaced at 2-1/2” to provide 12 watts/sq. ft., providing comfortable warmth across the floor area. As seen in Table 1, use Model Number 120040WD. 120010WD 120015WD 120020WD 120025WD 120030WD 120035WD 120040WD 120045WD 120050WD 120060WD 120070WD 120080WD 120090WD 120100WD Total Sq. ft. Total Sq. ft. Total Sq. ft.
SunTouch WarmWire Installation Manual ALWAYS 5 Sensor Resistance Log (page 6). ALWAYS pay close attention to voltage and amperage requirements of the circuit breaker, control, and the cable system. For instance, do not supply 240 VAC to 120 VAC controls and cables. ALWAYS make sure all electrical work is done in accordance with local building codes, the National Electrical Code (NEC), especially Article 424, Part IX, and Section 62 of the Canadian Electrical Code (CEC) Part I. Some Tips Trowel.
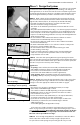
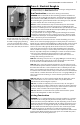
SunTouch WarmWire Installation Manual IMPORTANT! To retain the Limited Warranty, the following measurements must be recorded, and all steps of this manual followed. STEP 3.3 STEP 3.3 Take resistance readings of the cable and floor sensor to make sure they are not damaged. It is very important that this be done throughout the entire installation process. Use a quality digital ohmmeter or multimeter [able to measure up to 20,000 ohms (Ω)] to make these measurements.
SunTouch WarmWire Installation Manual STEP 4.2 7 Phase 4: Electrical Rough-in See wiring diagrams in Appendix 2 for different voltages and applications. For additional help see www.suntouch.com. New Construction (see below for existing construction) OVERVIEW We recommend the floor-warming system be installed on a dedicated circuit coming directly from the circuit breaker panel. Follow all National Electric Code (NEC) and other local electrical code requirements when installing this system.
SunTouch WarmWire Installation Manual STEP 4.9 STEP 4.10 STEP 4.8 Install a maximum 20-amp circuit breaker(s) into the breaker panel, depending on the load of the system. Use a 120-VAC single-pole breaker for a 120-VAC system. Use a 240-VAC double-pole breaker for a 240-VAC system. Use a Ground Fault Circuit Interrupter (GFCI) type if not using one of our controls (which have a built-in GFCI).
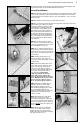
SunTouch WarmWire Installation Manual STEP 5.5 9 may result and may cause dangerous problems. Extra forethought at this stage will make the rest of the installation much easier. General Installation STEP 5.5 Measure about 3” from the wall for the strap. If the design called for 6”–12” away from the wall, install the strap at that distance. In counter or vanity kick-spaces, install the strap so the cable will be 1-1/2” to 2” away from the vanity. STEP 5.
SunTouch WarmWire Installation Manual STEP 5.15 Other Installations STEP 5.16 Because many different room shapes and floor obstructions may be encountered in any given installation, additional layouts are provided below to assist in determining the best way to complete installations in oddshaped areas. Corner shower or vanity STEP 5.15 For an angled area, such as a corner shower, first cut several pieces of strap a little longer than the cable spacing being used. STEP 5.17 STEP 5.
SunTouch WarmWire Installation Manual the floor with adhesives. Do not use fasteners that penetrate any waterproofing membrane or waterproofing system. Fill in the floor area with cable. Around the drain leave at least 2” spacing from the edge of the flange. Make sure cable is not placed where door hardware, handrails, or other items may mount to the floor. STEP 5.26 If covering a bench seat in the shower, cut lengths of strap and secure to the top surface of the seat with adhesives.
SunTouch WarmWire Installation Manual STEP 6.1 Phase 6: Finish Wiring STEP 6.1 Chisel a channel into the floor to lay the factory splice into. This will ensure the splice does not create a high-spot in the floor. CAUTION: The power lead splice MUST BE FULLY EMBEDDED IN the mortar bed and never bend the factory splices. NEVER allow any part of the splice or heating cable to enter a wall or drop through the subfloor. New Construction STEP 6.
SunTouch WarmWire Installation Manual STEP 6.12 If it was necessary to end a power lead at a junction box, feed 14- or 12-gauge electrical wire from this box to the control box. Tip: If more than one cable was installed, label the power leads with a brief description as to which area they supply power. Use tape to label them “Cable 1,” “Cable 2,” or “Kitchen,” “Bath,” or similar. This will make it easier to identify the leads later on. Take photos of the installation.
SunTouch WarmWire Installation Manual Troubleshooting Guide If not qualified to perform electrical installations, it is strongly recommended that a qualified, licensed electrician be hired to install the heating cables and related electrical components. If problems with the system arise, please consult the troubleshooting guide below. Any troubleshooting work should be done with the power removed from the circuit, unless otherwise indicated. Call the factory or see www.suntouch.
SunTouch WarmWire Installation Manual 15 Appendix 1: Types of Construction and Applications The cross sections on these pages depict types of construction (slab vs. frame floor) and applications com-monly used in the installation of the cable. Choose the best installation detail for the particular construction and application. SLAB Slab Construction and Applications (Dry-set or latex cement on slab; TCA #RH115-03) Insulation.
SunTouch WarmWire Installation Manual be sufficient for most regions, while in more temperate areas R-11 will suffice. Do not install rigid insulation layers directly above or below backer board or mortar. If possible, install insulation as shown in the diagrams at right. Reinforcement. There are several options for strengthening the subfloor: 1. Add 3/4”-thick plywood on top of the existing subfloor. 2.
SunTouch WarmWire Installation Manual 17 If plastic lath is used instead of the typical metal lath, the cable can be installed before pouring the self-leveling mortar bed. CAUTION: If metal lath is used in the mortar bed, do not allow the cable to come in direct contact with the lath. Damage to the cable could result. Self-leveling Mortar Beds. Self-leveling mortar beds are appropriate if installing non-masonry floor coverings such as engineered wood, vinyl, laminate, or carpet.
SunTouch WarmWire Installation Manual Typical Electrical Wiring Diagram with SunStat Control and Relay(s) Dedicated 120VAC or 240-VAC, 20-amp (maximum) circuit.
SunTouch WarmWire Installation Manual Appendix 3: Connecting Multiple Cables NOTE: The control is not shown in these diagrams in order to simplify them. These diagrams are given only as examples of how to properly connect multiple cables. Care must be taken not to overfill a box. Be sure to use wire nuts that are the correct size for the connections being made. Follow all codes for wiring. If in doubt, consult an electrician.
SunTouch WarmWire Installation Manual Appendix 4: Connecting the LoudMouth Monitor Illustrations showing (left) how to connect the LoudMouth monitor to two cables, and (right) how to connect the LoudMouth to three cables. The LoudMouth can monitor no more than three cables simultaneously. Do NOT leave the power leads connected in “series” like this when making final wiring connections; the cables will not heat sufficiently.
SunTouch WarmWire Installation Manual 21 Appendix 5: Sample Layouts Kitchen and Family Room (normal heat loss, slab on grade with insulation) Two zones, 240 volts: Kitchen/Zone 1a = 1 spool; Zone 1b = 1 spool; 120 sq. ft., 2” spacing. Family Room/Zone 2 = 1 spool, 240 sq. ft., 2 1/2” spacing 190 ft. of strap, or eight 25-ft. rolls. Strap 1 spool 120 sq. ft. 2-1/2” spacing Spool termination Sink Counter top and cabinetry Island Counter top and cabinetry Zone 1b Zone 2 Zone 1a 1 spool 70 sq. ft.
SunTouch WarmWire Installation Manual Master Bathroom (normal heat loss, framed floor construction) One zone, 120 volts: 1 spool; 470 sq. ft.; 2-1/2” spacing. 35 ft. of strap, or two 25-ft. rolls. Toilet Install cables at least 4”–6” away from toilet rings Bath Tub Strap Master Bathroom (normal heat loss, framed floor construction) One zone, 120 volts: 1 spool; 80 sq. ft.; 2-1/2” spacing. 24 ft. of strap, or one 25-ft. roll.
SunTouch WarmWire Installation Manual Basement Bathroom (high heat loss, below grade basement slab) One zone, 120 volts: 1 spool; 60 sq. ft.; 2” spacing. 39 ft. of strap, or two 25-ft. rolls. 1 spool 60 sq. ft. 2” spacing Closet Vanity Control Vanity Floor Sensor Spool termination Strap Shower Bath Tub Master Bathroom (normal heat loss, framed floor construction) One zone, 120 volts: 1 spool, 20 sq. ft., 2-1/2” spacing. 11 ft. of strap, or one 25-ft. roll.
SunTouch WarmWire Installation Manual Master Bathroom (normal heat loss, framed floor construction) One zone, 120 volts: 1 spool, 80 sq. ft., 2-1/2” spacing. 46 ft. of strap, or two 25-ft. rolls.
SunTouch WarmWire Installation Manual Recreation Room (high heat loss, below grade basement slab) One zone, 240 volts: 1 spool; 160 sq. ft.; 2” spacing. 69 ft. of strap, or three 25-ft. rolls. Control Floor Sensor Spool termination Strap 1 spool 160 sq. ft.
4500 E. Progress Place Springfield, MO 65803-8816 888-432-8932 (toll-free USA/Canada) 417-522-6128 (phone) 417-831-4067 (fax) www.suntouch.com SunTouch is a division of Watts Radiant, Inc. Watts Radiant is a subsidiary of Watts Water Technologies, Inc. Copyright © 2009 Watts Radiant, Inc. SunTouch Coated WarmWire Installation Manual STCWWMAN1009 10/21/2009 SunTouch products are patented under foreign and U.S. patents including numbers 6,303,905, 6,300,598, and 5,908,573. Trademarks and U.S.