
Manual

4 SunTouch WarmWire Installation Manual
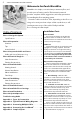
Phase 2: Preparation
CAUTION!
As with any electrical product, care should be taken to guard against the
potential risks of fire, electric shock, and injury to persons. The following
cautions must be observed:
NEVER cut the heating cable. The 10-ft. power lead may be cut shorter if
necessary, but never removed from the heating cable.
NEVER use nails, staples, or similar to fasten the heating cable to the
floor.
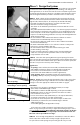
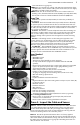
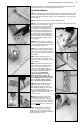
NEVER bang a trowel or other tool on the c able. Be careful not to nick,
cut, or pinch the cable causing it to be damaged.
NEVER install the cables under cabinets or other built-ins. Excessive heat
will build up under these items and cause damage.
NEVER install the cable in any walls, over walls or partitions that extend
to the ceiling, or in closets.
NEVER extend the heating portion of the cable beyond the room or
area in which it originates.
NEVER attempt to repair a damaged cable. Contact the factory for assis-
tance.
NEVER overlap heating cables. Dangerous overheating can occur.
NEVER allow a power lead or sensor wire to cross a heating cable; dam-
age could result.
NEVER embed the cables in adhesives intended for laminate or vinyl
flooring. Cables must be completely embedded in cement-based
polymer-modified mortar.
NEVER apply the wrong voltage to a cable. Damage can result.
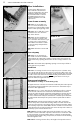
NEVER use 1” spacing.
ALWAYS completely embed the heating wire and factory splice
in mortar.
ALWAYS maintain a minimum of 2” spacing between cables.
ALWAYS use copper only as supply conductors to the control and the
cable. Do not use aluminum.
ALWAYS test the cable resistances and record them in the Cable and
NEVER bang a trowel or other
tool on the heating c able.
NO!
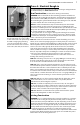
Always completely embed the
factory splice and all heating wire
in mortar. NEVER bend the splice
or place any part of it in the wall
or through the floor.
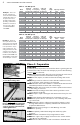
Example 1. There are
40 sq. ft. of bathroom
area to be warmed with
120 VAC. The cable is to
be spaced at 2-1/2” to
provide 12 watts/sq. ft.,
providing comfortable
warmth across the floor
area. As seen in Table
1, use Model Number
120040WD.
Example 2. There are
270 sq. ft. of kitchen and
dining area to be warmed
with 240 VAC. The cable is
to be spaced at 3” to pro-
vide 10 watts/sq. ft., pro-
viding warmth across the
entire floor area. As seen
in Table 2, choose Model
Numbers 240200WD and
240020WD to end up with
about 264 sq. ft. covered.
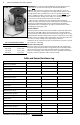
Table 1: 120 VAC Spo ols
Total Sq. ft. Total Sq. ft. Total Sq. ft. Wire
Model 2” Spacing 2-1/2” Spacing 3” Spacing Length Amperage Resistance
Number 15 watts/sq. ft. 12 watts/sq. ft. 10 watts/sq. ft. (ft.) Draw (ohms)
120010WD 8 10 12 47 1.0 112–137
120015WD 12 15 18 71 1.5 78–96
120020WD 16 20 24 94 2.0 58–72
120025WD 20 25 30 118 2.5 44–55
120030WD 24 30 36 141 3.0 34–42
120035WD 28 35 42 165 3.5 29-36
120040WD 32 40 48 188 4.0 25-32
120045WD 36 45 54 212 4.5 22–28
120050WD 40 50 60 235 5.0 20-26
120060WD 48 60 72 282 6.0 17-22
120070WD 56 70 84 329 7.0 14-19
120080WD 64 80 96 376 8.0 12–16
120090WD 72 90 108 423 9.0 11-15
120100WD 80 100 120 470 10.0 10-13
Table 2: 240 VAC Spo ols
Total Sq. ft. Total Sq. ft. Total Sq. ft. Wire
Model 2” Spacing 2-1/2” Spacing 3” Spacing Length Amperage Resistance
Number 15 watts/sq. ft. 12 watts/sq. ft. 10 watts/sq. ft. (ft.) Draw (ohms)
240020WD 16 20 24 94 1.0 223-274
240030WD 24 30 36 142 1.5 155-191
240040WD 32 40 48 188 2.0 116-143
240050WD 40 50 60 236 2.5 88-109
240060WD 48 60 72 282 3.0 68-84
240070WD 56 70 84 330 3.5 58-72
240080WD 64 80 96 376 4.0 51-63
240090WD 72 90 108 424 4.5 45-56
240100WD 80 100 120 470 5.0 41-51
240120WD 96 120 144 564 6.0 34-42
240140WD 112 140 168 658 7.0 29-36
240160WD 128 160 192 752 8.0 25-32
240180WD 144 180 216 846 9.0 22-28
240200WD 160 200 240 940 10.0 20-26
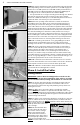
NEVER use 1”
spacing
NEVER use less than 2” spacing.
NO!
Note: Models ending -J on the UL tag have an additional jacket over the heating cable.
Note: Models ending -J on the UL tag have an additional jacket over the heating cable.
ALWAYS!