
Install Instructions


11 of 32 © 2015 Watts Water Technologies
STEP 3.1:
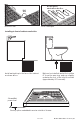
Floor Cleaning
The floor must be completely swept of all debris including all nails, dirt, wood, and other
construction debris. Make absolutely sure there are no objects on the floor which might
damage the TapeMat wire.
Wet mop the floor at least twice to ensure there is no dirt or dust. This will allow proper
bonding of the mortar.
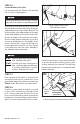
STEP 3.2:
Position the Power Leads
Carefully cut the tie binding the power lead coil. Do not nick the braid covering the power lead.
Place the mat on the floor to ensure the power lead will reach the control electrical box or
junction box location.
If the power lead will need to cross a long distance to reach the control location, it may be
possible to cut the mat mesh and pull loose the length of heating wire needed.
It is acceptable to run the power lead several feet in the floor area and embed in mortar, but
this may require making a shallow channel in the floor to ensure it lays flat with the rest of
the mat. See Step 3.8.
Make sure the power lead factory splice is to be completely flat and in the floor mortar,
not in the wall.
STEP 3.3:
Connect a LoudMouth
TM
If a LoudMouth is being used, connect it to the power lead wires. Refer to the instructions
provided with the LoudMouth for details and proper connections.
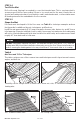
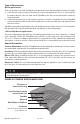
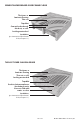
Phase 3 - Mat Installation
Do not cut the heating wire to make it fit the area. Doing so will cause dangerous overheating
and will void the warranty.
Test fit the mat by rolling it out, flipping it on itself as needed.
Make sure it fits before cutting the mesh.