
Install Instructions


IOM-WR-TapeMat 1526 12 of 32
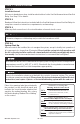
STEP 3.4
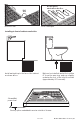
Test Fit the Mat
Roll out the mat, flipping it as needed to cover the intended area. This is very important to
ensure proper fit before proceeding. If there is too much mat for the area it cannot be cut
shorter and heating wire cannot be routed into a wall, under baseboards, or other similar areas.
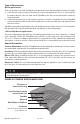
All heating wire must be embedded in the floor mortar.
STEP 3.5
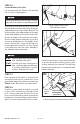
Shape the Mat
If the mat must be shaped to fit the floor area, see Table 6 for technique examples and see
the Appendix for additional layouts, techniques, and Cautions.
Install the mat approximately 4"–6" away from walls, showers, tubs, drains, etc. and 6" from a
toilet wax ring. It may be installed closer to walls if necessary, but make sure the heating wire
will not be located underneath finish trim. Install in-line with vanity and counter areas. Install
roughly 20" from back wall in toilet area.
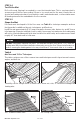
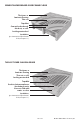
Table 6
Mat Turns and “Fill-in” Techniques
This table contains some of the common turns and techniques used to layout around corners,
angles, and built-ins.
180° or Back-to-Back Turn. 90° or Flip Turn.
Carefully cut the orange mesh to make turns. Never cut, nick, or otherwise damage the
heating wire.
Cut mat
Flip mat
over
Rotate
Cut mat
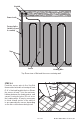
DO NOT leave gaps between the mats. The heat will conduct only about 1-1/2" from the
heating wire. Mat should be installed continuously across the floor. Never install mats in a
fashion causing the heating wires to be any closer than 2" from each other or to overlap.