
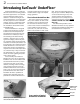
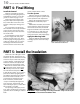
Install Instructions


box below the floor for the mat leads.
Leave 6”–8” of extra wire at the control
box and junction box. Refer to the wir-
ing diagrams in Part 6 for assistance.
Install SunStat Sensor
A floor sensor comes with the
SunStat control and must be installed
correctly to control the floor tempera-
ture. Remember to locate the sensor in
a floor where a mat is located. The fol-
lowing are recommended methods for
installing the sensor. Other equivalent
methods may be used.
Before installing the sensor, make
sure to test it with an ohmmeter.
See page 5, “Checking the Floor
Sensor.”
Method 1. Since a sensor may
be difficult to install in some existing
floors, the sensor may be placed under
the subfloor. However, keep in mind
that the temperature the sensor gives
will not be a true floor surface tempera-
ture and the floor-sensing control may
need to be adjusted accordingly.
Drill a hole through the bottom plate
of the wall to route the sensor wire.
Feed the sensor wire down from the
control box through the floor. (A fish-
tape may need to be used in order to
do this.)
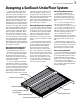
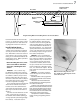
The most accurate method is to drill
a 3/4”–1”-long hole at an angle into
the bottom of the subfloor (drilling at
an angle prevents puncturing through
floor surface). Locate this hole in a
SunTouch UnderFloor Installation Manual
7
joist bay directly over where a mat will
be installed, about 2” from the joist.
Insert the sensor into the angled hole
and seal it with adhesive. Insulate the
sensor with additional “blueboard” or
fiberglass insulation, 1”–2” thick and 6”
square, adhered and sealed under the
sensor. This will isolate the sensor from
the heated joist space and give a truer
floor surface temperature.
Method 2. If it is not possible to
drill a hole to set the sensor in the sub-
floor, it may be held flat to the subfloor
with a nylon wire clip. Locate the sen-
sor in a joist bay directly over where
a mat will be installed, about 2” from
the joist. Insulate the sensor with addi-
tional “blueboard” or fiberglass insula-
tion, 1”–2” thick and 6” square. This will
help isolate the sensor from the heated
joist space.
Method 3. If possible, install the
sensor directly into or under the floor
covering area.
If the floor surface is tiled, a grout line
can be removed and the sensor laid into
this grout line.
Drill a hole into the wall behind the
baseboard trim area and directly below
the control electrical box.
Feed the sensor through the knock-out,
down to the hole that was drilled near the
floor, and out into the floor above where
the heating mat will be installed. Locate
the sensor at least 1 ft. from outside walls
and near the center of a joist space.
Complete the rest of the installation
before covering or regrouting over the
sensor.
Method 3: Remove the grout 1/4” to 1/2”
deep. Install sensor. Reinstall grout over the
sensor and sensor wire.
Subfloor
Floor surface
Sensor tip
Bead of construction
adhesive
Angled hole drilled
for floor sensor
Floor joist
Minimum 1”-thick
insulation
Insulation (6” square)
Diagram showing Method 1 for installing the floor sensor into the subfloor.