
specific installation instructions


5 of 36 © 2014 Watts Water Technologies
Installation must be performed by qualified personnel, in accordance with local codes
and standards. A licensed electrician is recommended.
ALWAYS make sure all electrical work is done by qualified persons in accordance with local
building and electrical codes, Section 62 of the Canadian Electrical Code (CEC) Part I, and
the National Electrical Code (NEC), especially Article 424.
ALWAYS use copper only as supply conductors to the thermostat. Do not use aluminum.
ALWAYS seek help if a problem arises. If ever in doubt about the correct installation proce-
dure to follow, or if the product appears to be damaged, the factory must be called before
proceeding with the installation.
Before installing WarmWire, make sure to fully inspect the products and carefully plan the site.
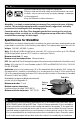
Items Needed
Materials:
• WarmWire
®
system
•
CableStrap
™
or a cable attachment membrane such as Schluter
®
DITRA-HEAT Membrane
or RPM mat
• SunStat
®
Thermostat with floor sensor
• SunStat Relay control (if required)
•
Control electrical box (UL Listed, extra deep, see control instructions for size and type
required)
• Junction electrical box (if required, see Step 2.2)
•
Wire nuts (if a junction electric box is required, see Step 2.2, must be UL Listed and
proper size)
• Flexible or rigid conduit (if required, see Step 2.4, must be UL Listed and proper size)
• 12-guage or 14-guage electrical wiring cable (UL Listed, see Step 2.1)
• Nail plate
Tools:
•
Digital multi-meter (for ohms testing; must read up to 20,000 ohms (Ω) to measure sensor)
• Drill with 1/2" and 3/4" bits
• Hammer and chisel
• Hot glue gun and hot glue (craft grade)
• Wire strippers
• Phillips screwdriver
• Fish tape
• Hole saw
• Floor covering installation tools
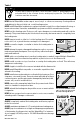
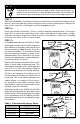
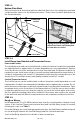
Phase 1 - Preparations
Floor sensor
is included in
the thermostat
packaging. This must
be installed in the
floor with the cable.